
Creating the Blazor app
We will first create the Blazor application. I'm going to use Visual Studio 2019 to do that, but you can use Visual Studio Code, etc. To follow along with this tutorial, go ahead and download the following:
- Visual Studio 2019 with the ASP.NET and web development workload selected as well as the Azure Development workload.
- An Azure subscription (If you don't have an Azure subscription, create a free account before you begin)
For Visual Studio Code, make sure you have the following installed:
- .NET Core 3.1 SDK (latest version)
- Get the Blazor templates by executing the following command on the command line:
dotnet new -i Microsoft.AspNetCore.Blazor.Templates
Let's create the Blazor app:
Open Visual Studio 2019
-
Create a new project
- Choose Blazor App
- Give it a name
- Choose the Blazor WebAssembly App template.
- Press create
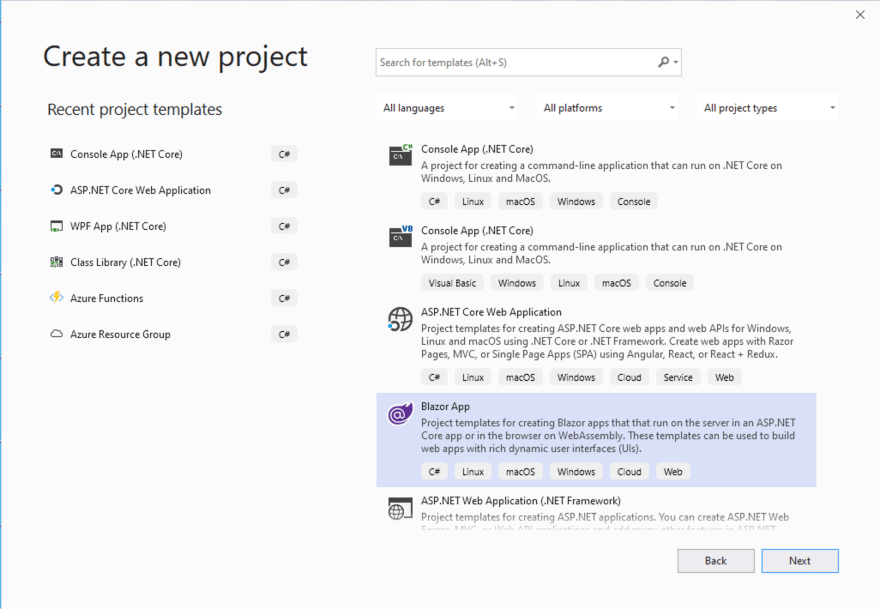
(Create a new Blazor app in Visual Studio)
You should now have a Blazor application. Take a look at it in the solution explorer. It will look like this:

(The folder structure of a default Blazor app)
If you open the page Counter.razor in the Pages folder, you'll see an example of how you can use Blazor to work with the UI. Cool right? You can have the UI trigger C# methods and do whatever you want, like increment an int.
@page "/counter"

<h1>Counter</h1>

<p>Current count: @currentCount</p>

<button class="btn btn-primary" onclick="@IncrementCount">Click me</button>

@functions {
    int currentCount = 0;

    void IncrementCount()
    {
        currentCount++;
    }
}
Run the application locally by pressing **F5**. You can also debug the C# code by putting a breakpoint in it as you are used to with ASP.NET.
Publish the Blazor app
To be able to host the Blazor app, we need to publish the files that we need to run it. That's easy in Visual Studio.
- Right-click the Blazor project and click Publish
- Choose Folder as the publish target
- Click Publish to publish the files
- Navigate to the published files. Navigate to the dist folder. We need the contents of that folder to run the website. It should look like this:
C:\Users\mbcrump\source\repos\BlazorApp3\BlazorApp3\bin\Release\netstandard2.1\publish\BlazorApp3\dist>tree
Folder PATH listing
Volume serial number is E6B7-F4E5
C:.
├───css
│   ├───bootstrap
│   └───open-iconic
│       └───font
│           ├───css
│           └───fonts
├───sample-data
└───_framework
    ├───wasm
    └───_bin
(The result of publishing a client-side Blazor app)
Create an Azure Storage Account and enable the Static website feature
Now that we have a working static web app, we can run it in Azure. We are going to run it as a static website in Azure Storage. Running the app in there is very inexpensive, reliable and performant.
Let's start by creating a new Azure Storage account.
Go to the Azure portal
Click the Create a resource button (the plus sign in the top left corner)
-
Search for or select Storage account. This will open the Create storage account blade
- Select an Azure subscription
- Select or create a Resource group
- Fill in a name
- Make sure that the account is a StorageV2 account
- Click Review + create
- Click Create
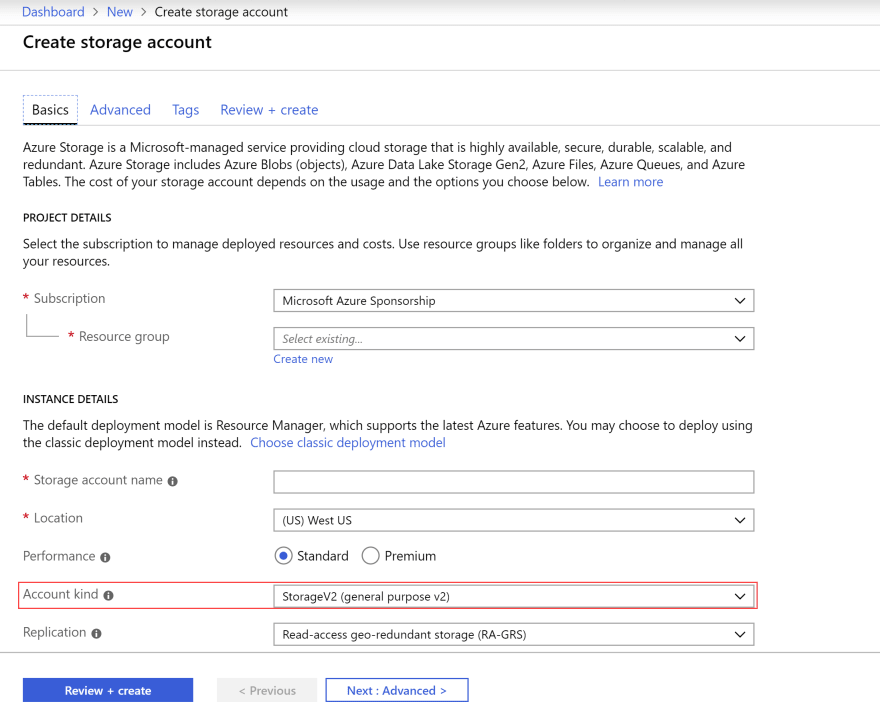
(Create a new Azure Storage account)
When the storage account is created, we can enable its static website feature.
- Go to the Azure storage account in the Azure portal
- Click on the static website menu-item
- Click enable
- Fill in index.html as the index document name. This will be the default file that is used when we navigate to the website
- Click Save to enable the setting
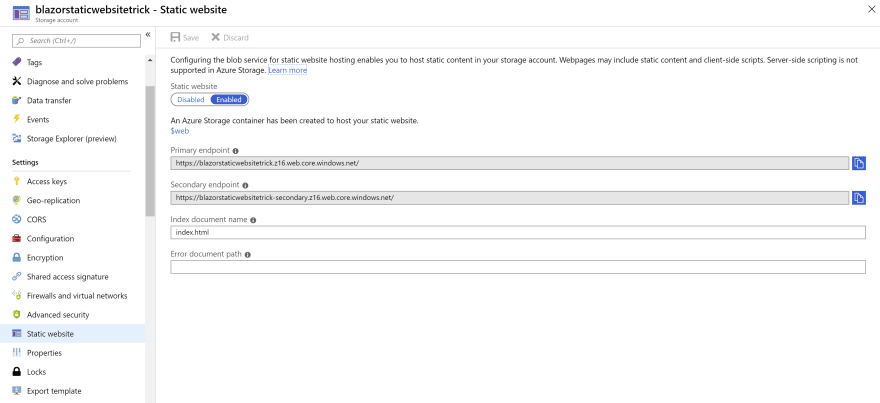
(The static website feature in Azure Storage)
This Azure Storage Account can now host a static website. Notice the Primary endpoint URL and copy it. That is the URL that we use to reach the website.
Copy the Blazor app into Azure Storage and test the website
There is only one more thing to do: copy the files of the Blazor application into the Azure Storage Account. We will do that using the Azure Storage Explorer, which is a free tool that you can use to manage Azure Storage.
- Open the Azure Storage Explorer and make sure that you are signed in to your Azure account
- Navigate to the Azure storage account that we've created
- Drill down into Blob Storage
- The static website feature looks for files in the \$web container that is created. Click on the \$web container
- Now open an explorer window to the dist folder of the published Blazor app. Select the contents of the dist folder and drag that onto the storage explorer. It will automatically upload the files into the \$web container

(Azure Storage Explorer)
That's it!
Now go to a browser and paste in the Primary endpoint URL of the Azure Storage static website. Here we go. A static Blazor website running in Azure!
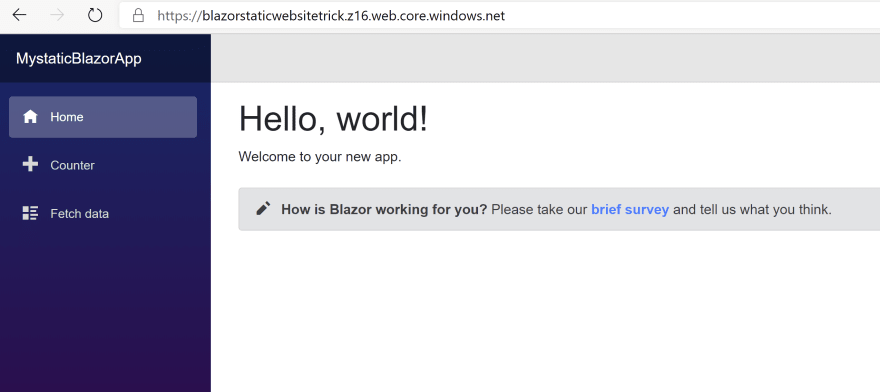
(Blazor app running in Azure Storage as a static website)
We've just deployed the app manually, but you can also automate this process by using DevOps Pipelines. This is easy to set up and eliminates errors that we might introduce by copying things manually. You can learn how to get started with DevOps Pipelines here.
Conclusion
Blazor is a very cool feature of ASP.NET Core that allows you to use C# instead of JavaScript, to create web UIs. Many .NET developers have dreamed about that for a long time, and now it is finally here.
And when you've created a website with Blazor, there is nothing simpler than running it as a static website in Azure Storage. It is extremely simple to use and it is inexpensive. It is also very reliable, as Azure Storage is highly available by default and makes sure that you never lose data. On top of that, your website will be very fast, because Azure Storage is very fast and Blazor is very fast. You can learn more about Blazor here. Thanks!
Stay connected with me on various social platforms for daily software development news.

Top comments (6)
I see you have https enabled. Is that by default? Previously I had to jump through some hoops to get that working properly for a storage account on a custom domain. Don't get me wrong, I do like your article and I like Azure (a lot). But at this moment I still think GitHub pages is easier to set up with a custom domain for this kind of thing. I would advise people to also have a look at that option.
The https is on by default for static sites hosted in Azure Storage. I haven't worked with custom domains on those pages but know it is possible. And yes, I'm also a big fan of GH Pages. Both great options.
Wow this is really amazing. Thanks.
Glad it helped!
Is there a live demo?
No live demo anymore as I clean up resources daily from my demo/test group. But you should get the idea.