
A couple of weeks ago, we looked at how to use Puppeteer with Node.js Azure Functions to take screenshots of web pages. Today, we'll look at how to render PDFs in Azure Functions using Razor and the C# port of Puppeteer, PuppeteerSharp.
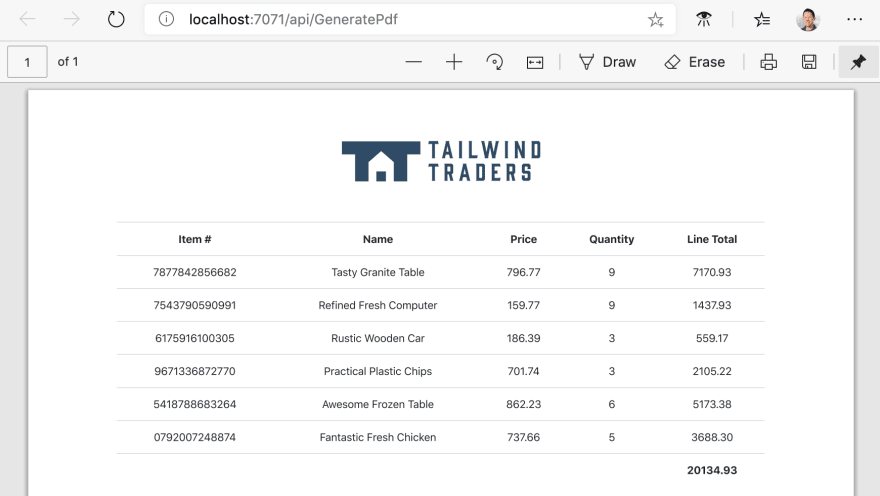
A common usage of this is generating something like an invoice. We'll create PDF invoices for our favorite fictitious online store, Tailwind Traders.
Overview
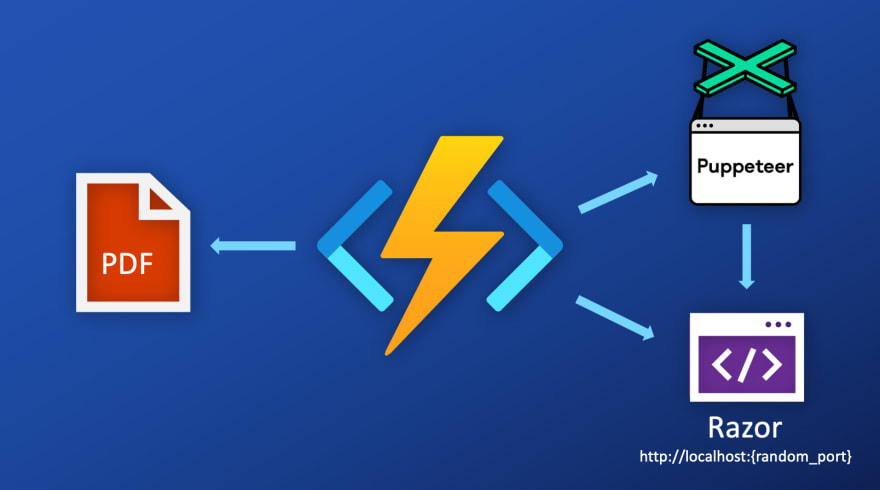
We'll run ASP.NET Core Razor Pages in a .NET Azure Functions app and use PuppeteerSharp with headless Chromium to render the invoice Razor template to a PDF.
In the rest of this article, we'll walk though these steps:
- Build an ASP.NET Core Razor Pages app that includes a Razor template and other resources required to render the invoice.
- Create an Azure Functions app and configure it to run PuppeteerSharp.
- Run the ASP.NET Core Razor Pages app in the function app.
- Write a function that uses PuppeteerSharp to render the invoice and generate a PDF.
- Deploy the app to Azure.
Create an ASP.NET Core Razor Pages app
We'll use a typical ASP.NET Core Razor Pages app to render our invoice. It's just a simple project created with dotnet new webapp.
In the app, we'll create a form that has a single textbox. Puppeteer will populate the form with some JSON data to pass to the Razor page. When the form is submitted, the Razor renders an invoice.
This is the Razor code.
@page
@model IndexModel

<div class="text-center">
  @* <h1 class="display-4"><img class="logo" src="img/functions.svg" /> Invoice</h1> *@

  <div class="logo">
    <img class="logo" src="img/ttlogo.png" />
  </div>
  @if (Model.Items == null)
  {
    <div>
      <form id="invoice-form" method="post">
        <textarea name="items" id="items-box"></textarea>
        <input type="submit" id="submit-button" value="Submit" />
      </form>
    </div>
  }
  else
  {
    <div>
      <table class="table">
        <thead>
          <tr>
            <td>Item #</td>
            <td>Name</td>
            <td>Price</td>
            <td>Quantity</td>
            <td>Line Total</td>
          </tr>
        </thead>
        <tbody>
          @foreach(var item in Model.Items)
          {
            <tr>
              <td>@item.ProductId</td>
              <td>@item.Name</td>
              <td>@item.UnitPrice.ToString("F2")</td>
              <td>@item.Quantity</td>
              <td>@((item.UnitPrice * item.Quantity).ToString("F2"))</td>
            </tr>
          }
          <tr>
            <td colspan="4"></td>
            <td><b>@(Model.Items
                    .Select(i => i.UnitPrice * i.Quantity)
                    .Sum()
                    .ToString("F2"))</b></td>
          </tr>
        </tbody>
      </table>
    </div>
  }
</div>
And this is the OnPost method that takes the JSON invoice data and converts it into the page model.
public void OnPost()
{
    var options = new JsonSerializerOptions
    {
        PropertyNamingPolicy = JsonNamingPolicy.CamelCase,
    };
    var itemsJson = Request.Form["items"].First();

    Items = JsonSerializer.Deserialize<IEnumerable<InvoiceItem>>(itemsJson, options);
}
For more information on how to get started with Razor Pages, check out this tutorial.
To test this out, run dotnet run and submit some products in the box.


Use PuppeteerSharp in C# Azure Functions
In a separate project, we'll create an Azure Functions app. In the app, add a reference to PuppeteerSharp.
While the Node.js Puppeteer package downloads Chromium during npm install, PuppeteerSharp doesn't. Instead, we need to use the BrowserFetcher class in our app to download the browser.
We can configure our function app to download the browser at startup.
public override void Configure(IFunctionsHostBuilder builder)
{
    var bfOptions = new BrowserFetcherOptions();
    if (RuntimeInformation.IsOSPlatform(OSPlatform.Linux))
    {
        bfOptions.Path = Path.GetTempPath();
    }
    var bf = new BrowserFetcher(bfOptions);
    bf.DownloadAsync(BrowserFetcher.DefaultRevision).Wait();
    var info = new AppInfo
    {
        BrowserExecutablePath = bf.GetExecutablePath(BrowserFetcher.DefaultRevision)
    };
    builder.Services.AddSingleton(info);
}
Notice that on Linux, we're downloading to the machine's temp folder. We need to do this because when we deploy it to the Linux Consumption plan in Azure, the default download location (the app's bin folder) is readonly.
After the browser is downloaded, we stash the path of the executable into an AppInfo object that can be injected into our functions. We'll reference this in order load the browser from the same location it was downloaded to.
Note: Downloading the app at function app startup will increase cold start time significantly. If you find that cold start is too slow, explore other ways to download the browser, such as downloading it to shared mounted storage. This storage can be shared between different function app instances, so subsequent instances do not have to download the browser again.
Reference and start the Razor app from Azure Functions
Now that we have a Razor Pages app and a function app, we need to integrate the two together.
In the function app, we add a reference to the Razor Pages app.
dotnet add reference ../RazorPagesApp/RazorPagesApp.csproj
This builds and copies the binaries from the Razor Pages app to the function app. Since we have some static resources like images, we need to configure those to be copied over as well. To do this, we update the function app's project file to copy over the Razor Pages app's wwwroot folder.
<ItemGroup>
  <Content Include="..\RazorPagesApp\wwwroot\**" Link="wwwroot\%(RecursiveDir)%(Filename)%(Extension)" CopyToOutputDirectory="Always" />
</ItemGroup>
In order for Puppeteer's headless Chromium browser to render the invoice, we need to expose a local endpoint for the Razor Pages app's ASP.NET Core server. At function app startup, we look for an unused part and start the server. Our Configure method now looks like this:
public override void Configure(IFunctionsHostBuilder builder)
{
    var bfOptions = new BrowserFetcherOptions();
    if (RuntimeInformation.IsOSPlatform(OSPlatform.Linux))
    {
        bfOptions.Path = Path.GetTempPath();
    }
    var bf = new BrowserFetcher(bfOptions);
    bf.DownloadAsync(BrowserFetcher.DefaultRevision).Wait();
    var info = new AppInfo
    {
        BrowserExecutablePath = bf.GetExecutablePath(BrowserFetcher.DefaultRevision)
    };

    var port = GetAvailablePort();
    info.RazorPagesServerPort = port;
    builder.Services.AddSingleton(info);

    var webHost = Host.CreateDefaultBuilder()
        .ConfigureWebHostDefaults(webBuilder =>
        {
            var scriptRoot = Environment.GetEnvironmentVariable("AzureWebJobsScriptRoot");
            System.Console.WriteLine($"Starting web server on port {port}");
            if (!string.IsNullOrEmpty(scriptRoot))
            {
                webBuilder.UseContentRoot(scriptRoot);
            }

            webBuilder.UseUrls($"http://0.0.0.0:{port}")
                .UseStartup<RazorPagesApp.Startup>();
        })
        .Build();

    webHost.Start();
}
Notice we also stash the selected port in the AppInfo object that can be later accessed by the functions using dependency injection.
Now when we start the function app, it'll ensure the browser is downloaded and start up the Razor Pages app at a random port.
Render the Razor page as a PDF
The last thing we need to add to our app is a function that uses Puppeteer to render the PDF.
public class GeneratePdf
{
    private readonly AppInfo appInfo;

    public GeneratePdf(AppInfo browserInfo)
    {
        this.appInfo = browserInfo;
    }

    [FunctionName("GeneratePdf")]
    public async Task<IActionResult> Run(
        [HttpTrigger(AuthorizationLevel.Anonymous, "get")] HttpRequest req,
        ILogger log)
    {
        var browser = await Puppeteer.LaunchAsync(new LaunchOptions
        {
            Headless = true,
            ExecutablePath = appInfo.BrowserExecutablePath
        });
        var page = await browser.NewPageAsync();
        await page.GoToAsync($"http://localhost:{appInfo.RazorPagesServerPort}/");

        var data = GetData();
        await page.TypeAsync("#items-box", data);
        await Task.WhenAll(
            page.WaitForNavigationAsync(),
            page.ClickAsync("#submit-button"));
        var stream = await page.PdfStreamAsync();
        await browser.CloseAsync();

        return new FileStreamResult(stream, "application/pdf");
    }
}
The function uses Puppeteer to start a headless Chrome browser, open the input form in the Razor Pages app, submit the invoice data to render the invoice, and generate a PDF from the web page.
Deploy to Azure
Because the app takes care of downloading Chromium and our app is configured to download it to the correct location, there's nothing special we need to do to deploy the app. Remember that headless Chromium only works on Linux. We can deploy it to the Linux Consumption plan.


Top comments (1)
Will this be available for windows plans going forward?