This article is part of #25DaysOfServerless. New challenges will be published every day from Microsoft Cloud Advocates throughout the month of December. Find out more about how Microsoft Azure enables your Serverless functions.
Have an idea or a solution? Share your thoughts on Twitter!
Wishmaster 2000
It's that time of the year. All children start wishing for something amazing to end up in their stocking for the holidays.
For it to be possible for Santa to deliver the right thing to the right child - he wants to make it possible for the children to write to him.
He does realize we live in 2019 and that we can use the Internet. Receiving millions of hand-written letters is a thing of the past. He also wants those Elves to be notified every time a wish arrives.
Santa needs the following:
- A Web Page, It should send the request to a Function endpoint so the wish and all its metadata can be stored.
- A function endpoint to store the Wish, this endpoint should take the child's wish and store it in a CosmosDB Database
- A CosmosDB triggered function endpoint, this endpoint should react to every new wish being inserted in the database and write a message to a Slack channel overseen by the Elves.
- A Slack for the elves, every time something new ends up in a database we want the Elves to know about it so they get off their lazy feet :)
Let's draw up the architecture of how this is supposed to work to have a mile-high view of the situation:

References
Free account Azure account You will need to sign up on Azure to scaffold a CosmosDB database and create a storage account
How to install azure cli
For some of the activities, we do we will use Azure CLI in the terminal. This is a great way to manage your resources.Create an Azure function in VS Code,
This will show you how to build your first Azure Function in VS CodeWorking with Azure Cosmos DB and Node.js This article takes you through building a Node.js app, create an Azure Cosmos DB app and connect the two.
Create an Azure Cosmos DB using Azure CLI
This shows how you can set up your Cosmos DB database using the Azure CLICreate an Azure Cosmos DB using Azure CLI + additional resources
This shows all the different resources you might need to create before and during setting up Azure Cosmos DB, a bit longer version than the above linkServerless CRUD with Azure Cosmos DB client
This is a repository by my colleague Simona Cotin that shows how you can do a full CRUD using the MongoDB clientReference page for Serverless + Azure Cosmos DB at GitHub
This is the most complete page there is on the combination Serverless + JavaScript + Azure Cosmos DB
A Webpage
The webpage should support collecting data needed to post a wish. So what does a wish consist of?
- Wish, the wish itself, this should be a longer text description
- From, this should be the name of the person that wrote the wish, ideally a name + address
Ok, so what do we need to build this web page? It's easy to think we need a SPA framework. To prove that we don't I'm going to build this in Vanilla JS, that is no framework. For this I will need the following files:
-| /webpage
---| index.html
---| app.js
---| app.css
Ensure you have a tool like http-server so you easily can test this web page locally.
index.html
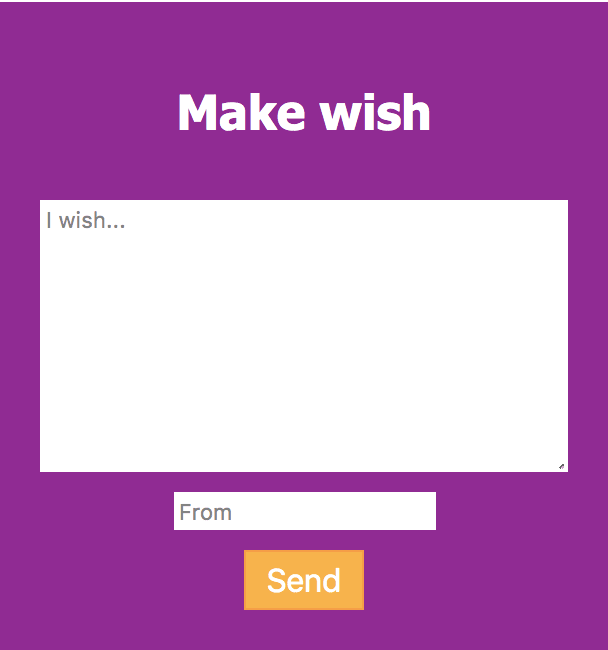
This should contain the markup of over web page. So that means input fields to capture wish and from and way to submit the content towards an endpoint.
Change the content to the following:
<!--  index.html -->

<html>
  <head>
    <meta name="viewport" content="width=device-width, initial-scale=1" />
    <link rel="stylesheet" href="app.css">
  </head>
  <body>
    <div class="page">
      <h2>Make wish</h2>
      <div class="item">
        <textarea rows="10" cols="70" placeholder="I wish..." name="wish" id="wish"></textarea>
      </div>
      <div class="item">
        <input type="text" placeholder="From" name="from" id="from" />
      </div>
      <div class="item">
        <button id="sendButton">
          Send
        </button>
      </div>
    </div>
    <div class="item response" id="response">
    </div>>
    <script src="app.js"></script>
  </body>
</html>
app.js
This should wire up all events and be able to perform the needed Web Request towards an endpoint. Give it the following content:
// app.js

const sendEl = document.getElementById('sendButton');
const wishEl = document.getElementById('wish');
const fromEl = document.getElementById('from');
const responseEl = document.getElementById('response');

const baseUrl = 'http://localhost:7000';

sendEl.addEventListener('click', sendWish)

async function sendWish() {
  console.log('send wish');
  const res = await fetch(`${baseUrl}/wish`, {
    method: 'POST',
    body: JSON.stringify({
      wish: wishEl.innerHTML,
      from: fromEl.innerHTML
    })
  })
  const json = await res.json();
  console.log('response', json);
  responseEl.innerHTML = json;
}
app.css
We need some decent styling for this. Let's add the following CSS classes:
.page {
  background: darkmagenta;
  color: white;
  display: flex;
  align-items: center;
  padding: 20px;
  flex-direction: column;
  font-family: 'Segoe UI', Tahoma, Geneva, Verdana, sans-serif;
}

.page .item {
  margin-top: 10px;
}

.page .item textarea {
  width: 100%;
}

.page .item button {
  font-size: 16px;
  border: solid 1px darkorange;
  padding: 5px 10px;
  color: white;
  background: orange;
}

.page .item .response {
  font-style: italic;
}
Try it out
Let's have a look at our app by starting http-server -p 8008 and thereby serve up our app at http://localhost:8080:
A function endpoint to store the Wish
Next, we need an endpoint that the above web page can send its request to. We can build that as a Function App. Ensure you got the following installed:
Install Azure Functions Core tools. Have a look here for install instructions for your OS install
Install a VS Code extension, look for an extension called
Azure Functions

Ready? Ok, let's go :)
Build a Function app
This step involves us doing the following:
- Provision a CosmosDB database, we will need a database to store our requests
- Scaffold a Function App, this means creating the Function App, the function endpoint and adding the needed code to connect to the CosmosDB database we just created
Provision a CosmosDB database
Go to portal.azure.com and select + Create a resource on your top left. Enter Azure Cosmos DB and select the template that comes up.
Fill in the appropriate fields:

Once the resource is created we need to go to it and select the menu option Data Explorer and New Container like so:

You will be asked to fill in the following fields:
-
Database id, you can give it whatever name you want, I choose to name it
WishDB - Throughput, give it the value 1000
-
Container id, this is the name of the collection. A collection holds a list of documents. Every document is like a row in a table, with a table and collection being roughly the same thing. Give it the name
Wishes -
Partition key, The partition key specifies how the documents in Azure Cosmos DB collections are distributed across logical data partitions. What does that even mean? It means this database scales in the Cloud. We tell it how to scale and how to use a technique used sharding to do so. Give the value
/id

Scaffold a Function App
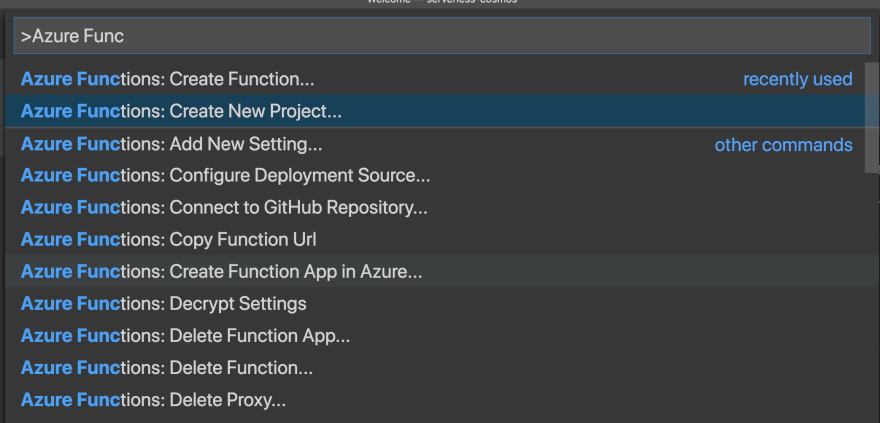
Let's bring up the command palette in VS Code and type Azure Functions: Create New Project:
Select JavaScript and when asked about the first function - name that Wish and ensure it's triggered by HTTP. Next up in Wish/index.js change the code to the following:
function uuidv4() {
    return 'xxxxxxxx-xxxx-4xxx-yxxx-xxxxxxxxxxxx'.replace(/[xy]/g, function (c) {
        var r = Math.random() * 16 | 0,
            v = c == 'x' ? r : (r & 0x3 | 0x8);
        return v.toString(16);
    });
}

module.exports = async function (context, req) {
    context.log('Entering function');

    if (!req.body.wish || !req.body.from) {
        context.res = {
            status: 400,
            body: "Please pass wish,from"
        };
    }

    const {
        wish,
        from
    } = req.body;

    context.bindings.newWish = JSON.stringify({
        id: uuidv4(),
        wish,
        from
    })
    context.done();
};
The function uuidv4() gives us a unique ID, which is nice to have with databases. The main function itself, that we export, is simply digging out wish and from, from the request body and assign that to context.bindings.newWish. Lastly we call context.done(). This is all that's needed to insert this content into our CosmosDB database.
We are not quite done. We need to do two things:
-
Connect to our database, we do that by updating
local.settings.jsonwith a connection string -
Install the needed binding for CosmosDB, we need to update
host.jsonto install binding support for CosmosDB
Connect to our Database
We need to add the following key CosmosDB to our Values property in local.settings.json. The value of this property should be assigned the connection string information for our database, we can find that in portal.azure.com, menu option Keys and the field PRIMARY CONNECTION STRING.
Next we need to update Wish/function.json and add a binding that points out our CosmosDB key, from local.settings.json but also points out the database name, the collection and name reference that we can refer to. We need to add the following bindings entry to the bindings array in function.json:
{
  "name": "newWish",
  "type": "cosmosDB",
  "databaseName": "WishDB",
  "collectionName": "Wishes",
  "createIfNotExists": true,
  "connectionStringSetting": "CosmosDB",
  "direction": "out"
}
As we can see above we are pointing out all that we indicated above, to connect to our data source. Additionally, we also point out the named reference newWish that we refer to in Wish/index.js.
Install CosmosDB bindings
We need to install bindings for CosmosDB. What this means is that we need some libraries that is able to talk to CosmosDB code from our JavaScript code. Open up the file host.json in your Function App root and give it the following content:
{
  "version": "2.0",
  "extensionBundle": {
    "id": "Microsoft.Azure.Functions.ExtensionBundle",
    "version": "[1.*, 2.0.0)"
  }
}
The values under extensionBundle are what compels VS Code, under debugging, to install all the needed bindings.
That might be a bit excessive in a production scenario. Normally you want to install just CosmosDB. I will update this instruction as soon as I find how to install just that and not everything as we are doing now.
A CosmosDB triggered function endpoint
This solution consists of two parts:
- A Function endpoint that gets triggered by a new row in a database, when there is a new change in the database, like a new row our Function endpoint will be invoked.
- An integration towards Slack, once our function is invoked we will have the data that was just created in the database and we can send that to somewhere else. That somewhere else is Slack.
Function endpoint
First, we will scaffold our Function Endpoint. We can easily do so with our Azure Function extension in VS Code using the Command palette and the option Azure Function: Create function. Give this new function the name NewWish and ensure it uses JavaScript and has Anonymous as authorization (we can change that later to Function to make it more secure, once it's deployed).
NewWish/function.json
Next, we need to add an out binding that connects to our CosmosDB database. The function.json for our NewWish directory should have the following content:
{
  "bindings": [
    {
      "type": "cosmosDBTrigger",
      "name": "documents",
      "direction": "in",
      "connectionStringSetting": "CosmosDB",
      "databaseName": "WishDB",
      "collectionName": "Wishes",
      "createLeaseCollectionIfNotExists": "true"
    }
  ]
}
As you can see we give it the following values:
-
type, this has the value
cosmosDBTrigger, this will ensure the function is triggered on new rows being added to the database - name, this is the name we will refer to in code
-
direction, this needs to be
in, because the data is incoming, we are reading it -
connectionStringSetting, this points to something called
CosmosDB, this is a key we need to set inlocal.settings.json - databaseName, this is the name we gave the database when we created it
- collectionName, this is the collection name we gave it on creating it
local.settings.json
As we stated before this needs a key called CosmosDB that needs to point to the Connection String found in the Azure Portal for your DB resource. Let's start with the local.setting.json file:
"Values": {
    "AzureWebJobsStorage": "<should point to connection string for a storage account>",
    "FUNCTIONS_WORKER_RUNTIME": "node",
    "CosmosDB": "<should point to connection string for your CosmosDB database>"
  }
Next, go to your resource in the Azure Portal and the menu option Keys and copy the value under PRIMARY CONNECTION STRING. For the storage account let's wait with that one as we will be prompted for one the first time we debug.
NewWish/index.js
Because we will be using the library node-fetch - start by running the following command at the root of our function app:
npm install node-fetch
Next, give the index.js file the following content:
const fetch = require('node-fetch');

module.exports = async function (context, documents) {

  if (!!documents && documents.length > 0) {
      context.log('Document Id: ', documents[0].id);

      // call slack
      const [row] = documents;

      fetch(
        "<webhook URL at slack>",
        {
          method: "POST",
          body: JSON.stringify({
            text: `ID: ${row.id} FROM: ${row.from} WISH: ${row.wish}`
          }),
          headers: { "Content-Type": "application/json" }
        }
      );
  }
}
The above code is invoked when the database receives a new row. The new row/s is stored in the documents parameter. We then call the Slack API and posts the information on Id, From and Wish. We are missing the WebHook URL though and we will need to fix that next.
Slack WebHook
We need the following to be able to talk to Slack.
- Create a Slack workspace, follow this guide Create a workspace
-
Create a WebHook
- Create a Slack app (if you haven’t already got one).
- Enable incoming webhooks from the settings page.
- Click Add new webhook to the workspace.
- Pick a channel for the app to post to, then click Authorise
Then you should have a page looking like this:
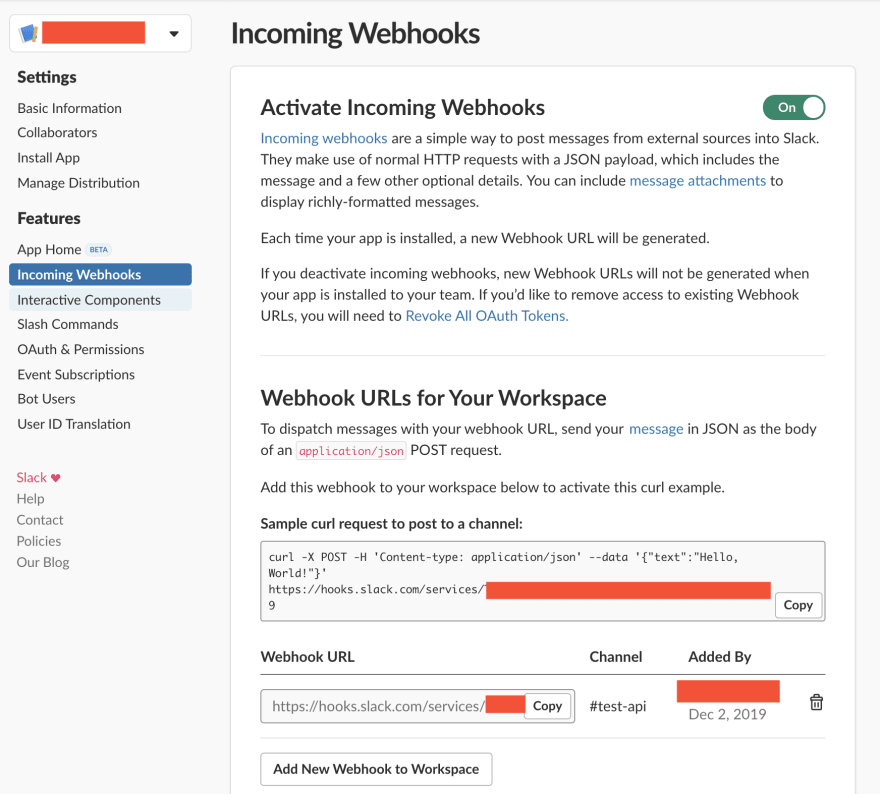
Pressing Copy, we should now have the WebHook URL that we need and we can update our fetch call in NewWish/index.js. How bout we take it for a spin?
Testing it out
To test this out we need to do the following:
-
Get the Function up and running, we do that by selecting
Debug/Start Debugging - Add new row, we go to portal.azure.com and our resource and we add a new entry to our database
-
Check out the slack channel, our slack channel should now contain our posted message that the endpoint
NewWishsent to Slack.
Get the Function up and running
We select Debug/Start Debugging and it should look like so:
Add new row
Under normal circumstances, we would be using our WebApp to insert data into our database. We will do the simpler option and just go to our database resource in Azure directly, select the menu option Data Explorer and click New Item. Thereafter we give it the following value:
{
  "id": "some_id",
  "from": "Chris",
  "wish": "World peace"
}
and click Save.
This should first hit the breakpoint in our FunctionApp for /NewWish, like so:

We let the breakpoint go and go to our Slack Channel.

Victory, our database insert led to our Function App being invoked that in turn posted on Slack. That will keep those Elves on their toes ;)
Summary
This was quite the exercise. Lots of moving parts. If you look at it though. Each part was quite easy to build and all the help we got with setting up the connection to CosmosDB made this really easy to achieve.
Want to submit your solution to this challenge?
Want to submit your solution to this challenge? Build a solution locally and then submit an issue. If your solution doesn't involve code you can record a short video and submit it as a link in the issue description. Make sure to tell us which challenge the solution is for. We're excited to see what you build! Do you have comments or questions? Add them to the comments area below.
Watch for surprises all during December as we celebrate 25 Days of Serverless. Stay tuned here on dev.to as we feature challenges and solutions! Sign up for a free account on Azure to get ready for the challenges!

Top comments (0)