1. Azure Web App for Containers 環境で MicroProfile Config 動作検証
アプリケーションは、外部システムとの連携のための接続情報 (DB や、外部の HTTP エンドポイント)や、開発環境、テスト環境、本番環境などの環境設定の差を、プログラム・ソースコードから切り離し、外部の設定ファイル等に書き出すことで容易に接続先や設定を切り替えることができます。
また、外部の設定ファイルなどに書き出しておくことで、接続先を切り替えるためにアプリケーションのソースコードの編集やビルドは不要で、同一のソースコードや実行ライブラリを利用できます。
クラウド・ネィティブなアプリケーションを構築していくために、設定情報の外だしはとても重要です。
「参照:The Twelve Factors のIII. 設定 : 設定を環境変数に格納する」
Twelve-Factorは 設定をコードから厳密に分離すること を要求する。
MicroProfile Config を利用すると、設定情報を下記のようなさまざまな場所から取得できます。
これらの設定場所を ConfigSources と呼び、 同じプロパティが複数の ConfigSource で定義されている場合、ポリシーを適用しどの値が有効かを指定します。
- Java VM のシステム ・プロパティから
- OS の環境変数
- 外部構成ファイル (.properties, .xml)から
- LDAP, DB, Key-Value ストア などの外部データそ=す
また状況によっては、一部のデータソースを動的に切り替えたい場合があります。そして変更した値は、アプリケーションを再起動することなく、プログラム上から更新した内容を利用する必要があります。こうしたニーズに応えるため、MicroProfile Config では、構成した値を変更直後から利用できるようになっています。
MicroProfile Config の実装について
Microprofile Config は API のみを規定しており実装は含まれていません。
MicroProfile Config の実装は、各 MicroProfile の実装プロバイダから個別に提供されています。
- Apache Geronimo Config
- WebSphere Liberty 2017 March-June Beta so far
- Payara Server 173 and Payara Micro 173
- WildFly & Thorntail
- microBean™ MicroProfile Config
MicroProfile Config の概要
MicroProfile Config は数少ない API から構成されています。
MicroProfile Config API 1.4 の一覧
- Config
- ConfigBuilder
- ConfigProperty
- ConfigProvider
- ConfigProviderResolver
- ConfigSource
- ConfigSourceProvider
- Converter
ConfigSource の優先順位
Configは、登録されたorg.eclipse.microprofile.config.spi.ConfigSourceから収集された情報で構成されます。 これらのConfigSourceは、順序に従ってソートされます。 これにより、外部から重要度の低い設定を上書きできます。
デフォルトでは、3つのデフォルトConfigSourceがあります。
- System.getProperties()(優先順位 = 400)
- System.getenv()(優先順位= 300)
- ClassPath上の META-INF/microprofile-config.properties ファイル(デフォルト優先順位 = 100、各ファイル中に config_ordinal プロパティを設定して個別に優先順位を設定可能)
デフォルト値は、アプリケーションのパッケージ時にファイル内で指定でき、値はデプロイメントごとに後から上書きできます。 「優先順位は値が大きいほど優先されます。」
設定情報の取得例
MicroProfile Config 仕様では、設定値を読み取るために 2種類の方法を用意しています。
- プログラム的な設定情報の取得
- アノテーションを利用した設定情報の取得
1. プログラム的な設定情報の取得
プログラム的に Config インスタンスを取得し設定情報を取得するサンプルを下記に示します。
public class  MyAppWithGetConfigFromProgram {

    public Response invokeMicroserviceWithConfig() {
        // Config インスタンスの取得
        Config config = ConfigProvider.getConfig();
        // マイクロサービス A の URL を取得
        String microserviceA = config.getValue("URL_OF_MICROSERVICE_A", String.class);
        // マイクロサービス A の呼び出し
        return invokeMicroservice(microserviceA);
    }
}
設定情報を取得するためには、最初に Config インスタンスを取得しなければなりません。
プログラム的に Config インスタンスを取得するためには、ConfigProvider#getConfig() を呼び出して取得できます。
(Config クラスのインスタンスは、生成されたのちコンテキストクラスローダーに登録されます。)
2. アノテーションを利用した設定情報の取得 (推奨)
アノテーションを利用し Config インスタンスを取得し、@ConfigProperty で設定情報を取得するサンプルを下記に示します。
@ApplicationScoped
public class MyAppWithGetConfigFromAnnotation {

    @Inject
    private Config config;

    //The property myprj.some.url must exist in one of the configsources, otherwise a
    //DeploymentException will be thrown.
    @Inject
    @ConfigProperty(name="myprj.some.url")
    private String someUrl;

    //The following code injects an Optional value of myprj.some.port property.
    //Contrary to natively injecting the configured value, this will not lead to a
    //DeploymentException if the value is missing.
    @Inject
    @ConfigProperty(name="myprj.some.port")
    private Optional<Integer> somePort;
}
MicroProfile Config サンプル・アプリケーション
1. MicroProfile Config サンプル・プロジェクトの作成
MicroProfile Starter にアクセスし、MicroProfile のプロジェクトを作成します。
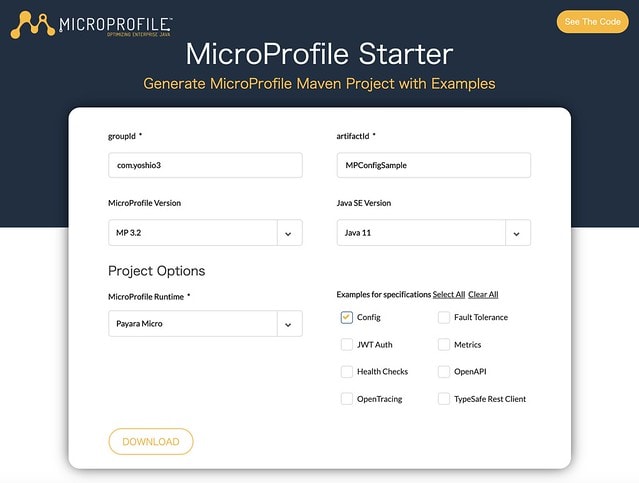
(DOWNLOAD) のリンクを押下すると MPConfigSample.zip ファイルがダウンロードできます。ファイルを展開すると下記のようなファイル・ディレクトリ構成が自動的に生成されています。
.
├── pom.xml
├── readme.md
└── src
    └── main
        ├── java
        │   └── com
        │       └── yoshio3
        │           └── MPConfigSample
        │               ├── HelloController.java
        │               ├── MPConfigSampleRestApplication.java
        │               └── config
        │                   └── ConfigTestController.java
        ├── resources
        │   └── META-INF
        │       └── microprofile-config.properties
        └── webapp
            ├── WEB-INF
            │   └── beans.xml
            └── index.html
11 directories, 8 files
そして、MicroProfile Config のサンプルコードが ConfigTestController.java に下記のように記載されています。
package com.yoshio3.MPConfigSample.config;

import org.eclipse.microprofile.config.Config;
import org.eclipse.microprofile.config.ConfigProvider;
import org.eclipse.microprofile.config.inject.ConfigProperty;

import javax.enterprise.context.RequestScoped;
import javax.inject.Inject;
import javax.ws.rs.GET;
import javax.ws.rs.Path;

@Path("/config")
@RequestScoped
public class ConfigTestController {

    @Inject
    @ConfigProperty(name = "injected.value")
    private String injectedValue;

    @Path("/injected")
    @GET
    public String getInjectedConfigValue() {
        return "Config value as Injected by CDI " + injectedValue;
    }

    @Path("/lookup")
    @GET
    public String getLookupConfigValue() {
        Config config = ConfigProvider.getConfig();
        String value = config.getValue("value", String.class);
        return "Config value from ConfigProvider " + value;
    }
}
上記のコードでは、プロパティに記載された値を HTTP のレスポンスとして返す簡単なコードです。
下記のように HTTP の GET メソッドで呼び出すと return 文で記載される文字列が返ってきます。
$ curl -X GET http://localhost:8080/data/config/injected
$ curl -X GET http://localhost:8080/data/config/lookup
実際の設定内容は、META_INF ディレクトリ配下の microprofile-config.properties ファイルに記載されています。
# プロパティ・ファイルの場所
└── src
    └── main
        ├── resources
        │   └── META-INF
        │       └── microprofile-config.properties
デフォルトで下記のプロパティが設定されています。
# プロパティ・ファイルに設定された値
injected.value=Injected value
value=lookup value
2. サンプル・プロジェクトのビルドと実行
MicroProfile Config の動作確認を行うため、プロジェクトをビルドし、アプリケーションを起動します。
# プロジェクトのビルド
$ mvn clean package

# アプリケーションの実行
$ java -jar target/MPConfigSample-microbundle.jar

......
Payara Micro URLs:
http://192.168.100.7:8080/

'ROOT' REST Endpoints:
GET     /data/application.wadl
GET     /data/config/injected
GET     /data/config/lookup
GET     /data/hello
GET     /openapi/
GET     /openapi/application.wadl
]]
[2020-03-10T22:19:06.610+0900] [] [情報] [] [PayaraMicro] [tid: _ThreadID=1 _ThreadName=main] [timeMillis: 1583846346610] [levelValue: 800] Payara Micro  5.194 #badassmicrofish (build 327) ready in 32,755 (ms)
[2020-03-10T22:19:33.646+0900] [] [情報] [] [javax.enterprise.system.container.web.com.sun.web.security] [tid: _ThreadID=29 _ThreadName=http-thread-pool::http-listener(1)] [timeMillis: 1583846373646] [levelValue: 800] Context path from ServletContext:  differs from path from bundle: /
上記のようにアプリケーションが起動したのち、curl コマンドを実行し動作確認を行います。
正しく動作している場合、下記のようにプロパティ・ファイルから取得した設定 (Injected value, value) の文字列が表示されます。
# アノテーションで実装されたエンドポイントへの呼び出し
$ curl localhost:8080/data/config/injected
Config value as Injected by CDI Injected value

# プログラムで実装されたエンドポイントへの呼び出し
$ curl localhost:8080/data/config/lookup
Config value from ConfigProvider lookup value
MicroProfile ではプロパティ・ファイルの設定値をシステム・プロパティで上書き設定することができます。そこで環境変数を設定し、環境変数の値を Java のシステム・プロパティに代入して実行します。すると "microprofile-config.properties" ファイルに設定した値を上書きし、環境変数に設定した値が表示されている事を確認できます。
# 環境変数の設定 [.(ドット)を _(アンダーバー)に置き換えて設定]
$ export injected_value="Environment Value"

# 環境変数を Java のシステム・プロパティに設定してアプリを実行
$ java -D"$injected_value" -jar target/MPConfigSample-microbundle.jar

# アプリケーションの動作確認
$ curl http://localhost:8080/data/config/injected
Config value as Injected by CDI Environment Value
ご注意: properties ファイル中では . (ドット)表記で記載していますが、環境変数は OS によっては . (ドット)表記が使えません。そこで、環境変数の設定では . (ドット)表記箇所を _ (アンダーバー)に置き換えて設定してください。実装内部で自動的に変換をしています。
3. ローカルの Docker 環境での実行
ローカルの環境でアプリケーションの動作確認ができたので、次にローカルの Docker 環境で MicroProfile を動作させます。Payara Micro の Docker コンテナのイメージを作成するため、下記のような Dockerfile を作成してください。
FROM payara/micro:5.201

USER payara
WORKDIR ${PAYARA_HOME}

# Deploy Artifact
COPY ./target/MPConfigSample.war $DEPLOY_DIR

CMD ["--nocluster","--deploymentDir", "/opt/payara/deployments", "--contextroot", "app"]
次に、この Dockerfile を利用してコンテナのイメージを作成します。docker build コマンドを実行しコンテナのイメージを作成してください。
$ docker build -t tyoshio2002/payara-config-sample:1.0 .

# コマンド実行時のコンソール出力例
Sending build context to Docker daemon  151.2MB
Step 1/5 : FROM payara/micro:5.201
5.201: Pulling from payara/micro
050382585609: Already exists
59f5185426ac: Already exists
4d95208cd9c0: Pull complete
c1409397cf71: Pull complete
Digest: sha256:3ff92627d0d9b67454ee241cc7d5f2e485e46db81a886c87cf16035df7c80cc8
Status: Downloaded newer image for payara/micro:5.201
 ---> a11a548b0a25
Step 2/5 : USER payara
 ---> Running in cb755e484e79
Removing intermediate container cb755e484e79
 ---> 564283252ae4
Step 3/5 : WORKDIR ${PAYARA_HOME}
 ---> Running in f26dd5cd172c
Removing intermediate container f26dd5cd172c
 ---> f2bf88b18a77
Step 4/5 : COPY ./target/MPConfigSample.war $DEPLOY_DIR
 ---> 1b54373fe95a
Step 5/5 : CMD ["--nocluster","--deploymentDir", "/opt/payara/deployments", "--contextroot", "app"]
 ---> Running in 3eb731eb77c3
Removing intermediate container 3eb731eb77c3
 ---> 1d11549e99b8
Successfully built 1d11549e99b8
Successfully tagged tyoshio2002/payara-config-sample:1.0
コンテナのイメージが作成できたのち、コンテナを起動します。下記のコマンドを実行してコンテナを起動してください。
$ docker run -p 8080:8080 -e injected_value=hogehoge -it tyoshio2002/payara-config-sample:1.0

# コマンド実行時のコンソール出力例
..... (中略)
[2020-03-11T07:46:59.119+0000] [] [INFO] [] [PayaraMicro] [tid: _ThreadID=1 _ThreadName=main] [timeMillis: 1583912819119] [levelValue: 800] [[
{
    "Instance Configuration": {
        "Host": "3877abb54d57",
        "Http Port(s)": "8080",
        "Https Port(s)": "",
        "Instance Name": "payara-micro",
        "Instance Group": "no-cluster",
        "Deployed": [
            {
                "Name": "MPConfigSample",
                "Type": "war",
                "Context Root": "/app"
            }
        ]
    }
}]]
[2020-03-11T07:46:59.131+0000] [] [INFO] [] [PayaraMicro] [tid: _ThreadID=1 _ThreadName=main] [timeMillis: 1583912819131] [levelValue: 800] [[
Payara Micro URLs:
http://3877abb54d57:8080/app
'MPConfigSample' REST Endpoints:
GET /app/data/application.wadl
GET /app/data/config/injected
GET /app/data/config/lookup
GET /app/data/hello
]]
[2020-03-11T07:46:59.131+0000] [] [INFO] [] [PayaraMicro] [tid: _ThreadID=1 _ThreadName=main] [timeMillis: 1583912819131] [levelValue: 800] Payara Micro  5.201 #badassmicrofish (build 512) ready in 31,286 (ms)
作成したコンテナの起動が完了したので、コンテナ上で動作するアプリケーションに対して接続をします。
今回は、起動時にコンテナ内部の 8080番ポートを、ローカルの 8080番ポートにマッピングしていますので、ローカル環境の 8080 番ポートにアクセスすることで、コンテナのアプリケーションに接続できます。
下記のコマンドを実行してください。
$ curl http://localhost:8080/app/data/config/injected
Config value as Injected by CDI hogehoge
コンテナの起動時に引数として環境変数 (-e injected_value=hogehoge) を与えているため、起動時に入力した文字列が表示されます。
4. Azure Web App for Containers 環境での実行
ローカルの Docker 環境で動作確認ができたので、Web App for Containers 環境で動作確認を行います。下記の手順に従い動作確認を行います。
- Azure Container Registry 用のリソース・グループを作成
- Azure Container Registry を作成
- Azure Container Registry のパスワードの確認
- Azure Container Registry にログインしイメージを Push
- Azure Container Registry に Push したイメージの確認
- Web App for Containers 用のリソース・グループを作成
- Web App for Containers 用の AppService プランの作成
- コンテナ・イメージを指定し Web App for Containers を作成
- デプロイしたアプリケーションの動作確認
- Web App for Containers のアプリケーション設定の追加
- 設定変更後のアプリケーションの動作確認
4.1. Azure Container Registry 用のリソース・グループを作成
まずは、Azure Container Registry を作成し、ローカルで作成した Docker コンテナのイメージをアップロードします。そこで、Azure Container Registry を作成するためのリソース・グループを作成します。
$ az group create --name WebApp-Containers --location "Japan East"
{
  "id": "/subscriptions/f77aafe8-****-****-****-d0c37687ef70/resourceGroups/WebApp-Containers",
  "location": "japaneast",
  "managedBy": null,
  "name": "WebApp-Containers",
  "properties": {
    "provisioningState": "Succeeded"
  },
  "tags": null,
  "type": "Microsoft.Resources/resourceGroups"
}
4.2. Azure Container Registry を作成
次に、Azure Container Registry を作成します。
- --name にコンテナ・レジストリ名を指定します
- --resource-group に上記で作成したリソース・グループ名を指定します
- --sku は "Basic", "Standard", "Premium" の何れかを指定します
- --admin-enabled true に設定する事で、コンテナ・レジストリに docker コマンドでアクセスできるようにします
$ az acr create --name containerreg4yoshio --resource-group WebApp-Containers --sku Basic --admin-enabled true
{
  "adminUserEnabled": true,
  "creationDate": "2020-03-12T02:27:59.357654+00:00",
  "id": "/subscriptions/f77aafe8-****-****-****-d0c37687ef70/resourceGroups/WebApp-Containers/providers/Microsoft.ContainerRegistry/registries/containerreg4yoshio",
  "location": "japaneast",
  "loginServer": "containerreg4yoshio.azurecr.io",
  "name": "containerreg4yoshio",
  "networkRuleSet": null,
  "policies": {
    "quarantinePolicy": {
      "status": "disabled"
    },
    "retentionPolicy": {
      "days": 7,
      "lastUpdatedTime": "2020-03-12T02:28:01.654662+00:00",
      "status": "disabled"
    },
    "trustPolicy": {
      "status": "disabled",
      "type": "Notary"
    }
  },
  "provisioningState": "Succeeded",
  "resourceGroup": "WebApp-Containers",
  "sku": {
    "name": "Basic",
    "tier": "Basic"
  },
  "status": null,
  "storageAccount": null,
  "tags": {},
  "type": "Microsoft.ContainerRegistry/registries"
}
4.3. Azure Container Registry のパスワードの確認
次に、Azure Container Registry に接続するためのパスワードを確認します。
- --name にコンテナ・レジストリ名を指定します
- --resource-group に上記で作成したリソース・グループ名を指定します
$ az acr credential show --name containerreg4yoshio --resource-group WebApp-Containers
{
  "passwords": [
    {
      "name": "password",
      "value": "4zaIiLk*************+H1XO4AlYFvN"
    },
    {
      "name": "password2",
      "value": "fT03XPs*************Oq2cAZiVHV+L"
    }
  ],
  "username": "containerreg4yoshio"
}
4.4. Azure Container Registry にログインしイメージを Push
次に、docker login コマンドを実行し Azure Container Registry に接続します。
(パスワードは上記で取得したパスワードを入力してください。)
ログインが完了すると、docker tag コマンドでイメージのタグ付けを行います。ローカルで作成した Docker コンテナのイメージ名に、コンテナ・レジストリの "loginServer" 名 ( 例:"containerreg4yoshio.azurecr.io") を付け加えた名前でタグ付けします。
最後に、docker push コマンドを実行し、Azure Container Registry にイメージを Push します。
# Azure Container Registry にログイン
$ docker login containerreg4yoshio.azurecr.io -u containerreg4yoshio
Password:
Login Succeeded

# Docker コンテナのタグ付け
$ docker tag tyoshio2002/payara-config-sample:1.0 containerreg4yoshio.azurecr.io/tyoshio2002/payara-config-sample:1.0

# Azure Container Registry にタグ付けしたイメージを Push
$ docker push containerreg4yoshio.azurecr.io/tyoshio2002/payara-config-sample:1.0

The push refers to repository [containerreg4yoshio.azurecr.io/tyoshio2002/payara-config-sample]
bbd197848553: Pushed
ec40a5d738cc: Pushed
f95fe3528c56: Pushed
bded2364df91: Pushed
1bfeebd65323: Pushed
1.0: digest: sha256:689dbacc212d37afe09c43417bc79d8e241c3fa7b5cf71c27097ef535cf77f76 size: 1368
4.5. Azure Container Registry に Push したイメージの確認
Azure Container Registry に正しくイメージが Push されていることを確認します。
$ az acr repository list -n containerreg4yoshio -g WebApp-Containers
Argument 'resource_group_name' has been deprecated and will be removed in a future release.
[
  "tyoshio2002/payara-config-sample"
]

$ az acr repository show-tags --name containerreg4yoshio  --repository tyoshio2002/payara-config-sample
[
  "1.0"
]
4.6. Web App for Containers 用のリソース・グループを作成
Azure Conginer Registry を作成したので、次に Web App for Containers を作成します。まず、Web App for Containers を作成するリソース・グループを作成します。
$ az group create --name WebApp --location "Japan East"
{
  "id": "/subscriptions/f77aafe8-****-****-****-d0c37687ef70/resourceGroups/WebApp",
  "location": "japaneast",
  "managedBy": null,
  "name": "WebApp",
  "properties": {
    "provisioningState": "Succeeded"
  },
  "tags": null,
  "type": "Microsoft.Resources/resourceGroups"
}
4.7. Web App for Containers 用の AppService プランの作成
次に、Linux 用の AppService プランを作成します。今回は検証環境での動作確認のため、SKU は B1 を利用していますが、環境に応じて適宜、ご選択ください。
- --name にAppService プラン名を指定します
- --resource-group に上記で作成したリソース・グループ名を指定します
- --sku に F1, B1, P1V2, P2V2, P3V2, I1, I2, I3 など稼働させるマシン・価格など適切な SKU (Stock Keeping Unit)を指定します
- --is-linux は Linux 環境での構築を指定します。
$ az appservice plan create --name webapp4container --resource-group WebApp --sku B1 --is-linux
{
  "freeOfferExpirationTime": "2020-04-11T02:38:56.873333",
  "geoRegion": "Japan East",
  "hostingEnvironmentProfile": null,
  "hyperV": false,
  "id": "/subscriptions/f77aafe8-****-****-****-d0c37687ef70/resourceGroups/WebApp/providers/Microsoft.Web/serverfarms/webapp4container",
  "isSpot": false,
  "isXenon": false,
  "kind": "linux",
  "location": "Japan East",
  "maximumElasticWorkerCount": 1,
  "maximumNumberOfWorkers": 3,
  "name": "webapp4container",
  "numberOfSites": 0,
  "perSiteScaling": false,
  "provisioningState": "Succeeded",
  "reserved": true,
  "resourceGroup": "WebApp",
  "sku": {
    "capabilities": null,
    "capacity": 1,
    "family": "B",
    "locations": null,
    "name": "B1",
    "size": "B1",
    "skuCapacity": null,
    "tier": "Basic"
  },
  "spotExpirationTime": null,
  "status": "Ready",
  "subscription": "f77aafe8-****-****-****-d0c37687ef70",
  "tags": null,
  "targetWorkerCount": 0,
  "targetWorkerSizeId": 0,
  "type": "Microsoft.Web/serverfarms",
  "workerTierName": null
}
4.8. コンテナ・イメージを指定し Web App for Containers を作成
次に、Azure Container Registry に Push したイメージを利用して Web App for Containers を作成します。
- --name に Web App for Containers の名前を指定します
- --resource-group に上記で作成したリソース・グループ名を指定します
- --plan に上記で作成した AppService プラン名を指定します
- --deployment-container-image-name に Azure Container Registry に Push したイメージ名を指定します。
$ az webapp create --resource-group WebApp \
                               --plan webapp4container \
                               --name yoshiowebapp \
                               --deployment-container-image-name containerreg4yoshio.azurecr.io/tyoshio2002/payara-config-sample:1.0

No credential was provided to access Azure Container Registry. Trying to look up...
{
  "availabilityState": "Normal",
  "clientAffinityEnabled": true,
  "clientCertEnabled": false,
  "clientCertExclusionPaths": null,
  "cloningInfo": null,
  "containerSize": 0,
  "dailyMemoryTimeQuota": 0,
  "defaultHostName": "yoshiowebapp.azurewebsites.net",
  "enabled": true,
  "enabledHostNames": [
    "yoshiowebapp.azurewebsites.net",
    "yoshiowebapp.scm.azurewebsites.net"
  ],
  "ftpPublishingUrl": "ftp://waws-prod-ty1-***.ftp.azurewebsites.windows.net/site/wwwroot",
  "geoDistributions": null,
  "hostNameSslStates": [
    {
      "hostType": "Standard",
      "ipBasedSslResult": null,
      "ipBasedSslState": "NotConfigured",
      "name": "yoshiowebapp.azurewebsites.net",
      "sslState": "Disabled",
      "thumbprint": null,
      "toUpdate": null,
      "toUpdateIpBasedSsl": null,
      "virtualIp": null
    },
    {
      "hostType": "Repository",
      "ipBasedSslResult": null,
      "ipBasedSslState": "NotConfigured",
      "name": "yoshiowebapp.scm.azurewebsites.net",
      "sslState": "Disabled",
      "thumbprint": null,
      "toUpdate": null,
      "toUpdateIpBasedSsl": null,
      "virtualIp": null
    }
  ],
  "hostNames": [
    "yoshiowebapp.azurewebsites.net"
  ],
  "hostNamesDisabled": false,
  "hostingEnvironmentProfile": null,
  "httpsOnly": false,
  "hyperV": false,
  "id": "/subscriptions/f77aafe8-****-****-****-d0c37687ef70/resourceGroups/WebApp/providers/Microsoft.Web/sites/yoshiowebapp",
  "identity": null,
  "inProgressOperationId": null,
  "isDefaultContainer": null,
  "isXenon": false,
  "kind": "app,linux,container",
  "lastModifiedTimeUtc": "2020-03-12T02:39:50.356666",
  "location": "Japan East",
  "maxNumberOfWorkers": null,
  "name": "yoshiowebapp",
  "outboundIpAddresses": "13.**.***.96,13.**.**.49,13.**.**.66,13.**.**.140,13.**.**.186",
  "possibleOutboundIpAddresses": "13.**.**.96,13.**.**.49,13.**.**.66,13.**.**.140,13.**.**.186,13.**.**.30,13.**.**.70,13.**.**.101,13.**.**.163,13.**.**.200",
  "redundancyMode": "None",
  "repositorySiteName": "yoshiowebapp",
  "reserved": true,
  "resourceGroup": "WebApp",
  "scmSiteAlsoStopped": false,
  "serverFarmId": "/subscriptions/f77aafe8-****-****-****-d0c37687ef70/resourceGroups/WebApp/providers/Microsoft.Web/serverfarms/webapp4container",
  "siteConfig": null,
  "slotSwapStatus": null,
  "state": "Running",
  "suspendedTill": null,
  "tags": null,
  "targetSwapSlot": null,
  "trafficManagerHostNames": null,
  "type": "Microsoft.Web/sites",
  "usageState": "Normal"
}
4.9. デプロイしたアプリケーションの動作確認
Web App for Containers を作成したのち、Web App for Containers のエンドポイントにアクセスし、正しくアプリケーションが動作しているか否かを確認します。
ここでは、環境変数を設定していないため、プロパティで設定した値 (Injected value) が表示されます。
$ curl https://yoshiowebapp.azurewebsites.net/app/data/config/injected
Config value as Injected by CDI Injected value
4.10. Web App for Containers のアプリケーション設定の追加
次に、Web App Config のアプリケーション設定を追加し、injected_value に "Value from Server App Setting" という文字列を設定します。
$ az webapp config appsettings set --resource-group WebApp --name yoshiowebapp --settings injected_value="Value from Server App Setting"
[
  {
    "name": "WEBSITES_ENABLE_APP_SERVICE_STORAGE",
    "slotSetting": false,
    "value": "false"
  },
  {
    "name": "DOCKER_REGISTRY_SERVER_URL",
    "slotSetting": false,
    "value": "containerreg4yoshio.azurecr.io/tyoshio2002"
  },
  {
    "name": "DOCKER_REGISTRY_SERVER_USERNAME",
    "slotSetting": false,
    "value": "containerreg4yoshio"
  },
  {
    "name": "DOCKER_REGISTRY_SERVER_PASSWORD",
    "slotSetting": false,
    "value": null
  },
  {
    "name": "WEBSITES_PORT",
    "slotSetting": false,
    "value": "8080"
  },
  {
    "name": "injected_value",
    "slotSetting": false,
    "value": "Value from Server App Setting"
  }
]
4.11. 設定変更後のアプリケーションの動作確認
最後に、アプリケーション設定で追加した設定が反映されているかを確認します。
$ curl https://yoshiowebapp.azurewebsites.net/app/data/config/injected
Config value as Injected by CDI Value from Server App Setting
上記 4.10 の設定後は、明示的にコンテナを再起動しなくても内部的に再起動が行われ設定が反映されます
以上で、MicroProfile Config を使用したアプリケーションを Azure Web App for Containers 環境で動作させることができました。また Web App for Containers のアプリケーション設定(外部の設定値)をアプリケーションで読み取ることができました。

Top comments (0)