TDLR; This article introduces the new improvements to the ONNX runtime for accelerated training and outlines the 4 key steps for speeding up training of an existing pyTorch model with the ONNX Runtime (ORT).
What is the ONNX Runtime (ORT)?
ONNX Runtime is a performance-focused inference engine for ONNX (Open Neural Network Exchange) models. ONNX Runtime was designed with a focus on performance and scalability in order to support heavy workloads in high-scale production scenarios. It also has extensibility options for compatibility with emerging hardware developments.
Recently at //Build 2020, Microsoft announced new capabilities to perform optimized training with the ONNX Runtime in addition to inferencing.
Announcing accelerated training with ONNX Runtime-train models up to 45% faster - Open Source Blog
These optimizations led to 45% speed of Microsoft’s own internal Transformer NLP models.
As part of our work to give back to the community Microsoft developed an example repo that demonstrates how to integrate ORT training into the official Nvidia implementation of large BERT model with over 8.3Bn parameters.
microsoft/onnxruntime-training-examples
This implementation can be found with the link above and can be even trained on your data using Azure ML with the example notebook.
However, while this is amazing for getting started it would be nice to understand what is going on under the hood which can be a little overwhelming at first glance.
In the remainder of this article, I will walk through the 4 main modifications that need to be made to pyTorch models for taking advantage of ORT and point you to where in the example code repo you can deep dive to learn more.
I won’t go through every detail of the modification but I will explain the core concepts so that you can get started on your own ORT journey.
Step 1: Set Up ORT Distributed Training Environment
To trains large neural networks often requires distributed compute clusters. In this way we can run a version of our script for each GPU on each VM in our cluster. To properly ensure that our data and our model gradients get updated we need to assign each version of our train script with a:
- World Rank — A rank for the process across all the VM Instances
- Local Rank — A rank for the script process on a given VM Instance
The ort_supplement provides a setup function that configures the ONNX runtime for distributed training for Open MPI and the Azure Machine Learning Service.
device = ort\_supplement.setup\_onnxruntime\_with\_mpi(args)

Step 2: Create an ORT Trainer Model
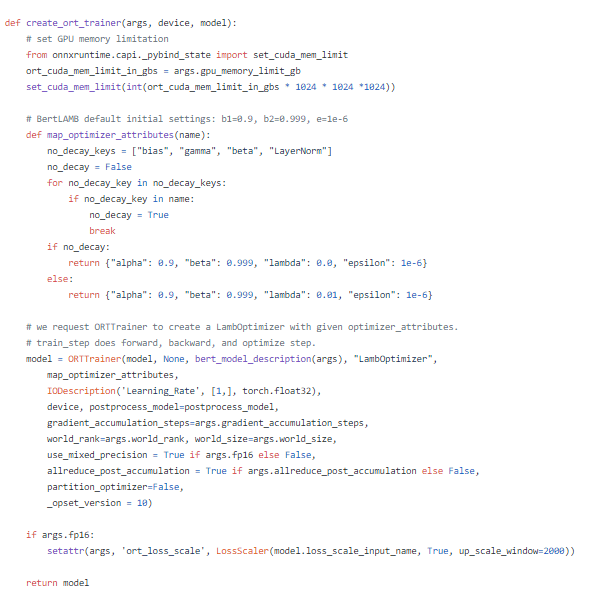
Once we have a distributed training environment the next step is to load the pyTorch model into the ORT for training to do this we use the create_ort trainer method from the ort_supplement script.
model = ort\_supplement.create\_ort\_trainer(args, device, model)

The ORT Trainer Model requires a couple of important arguments to implement:
- A pyTorch model bundled with a loss function
- An optimizer function by default we use the Lamb Optimizer
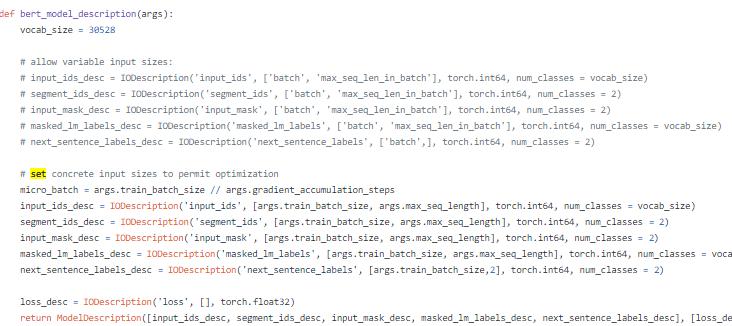
- A model description using the IODescription object to explain the model input and output tensor dimensions. Code for an example of the NVIDIA BERT Description looks as follows

Gradient Accumulation Steps — Number of steps to run on a script instance before syncing the gradient
Opset Version — The operation set version for the ONNX runtime. The latest version is 12
A Post Processing Function (Optional) that runs after the ONNX runtime converts the pyTorch model to ONNX that can further be used to support unsupported operations and optimize the ONNX model graph further
Map Optimizer Attributes -maps weight names to a set of optimization parameters.
For more information check out the following resource from the ORT training repo.
Step 3: Call ORT Training Steps to Train Model
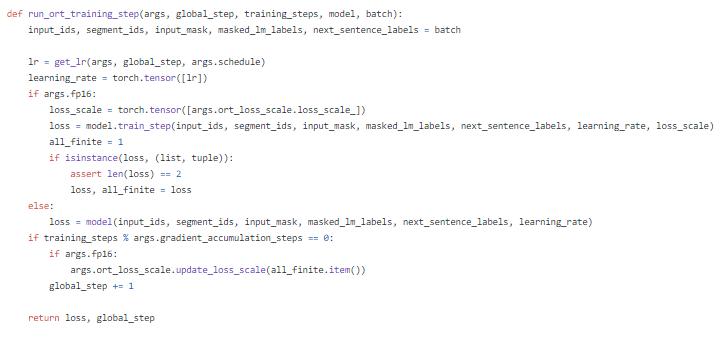
Once we’ve initialized our model we need to call run_ort_training_steps to actually step forward with our model, calculate it’s local loss and propagate it’s aggregated gradient.
loss, global\_step = ort\_supplement.run\_ort\_training\_step(args, global\_step, training\_steps, model, batch) # Runs the actual training steps

Step 4: Export Trained ONNX Model
Lastly once we have completed all the distributed training iterations of our model. While exporting to ONNX is not mandatory for evaluation doing so enables us to take advantage of ORTs accelerated inferencing. We can export our ORT model to the ONNX format for evaluation by calling the model.save_as_onnx function and providing it with our output destination. This function can also be used to checkpoint our model at each epoch.
model.save\_as\_onnx(out\_path)
Conclusion
With the four functions above you have the key tools you need to make sense of the full BERT LARGE ONNX training example. To see them in action check out the run_pretraining_ort script below.
microsoft/onnxruntime-training-examples
Next Steps
Now that you are more familiar with how to leverage the ORT SDK take a look at some other really cool ONNX blog posts and examples.
- Accelerate your NLP pipelines using Hugging Face Transformers and ONNX Runtime
- ONNX: high-perf, cross platform inference - Azure Machine Learning
- Evaluating Deep Learning Models in 10 Different Languages (With Examples)
As the Runtime matures we are always looking for more contributors check out our contribution guidelines here. Hope this helps you on your journey to more efficient deep learning.
About the Author
Aaron (Ari) Bornstein is an AI researcher with a passion for history, engaging with new technologies and computational medicine. As an Open Source Engineer at Microsoft’s Cloud Developer Advocacy team, he collaborates with Israeli Hi-Tech Community, to solve real world problems with game changing technologies that are then documented, open sourced, and shared with the rest of the world.


Top comments (0)