
Intro
This is it. You’ve been looking for this all your life. Well, guess what? You’ve found it! The end to your pain, misery, and hours of debugging code written back in the days when you thought your app would be done in three hours. Or when you thought you were only making a demo app that wasn’t worth the effort. Or when you just didn’t know any better.
In this guide, I explain my approach to creating a TypeScript project template that implements clean architecture principles. This will probably work for any type of application that you can think of, including SPAs (Single Page Apps) with Angular, React, Vue, or other frameworks such as React Native or Electron. Basically, if it uses TypeScript, it will work.
Clean architecture is not just about following a couple of rules to make it slightly less painful to write an app. It’s about transforming your work environment to help you enforce proper architecture and dependency rules. You don’t allow yourself to, possibly at some point in the future, be lazy and completely ignore the rules just to make a feature as quickly as you can because it will come back to bite you in the butt.
What is Clean Architecture?
The idea behind Uncle Bob’s clean architecture (which I really recommend you give a read) is a separation of concerns. It allows your code to be independent of frameworks, databases, or UIs. It also makes your code more testable.

The diagram visualizes a core idea of clean architecture: the dependency rule. You’ll notice all the arrows point inwards toward Entities. This means that entities do not depend on anything, but everything depends on them. This is because entities represent your business rules and do not care whether you use Angular, React, Vue, etc.
In short, Enterprise Business Rules is the layer where you implement classes or models that define the core rules of your enterprise/application.
You interact with these Entities using the encompassing layer, which is Use Cases. They dictate data flow to and from entities. They allow the below layers to interact with the entities.
Next, Controllers interact with the use cases to produce output used in Presenters, as you can see in the bottom right section of the diagram. This is where Angular or React components would take place, assuming the role of both Controllers and Presenters.
Finally, you have details such as a database in the outermost layer. It’s implied that you can change these outermost layer details without having to change any of the circles on the inside. That makes sense, right? A Web framework, for example, doesn’t care if you’re using MongoDB, SQL, or even Blockchain. And, of course, use cases or entities are even further away from such tools.
A Detailed Implementation Guide
Before getting started, there are a few things to mention:
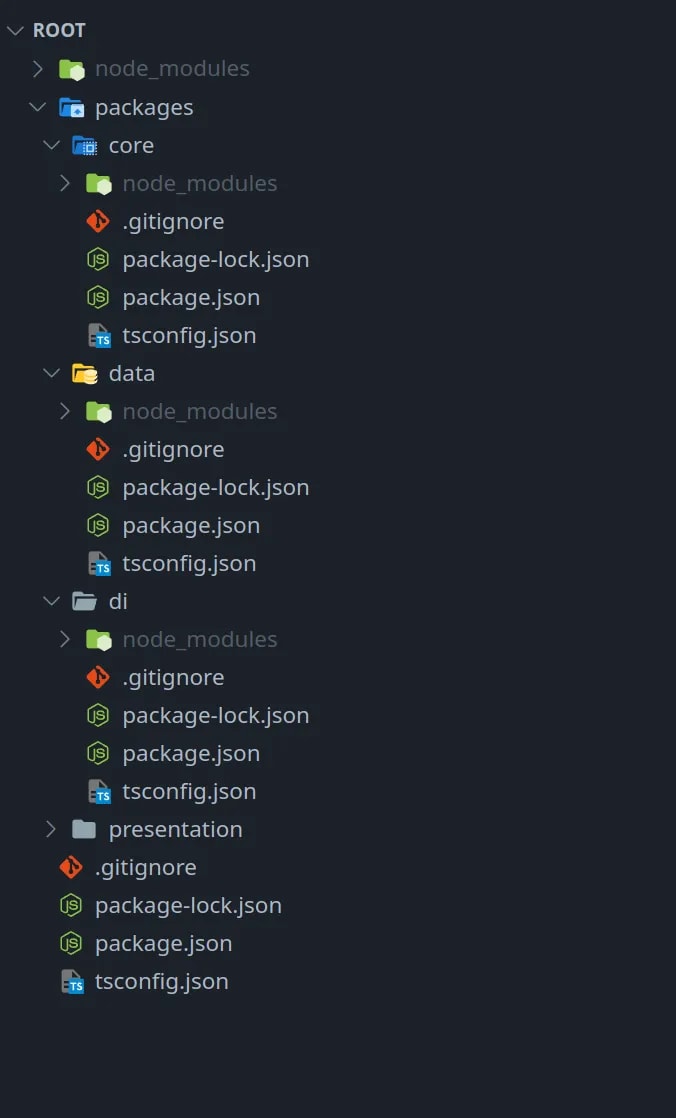
First, I divided the application template into four layers: Core, Data, Dependency Injection (DI), and Presentation.
- Core: Contains our entities, use cases, and repository interface. This is what the application is at its core (hence the name).
- Data: Contains implementations of core repositories for retrieving data from local and remote storage. This is how we get and store data.
- DI: Ties Core and Data together, allowing Presentation to depend only on Core directly.
- Presentation: This layer is how the user sees and interacts with our application. It would, for example, contain our Angular or React code.
Second, I preferred to use Lerna here because it gave me the least headache. There are alternatives like Yarn or Npm Workspaces, but they weren’t as easy as the current solution for me.
Finally, you may not agree with my approach in some sections, however, the beauty of this architecture is that you can swap anything for anything so long as your app core is unaltered and its dependencies are only towards itself.
Having said that, let’s start.
Creating Project Directories and Root
- Create a folder for your project. I just called mine
root - Inside this folder, create a folder named packages. Inside of that create three folders:
core,data, anddi.
You should now have something like the following:

Next, we have to initialize all of these. Inside of each root, core, data, di, do the following commands:
- run
npm init -y - create a
tsconfig.jsonfile. Use the configurations provided below.
For root tsconfig.json:
{
    "compilerOptions": {
         "module": "commonjs",
         "sourceMap": true,
         "allowSyntheticDefaultImports": true,

         "emitDecoratorMetadata": true,
         "experimentalDecorators": true,

         "noImplicitAny": true,
         "noImplicitOverride": true,
         "noImplicitReturns": true,
         "forceConsistentCasingInFileNames": true
    }
}
For core and data tsconfig.json:
{
    "extends": "../../tsconfig.json",

    "include": ["src/**/*.ts"],

    "exclude": ["node_modules"],

    "compilerOptions": {
        "baseUrl": ".",
        "rootDir": ".",

        "module": "ES2020",
        "target": "ES2020",
        "moduleResolution": "node",

        "outDir": "build/",

        "declaration": true,
        "declarationMap": true,
        "sourceMap": true,

        "plugins": [
            {
                "name": "@rollup/plugin-typescript"
            }
        ]
    }
}
For di tsconfig.json:
{
    "extends": "../../tsconfig.json",

    "include": ["src/**/*.ts"],

    "exclude": ["node_modules"],

    "compilerOptions": {
        "baseUrl": ".",
        "rootDir": ".",

        "module": "ES2020",
        "target": "ES2020",
        "moduleResolution": "node",

        "lib": ["ES6", "DOM"],

        "experimentalDecorators": true,
        "emitDecoratorMetadata": true,

        "declaration": true,
        "declarationMap": true,
        "sourceMap": true,

        "outDir": "build/",

        "plugins": [
            {
                "name": "@rollup/plugin-typescript"
            }
        ]
    }
}
Finally, we create presentation. You can do this one however you want. I just use the angular CLI to create it because it’s the framework I prefer. To initialize a project with the Angular CLI, run ng new in the packages dir and go through the steps according to your taste.
I also added .gitignore files to all packages as well as root to ignore node_modules and build by adding a /node_modules and a /build entry.
After all of that, you should have the following:
Configuring Core, Data, and DI
Next, we configure core, data, and di. They all follow the same initial configuration. So follow these next steps for all of them (or just do this for core, then copy and paste everything into data and di):
First, create a folder called src and add a file called index.ts in it. This file will be what exposes everything we want to export out of our package. Inside of src, create a folder called tests. This will contain all our unit tests for this package.
There are a few scripts and devDependencies we need to add to package.json. You can copy and paste the following (change the name of the package for data and di):
{
    "name": "core",
    "version": "1.0.0",
    "description": "",
    "scripts": {
        "build": "tsc --project tsconfig.build.json && npm run rollup",
        "build:watch": "nodemon -e ts --exec \"npm run build\" --ignore build/** --ignore tests/**",
        "rollup": "rollup -c",
        "test": "jest",
        "test:watch": "jest --watch"
    },
    "author": "",
    "license": "ISC",
    "devDependencies": {
        "@rollup/plugin-typescript": "^8.3.3",
        "@types/jest": "^28.1.6",
        "@types/node": "^18.0.0",
        "jest": "^28.1.3",
        "nodemon": "^2.0.19",
        "rollup": "^2.77.0",
        "rollup-plugin-dts": "^4.2.2",
        "ts-jest": "^28.0.7",
        "typescript": "^4.7.4",
        "tslib": "^2.4.0"
    },
    "main": "build/src/index.js",
    "types": "build/src/index.d.ts"
}
Notice the types property at the end of the file. This is necessary to allow this package to be importable and useable in other packages.
Here’s an explanation for each of those scripts:
-
build: builds your project, resulting in a build folder that contains
index.d.tswhich is going to enable this package to be imported into other packages. - build:watch: causes the project to rebuild on every change to the code
-
rollup: bundles your project’s types after the build. This is necessary to create an
index.d.tsthat includes correct declarations and exports. - test: runs all unit tests in your package
- test:watch: reruns your tests on every relevant change. (see jest docs for more info)
Here’s an explanation for the devDependencies:
-
rollup,rollup-plugin-dts, and@rollup/plugin-typescript: a module bundler that is used to fixindex.d.tsfiles into something more useful for our use case. -
jestandts-jest: for writing and running unit tests -
nodemon: allows us to run a command whenever the code changes. See thebuild:watchscript. - The rest are dependencies of TypeScript.
We need to add a couple more config files for rollup and jest. These files go at the same level as package.json. Here they are:
rollup.config.js:
import typescript from '@rollup/plugin-typescript';
import dts from 'rollup-plugin-dts';

import tsConfig from './tsconfig.json';

const config = [
    {
        input: "src/index.ts",
        output: [{ file: "build/src/index.js", sourcemap: true }],
        plugins: [
            typescript(
                {
                    sourceMap: tsConfig.compilerOptions.sourceMap
                }
            )
        ]
    },
    {
        input: 'build/src/index.d.ts',
        output: [{ file: "build/src/index.d.ts", "format": "es" }],
        plugins: [
            dts(
                {
                    compilerOptions: {
                        baseUrl: tsConfig.compilerOptions.baseUrl
                    }
                }
            )
        ]
    },
]

export default config;
jest.config.js
module.exports = {
    transform: { '^.+\\.ts?$': 'ts-jest' },
    testEnvironment: 'node',
    testRegex: '.*\\.(test)?\\.(ts)$',
    moduleFileExtensions: ['ts', 'js'],
};
One last thing: We don’t want our build to contain tests, so make a new file next to tsconfig.json called tsconfig.build.json. This is the file used in our build script in package.json. Its contents are the following:
{
    "extends": "./tsconfig.json",

    "exclude": ["node_modules", "src/tests"],
}
That’s it!
Each of your packages should look like this now:

We can do a test build of our packages now. To make things happen in the build, add any exports to your package’s index.ts file. For example: export const Foo = 1;
Now, run npm install && npm run build in each core, data, and di.
After this runs correctly, see that the build results are correct in your build/src/index.ts and build/src/index.d.ts files.
The project’s packages are ready now.
Setting Up the Mono Repo Configuration
Right now, we just have five non-related packages (root, core, data, di, and presentation). We need the root to act as the container for the other packages. To do this, we will use Lerna.
First, copy and paste the following config to your root package.json:
{
    "name": "root",
    "license": "ISC",
    "scripts": {
        "prestart": "npm install && lerna bootstrap",
        "start": "lerna run start",
        "test": "lerna run test",
        "build": "lerna run build",
        "graph": "nx graph"
    },
    "devDependencies": {
        "lerna": "^5.1.8",
        "nx": "^14.4.3",
        "tslib": "^2.4.0"
    }
}
Here’s a breakdown of the scripts:
-
prestart: This script automatically runs when you runnpm start. It makes sure all dependencies for all packages are present and configured correctly. -
start: Runs the start script for all packages under thepackagesdirectory. -
testandbuild: same asstart -
graph: Creates an interactive dependency graph so you can visualize your project dependencies.
The dependencies for Lerna and NX are required because our scripts use these.
Next, there are a few config files for Lerna and NX, named lerna.json, and nx.json, respectively.
{
    "packages": ["packages/*"],
    "useNx": true,
    "version": "0.0.0"
}
{
    "tasksRunnerOptions": {
        "default": {
            "runner": "nx/tasks-runners/default",
            "options": {
                "cacheableOperations": ["build", "test"]
            }
        }
    },
    "targetDefaults": {
        "build": {
            "dependsOn": ["^build"]
        },
        "start": {
            "dependsOn": ["^build"]
        }
    }
}
You’ll notice in nx.json that we have a property named cacheableOperations. This makes it so that only packages with changes are rebuilt/retested. As your project grows, you will be more grateful for this feature.
Another thing you’ll notice is the targetDefaults containing two entries: one for start and one for build. The config in here makes it so that if package A depends on package B, then package A’s start will only run after package B’s build, and so on and so forth. If it’s not obvious right now, you’ll see why this is necessary in the next section.
Setting up dependencies between packages
There’s one last step, and we’re done. We still haven’t told data, presentation, and di that they depend on core. We’ll do that next.
Inside of data/package.json, add the following property above devDependencies: dependencies: { "core": "*" }
Inside of di/package.json, add the following property above devDependencies: dependencies: { "core": "*", "data": "*" }
Inside of presentation/package.json, add the following property above devDependencies: dependencies: { "core": "*", "di": "*" }
NX and Lerna are smart enough to make sure core, data, and di are built before presentation starts because presentation depends on those other packages.
We are officially finished! Run npm start in root and watch the magic happen.
If you encounter any errors, remove all package-lock.json and node_modules from all folders, then run npm start again.
Here’s the finished implementation of all of the above instructions.
How Do I Use This Masterpiece of a Mono Repo?
You can read my article that explains how to use this template step by step. You can find the link here.
Why I Did Things the Way That I Did
I’ve been trying to find a good approach to do this for a while. I’ve considered the quickest approach by dumping everything under one package and trusting myself to respect the rules because I’m a good programmer (or so I like to believe), but that wasn’t good enough for me.
I needed something that made sure the rules weren’t being broken. By rules, I’m, of course, talking about the dependency rules. We cannot allow entities to be dependent on a database, nor can we allow entities to be dependent on UI code. I tried to solve this by including some scripts that would throw errors when dependencies were made between the wrong things (using dependency-cruiser), but it was way too finicky. And it would show errors too late.
So, I decided to divide each application layer into its own package. Complete with its own package.json and tsconfig.json and a configured bundler. I put all these layers together using Lerna and NX. This way, a package can never depend on something it shouldn’t, “accidentally” or otherwise, without it being present in its package.json dependencies. It has become a work of art, if I do say so myself.
Extras
I recommend you utilize VS Code workspaces when working with a mono repo such as the one we just made.
When you use VS Code workspaces, you can fully use syntax highlighting and workspace-specific extensions by allowing VS Code to treat each VS Code separately from the rest.
VS Code only cares about the tsconfig.json file in the root of your project. That means it completely disregards each of the tsconfig.json files in each of our packages, causing false positives to appear in your problems section. Workspaces save you from that.
Thank you for reading!

Top comments (0)