In the previous part, we mentioned how to set up our project environment with Hardhat. In this part, we will detail our project structure and write our first contract with its tests and finally, we will deploy it.
Okay, folks let’s open our VSCode.
When you look at our project's structure there is a contract that is coming as a default contract but we don’t need and don’t go over it. We’re gonna write our contract.
Let’s think about our contract, for example, we have a BookStore which lists our books and gives us information about listed books like the book’s name, author, price, and availability.
Creating Contract
And back to your VSCode, in the contract directory create a named BookStore.sol file.
Now, our BookStore.sol should be as follows;
//SPDX-License-Identifier: Unlicense
pragma solidity ^0.8.0;

contract BookStore {

    // Book's infos
    struct Book {
        string bookName;
        string bookAuthor;
        uint256 bookPrice;
        bool available;
    }

    // Books list
    Book[] public books;

    // Create a new book to add books list
    function createBook(
        string memory _name,
        string memory _author,
        uint256 _price,
        bool _available
    ) external {
        books.push(Book(_name, _author, _price, _available));
    }

    // Update book price by books list index
    function updateBookPrice(
        uint _index,
        uint256 _newPrice
    ) external {
        books[_index].bookPrice = _newPrice;
    }

    // Update book avalibility by books list index
    function updateBookAvalibility(
        uint _index,
        bool _isAvaliable
    ) external {
        books[_index].available = _isAvaliable;
    }

    // Gell all books
    function getAllBooks() external view returns(Book[] memory) {
        return books;
    }
}
Writing the Contract tests
In the test folder create a named book-store-test.js
The project’s structure follows as;
Folks at this stage I wanna point out something, in the previous part, I added all necessary libraries or plugins automatically because we chose an advanced sample project so in this file maybe you are confused about chai or other pieces of stuff that where they are coming because they are coming as a default.
const { expect } = require("chai");
const { ethers } = require("hardhat");

describe("BookStore", function () {
  let BookStore, bookStore;

  before(async function () {
   /**
     * A ContractFactory in ethers.js is an abstraction used to deploy new smart contracts,
     * so BookStore here is a factory for instances of our bookStore contract.
     */
    BookStore = await ethers.getContractFactory("BookStore");

    /**
     * Calling deploy() on a ContractFactory will start the deployment,
     * and return a Promise that resolves to a Contract.
     * This is the object that has a method for each of your smart contract functions.
     */
    bookStore = await BookStore.deploy();
    await bookStore.deployed();
  });

  it("should create a new book", async function () {
    await bookStore.createBook("1984", "George Orwell", 2, true);
    let books = await bookStore.getAllBooks();
    expect(books[0].bookName).to.equal("1984");
    expect(books[0].bookAuthor).to.equal("George Orwell");
    expect(books[0].bookPrice).to.equal(2);
    expect(books[0].available).to.equal(true);
  });

  it("should update book price", async function () {
    await bookStore.updateBookPrice(0, 4);
    let books = await bookStore.getAllBooks();
    expect(books[0].bookPrice).to.equal(4);
  });

  it("should update book availibity", async function () {
    await bookStore.updateBookAvalibility(0, false);
    let books = await bookStore.getAllBooks();
    expect(books[0].available).to.equal(false);
  });

  it("should return all books", async function () {
    await bookStore.createBook("Building a Second Brain", "Tiago Forte", 3, true );
    await bookStore.createBook("Last Summer on State Street", "Toya Wolfe", 1, true);
    await bookStore.createBook("Do Hard Things", "Steve Magness", 5, false);
    await bookStore.createBook("The Power of Discipline", "Daniel Walter", 6, true);
    await bookStore.createBook("Mindful Self-Discipline", "Giovanni Dienstmann", 2, false);
    let books = await bookStore.getAllBooks();
    expect(books.length).to.equal(6);
  });
});
after writing your test scenarios run the test task in your terminal;
npx hardhat test
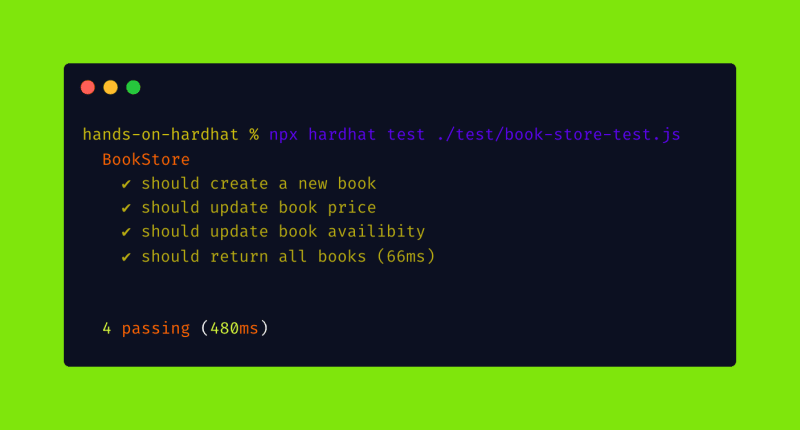
At this point, don’t forget to specify your test folder. For example, our test file is inside the test folder so we have o specify it;
npx hardhat test ./test/book-store-test.js
Well, our all tests passed.
Deploying the Contract
Okay, folks so far everything is cool to deploy our contract we have to write our deployment scripts. Open your script folder and create named deployBookStore.js file.
Your script file should be as follows;
/**
 * We require the Hardhat Runtime Environment explicitly here.
 * This is optional but useful for running
 * the script in a standalone fashion through `node <script>`.
 * When running the script with `npx hardhat run <script>`
 * you'll find the Hardhat Runtime Environment's
 * members available in the global scope.
 * */
const hre = require("hardhat");

async function main() {
  /**
   * Hardhat always runs the compile task when running scripts
   * with its command line interface.
   * If this script is run directly using `node`
   * you may want to call compile
   * manually to make sure everything is compiled
   * await hre.run('compile');
   * */

  // We get the contract to deploy
  const BookStore = await hre.ethers.getContractFactory("BookStore");
  const bookStore = await BookStore.deploy();

  await bookStore.deployed();

  console.log("BookStore deployed to: ", bookStore.address);
}

/**
 * We recommend this pattern to be able to use
 * async/await everywhere and properly handle errors.
 * */
main().catch((error) => {
  console.error(error);
  process.exitCode = 1;
});
After your script writing is done, open your terminal and write this command line to start a local blockchain;
npx hardhat node
Then, open another terminal and run your script file;
npx hardhat run ./scripts/deployBookStore.js --network localhost
As you can see our contract deployed successfully.
So we did all things perfectly what if we want to deploy our contract to a different network like Ropsten, Rinkeby, or Goerli. To perform this scenario we have some options Alchemy and Infura. They are Blockchain API and node infrastructure.
For now, I’m gonna use Infura which provides the tools and infrastructure that allow developers to easily take their blockchain application from testing to scaled deployment.
To set up environment go to Infura and sign up and then create a new project.
And then go to project detail page choose Ropsten Network and copy endpoint;
After we got the Infura API_KEY we also need private key. Open your Metamask wallet and choose Ropsten Test Network and click three dots then click Account details
Then click Export Private Key
After got the private key, back to your VSCode open hardhat.config.js file.
Your file code follows as;
require("dotenv").config();

require("@nomiclabs/hardhat-etherscan");
require("@nomiclabs/hardhat-waffle");
require("hardhat-gas-reporter");
require("solidity-coverage");

// This is a sample Hardhat task. To learn how to create your own go to
// https://hardhat.org/guides/create-task.html
task("accounts", "Prints the list of accounts", async (taskArgs, hre) => {
  const accounts = await hre.ethers.getSigners();

  for (const account of accounts) {
    console.log(account.address);
  }
});

// You need to export an object to set up your config
// Go to https://hardhat.org/config/ to learn more

const API_URL = "https://ropsten.infura.io/v3/API_KEY";
const PRIVATE_KEY = "";
/**
 * @type import('hardhat/config').HardhatUserConfig
 */
module.exports = {
  solidity: "0.8.4",
  networks: {
    ropsten: {
      url: API_URL,
      accounts: [`0x${PRIVATE_KEY}`],
    },
  },
};
Now, open your terminal run your deployment task;
npx hardhat run ./scripts/deployBookStore.js --network ropsten
To check your contract go to https://ropsten.etherscan.io/ search your contract adress.
That's all congratulations folks you've done writing, testing, and deploying your first contract.
To sum up, what can we do with HardHat?
- Coverage (Check for Missing Tests)
- Gas Reports (Check fo Optimization)
- Dotenv (Secure Keys for Deployment)
- Localhost (Quick Nodes for Local Testing)
- Solhint Integration (Style Guide and Security)
- Scripts (Compile and Deploy Running Scripts)
- Typescript (Statically Typed for Bug Avoidance)
- Etherscan Verification (Streamline Workflow on IDE)
Connect with me on social media: Twitter && LinkedIn && Github


Top comments (0)