
After gaining experience in creating React apps, it's time to explore various deployment options available to showcase your work to the world. We have been using Create React App to develop our React applications, so let’s see what it has to offer for our deployment process.
📌Introduction
React is a powerful JavaScript library for building interactive user interfaces. Once you have created your React app, the next step is to deploy it to a server so that it can be accessed by the users.
Assuming you have built a React app and are now searching for a means to share it with the rest of the world, there are numerous options available to deploy a React app and it’s always good to try something new. One popular and feasible option is to make use of GitHub Pages.
GitHub Pages is a free hosting service that allows you to easily deploy and share your web projects. So, why not take advantage of this option and give it a shot?
In this blog post, we will go through several steps to deploy your React app using Github Pages.
📌Prerequisites
- GitHub account
- Install Git on your machine and set up Git.
- Install Node.js
📌Step 1: Creating the repository
The first step is to create a new repository on GitHub for your React app. Once you have created your repository, clone it on your local machine using the Git command line tool for a Git GUI client.

📌Step 2: Create your React app
After cloning your empty git repository, create a react app in the working of your git repository by the following command:
npx create-react-app ./
📌Step 3: Add the dependencies to your app
Install the following package in your React app:
npm install gh-pages --save-dev
📌*Step 4: Add configs to your react app*
Normally, our app will be deployed on a subdomain with our username on github.io like any other app, so to keep our app well-informed about our root URL, we need to add a homepage attribute to our package.json file and assign the URL to it.
"homepage": "https://{user-name}.github.io/{repo-name}",
📌Step 5: Build your React app
Before you can deploy your React app to GitHub pages, you need to build it. In your package.json file, add the predeploy and deploy keys under scripts to create a production-ready build of your app. This will create a build directory in your project directory that contains the optimized and minified production build of your React app.
"predeploy": "npm run build",
"deploy": "gh-pages -d build",
Your package.json file should be similar to this:
{
  "homepage": "https://ayushsoni1010.github.io/test-react-app-deploy",
  "name": "test-react-app-deploy",
  "version": "0.1.0",
  "private": true,
  "dependencies": {
    "@testing-library/jest-dom": "^5.16.5",
    "@testing-library/react": "^13.4.0",
    "@testing-library/user-event": "^13.5.0",
    "react": "^18.2.0",
    "react-dom": "^18.2.0",
    "react-scripts": "5.0.1",
    "web-vitals": "^2.1.4"
  },
  "scripts": {
    "start": "react-scripts start",
    "build": "react-scripts build",
    "test": "react-scripts test",
    "eject": "react-scripts eject",
    "predeploy": "npm run build",
    "deploy": "gh-pages -d build"
  },
  "eslintConfig": {
    "extends": [
      "react-app",
      "react-app/jest"
    ]
  },
  "browserslist": {
    "production": [
      ">0.2%",
      "not dead",
      "not op_mini all"
    ],
    "development": [
      "last 1 chrome version",
      "last 1 firefox version",
      "last 1 safari version"
    ]
  },
  "devDependencies": {
    "gh-pages": "^5.0.0"
  }
}
📌Step 6: Deploy your React app
Now, all we need is to run npm run deploy command in the terminal every time we make changes and want to deploy our app with the latest changes and it will be up and running on the server.
npm run deploy
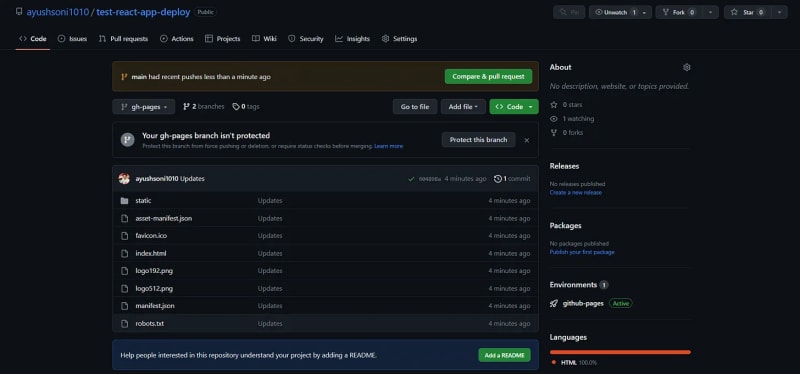
This command will create a branch named gh-pages. After the build finishes, it pushes the changes to the gh-pages branch on the remote repository and hosts your app.
Now, it should be deployed to your GitHub repository after some time. To acquire the URL, go to your repository and click on Settings and go to Pages.
Boom! Your site is live on GitHub Pages.
📌Step 7: Commit and Push your changes to GitHub
Once you committed the changes, you need to push your changes to GitHub.
Run the following commands to push your changes to the remote repository.
git add .
git commit -m "your commit message"
git push origin main
📌Conclusion
Deploying your React app to GitHub Pages is a simple and easy way to share your app with the world. By following these steps, you can quickly deploy your app and make it available to anyone with an internet connection. GitHub Pages is a great option for small projects, personal websites, or demo sites. If you have a complex app or need more control over your hosting environment, you may want to consider other hosting options. But for simpler React apps, GitHub Pages is an excellent choice that is both free and easy to use.
📌Over to you
Have you used github-pages to host your React applications?
Let me know in the comments😄
That's all for today.
If you enjoyed this content, please share your feedback and consider retweeting the first tweet😀.
New to my profile? 🎉
Hey! I am Ayush, a full-stack developer from India. I tweet and document my coding journey🌸.
Follow @ayushsoni1010 for more content like this🔥😉.

Top comments (0)