
Intrusion prevention security tool
According to the developers of denyhosts script, the script is intended to help thwart SSH server attacks on Linux systems. These attacks are sometimes referred to as dictionary based attacks or brute force attacks. This article will focus on how to install and configure denyhosts on Ubuntu 18.04 LTS.
A short audit to your ssh log (/var/log/auth.log on ubuntu) will give you an idea of the number of hackers trying to gain access to your server. True, none of them was successful. But, it will be better to automatically prevent that hacker from a continuous attempt to gain access to your server.
Installing denyhosts
Run the following command to install denyhosts on the your server:
sudo apt update
sudo apt install denyhosts
Type y and press Enter. When asked, “Do you want to continue?”. After that, denyhosts should be installed on your server.
Configure denyhosts
On Ubuntu 18.04 LTS the denyhosts configuration file is /etc/denyhosts.conf
To configure denyhosts on your server, run the following command:
sudo nano /etc/denyhosts.conf
The configuration file should look like the image below:

Now, know the meaning of each change we will be doing in the denyhosts configuration file.
DENY_THRESHOLD_INVALID
The default value for DENY_THRESHOLD_INVALID is 5. Meaning someone can try to ssh into your server using a guessed username(s) that is a non-existing user account. However, the person can only try it 5 times. After that, the IP of the attacker gets appended the /etc/hosts.deny file. No one can ssh using the IP that has been added to the /etc/hosts.deny file unless that IP has been removed for the configuration.
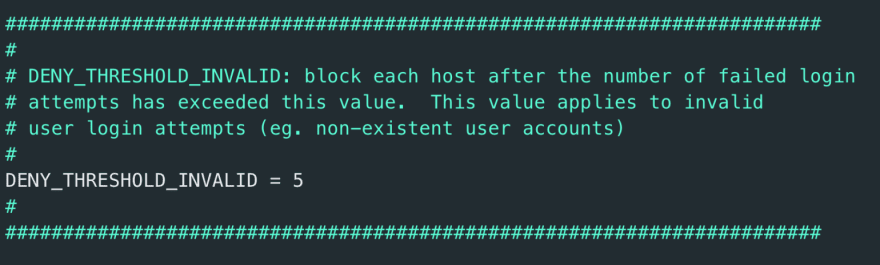
DENY_THRESHOLD_INVALID: block each host after the number of failed login attempts has exceeded this value. This value applies to invalid user login attempts (eg. non-existent user accounts)
DENY_THRESHOLD_VALID
DENY_THRESHOLD_VALID has a default value of 10. But this applies to only existing user accounts on the server. However, if an attempt to login with a valid user fails 10 times, the IP address attempting to establish a connection with the server will be added to the /etc/hosts.deny file.

DENY_THRESHOLD_VALID: block each host after the number of failed login attempts has exceeded this value. This value applies to valid user login attempts (eg. user accounts that exist in /etc/passwd) except for the “root” user
DENY_THRESHOLD_ROOT
DENY_THRESHOLD_ROOT has a default value of 1. This applies to the invalid root login. Meaning you can only attempt to login via ssh once when it fails, the machine trying to establish a connection with the server’s IP will be added to the /etc/hosts.deny file.

DENY_THRESHOLD_ROOT: block each host after the number of failed login attempts has exceeded this value. This value applies to “root” user login attempts only.
AGE_RESET_VALID
AGE_RESET_VALID has a default value of 5 days. Meaning a failed login for an existing user will reset to 0 after 5 days.

AGE_RESET_VALID: Specifies the period of time between failed login attempts that, when exceeded will result in the failed count for this host to be reset to 0.
AGE_RESET_ROOT
AGE_RESET_ROOT has a default of 25 days. That is, a failed root login can only be reset to 0 after 25 days.
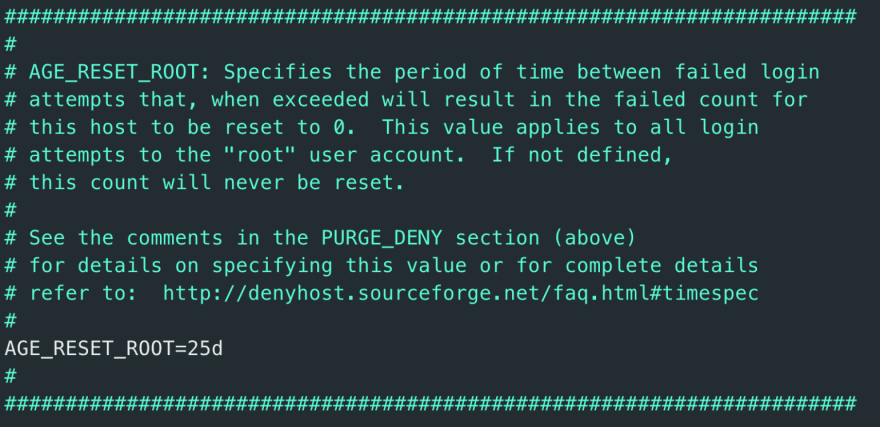
AGE_RESET_ROOT: Specifies the period of time between failed login attempts that, when exceeded will result in the failed count for this host to be reset to 0.
AGE_RESET_INVALID
AGE_RESET_INVALID has a default of 10 days. Meaning a failed login for a non-existing user will reset to 0 after 10 days.

AGE_RESET_INVALID: Specifies the period of time between failed login attempts that, when exceeded will result in the failed count for this host to be reset to 0.
The configuration file has more options than you can explore. The configuration is also self-explanatory, just take your time and read about what each configuration setting is doing before customizing it. Good, we now have good knowledge on how to configure denyhosts using the above configuration settings.
Moreover, there are a few other configurations in order not to lock our clients and ourselves out of the server.
Whitelisting an IP address
The reason for whitelisting our IP address and if possible that of our client machine is to let the system know that the IPs given in the whitelist are no threat to the system.
However, in order to add an IP address to the whitelist, edit the /etc/hosts.allow file with the following command:
sudo nano /etc/hosts.allow
Then follow the following syntax :
sshd: IP1, IP2, ..., IPn
For instance:
sshd: 152.178.43.13, 162.128.78.16

Now, save and close the file.
Restart denyhosts Service
Use the following commands to restart denyhosts service:
sudo systemctl restart denyhosts.service
Moreover, we can enable system denyhosts at startup using the following command:
sudo systemctl enable denyhosts.service
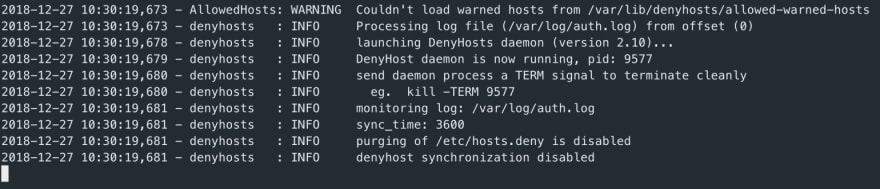
Analyze log Events for denyhosts
Now, let’s list the current denyhosts events using the command below:
sudo tail -f /var/log/denyhosts
Listing Blocked IPs
To list all IP addresses that have tried accessing the server via SSH run the command below:
sudo cat /etc/hosts.deny
However, denyhosts does not support IPv6.
Enable centralized synchronization support
Furthermore, let’s enable support for centralized synchronization. Hence, blocking hackers from many other servers. This website xmlrpc.denyhosts.net collect statistics from other servers running denyhosts synchronization. The synchronization support is disabled by default. Let’s enable it by adding the following line of code to /etc/denyhosts.conf
SYNC_SERVER = http://xmlrpc.denyhosts.net:9911
After, save and close the file, then restart denyhosts with the following command:
sudo systemctl restart denyhosts.service
In a situation where you need to stop or start denyhosts, the following commands might be helpful:
sudo systemctl start denyhosts.service
sudo systemctl stop denyhosts.service
Finally, as the article points out, denyhosts makes it easier for us to control computers that try to connect to our server. Making administrative tasks easier. If you want to know more about how to secure your server, check the article Quick Tips to Harden SSH on Ubuntu.

Top comments (0)