Building Android with Flutter and AWS Amplify — Part 3
Introduction
This is final part of a three part series on using Flutter with AWS Amplify to build an Android mobile application. In Part One we scaffolded out our shopping list application using Flutter to build our UI, before adding offline datasync capabilities to the application with Amplify Datastore. Then in Part Two we built a login / signup UI in Flutter and implemented the backend auth flow with Amazon Cognito using the Amplify Auth Category.
In this the final part of the series we will complete the application by adding two additional features from our backlog:
- Add the ability to store the users profile image in the cloud
- Add the ability to track user behaviour with analytics.
What are we going to build ?
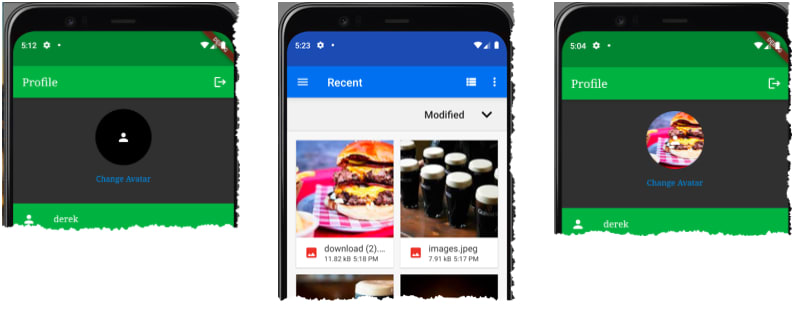
In this post we will start to build a screen flow that allows us to add an image to the user profile UI. Clicking ‘Change Avatar’ will launch the Android Gallery and allow us to choose an image, once an image is chosen we will be returned to the profile screen, with the chosen images displayed. As well as being displayed the image will be uploaded to the application back end, so that a user can maintain their profile image across devices.
Building the UI in Flutter
As ever, the first step in the process is to build out the UI in Flutter. To build the ‘ profile image widget ’ we will need two widgets, 1 / a circular profile widget to view the image in and, 2 / a button to launch the android gallery view so we can choose a new image. The UI code will look something like this
profile_view.dart
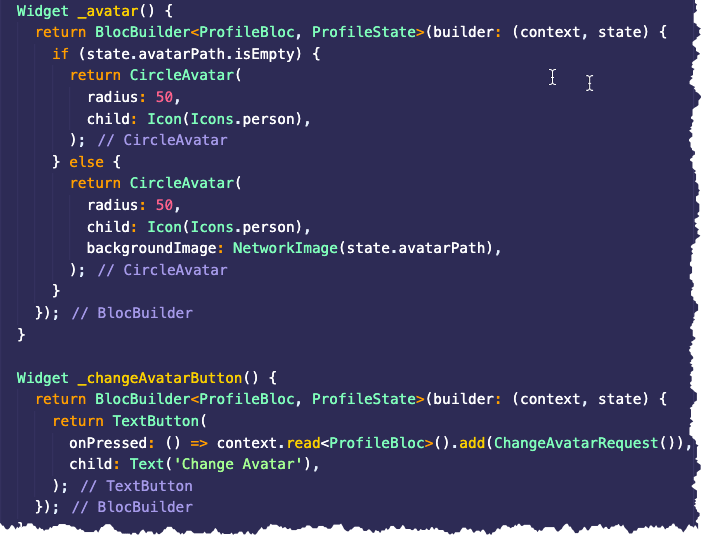
So here are the two widgets inside profile view — as you can see, we are using a BLoC to pass a state object into the UI. In this case the state object will store our image once we have grabbed it from the phones gallery. If we also look at the button code we can see that the call to open the gallery goes to the ChangeAvatarRequest() method — lets have a look at that next.
profile_bloc.dart

So inside the Profile BloC’s mapEventToState() method, if the ChangeAvatarRequest event comes in we are doing a number of things.
- using an _imagePicker to set the selectedImage
- passing that image to a storageRepository for uploading
- updating the user object with the imageKey to the image
- updating the user profile and grabbing the URL for the uploaded image.
For this to work we are missing a few things that we need to setup, namely the _imagepicker and a storageRepository. So lets do these next.
Adding an Image Picker
So the image picker is the package that will open the Android Gallery app and allow us to pick an image. This functionality we can get from Flutter’s repository of packages pub.dev , with the one we want being called image_picker. If we navigate to the image_picker package on pub.dev we are given installation instructions for Android.
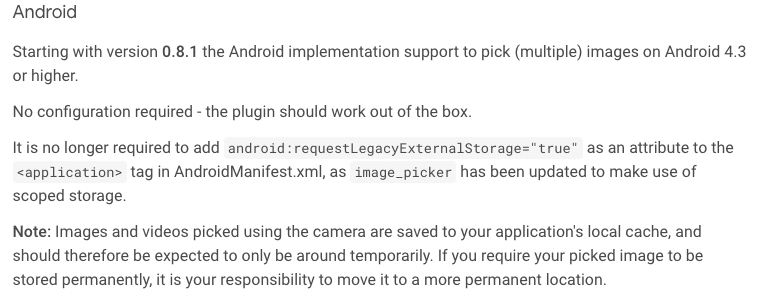
So all we need to do then to install image_picker for use in our Android device is add it into pubspec.yml.
Creating a Storage Repository
As in previous posts, we are using the repository pattern to wrap and abstract API calls for the underlying storage mechanism. In the Storage Repository’s case we are abstracting away the AWS Amplify Storage feature/category. So lets install that category before proceeding.
To do this we run the following command from a terminal within our project.
amplify add storage

It is then prompting us to fill in some values, we are choosing mostly defaults apart from the ‘Who should have access’ question where we select Auth users only and give them full CRUD privileges.
Once we are happy with this, we call
amplify push
to push all of these changes into the AWS account and provision an S3 bucket for our uploaded files to live in with the correct access controls built in.
Adding dependencies and API calls
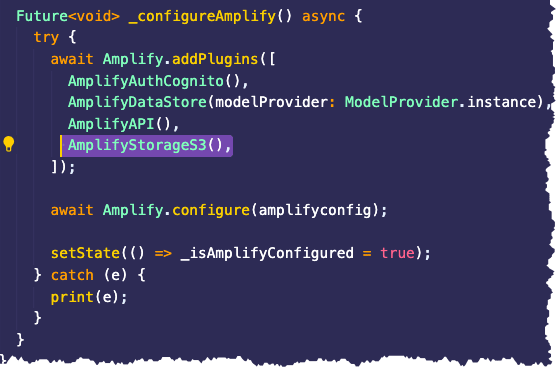
The next thing we need to do is change ‘pubspec.yml’ to add the amplify_storage_s3 plugin before updating the_configureAmplify() method in main.dart. This should now look like this with the added call to AmplifyStorageS3
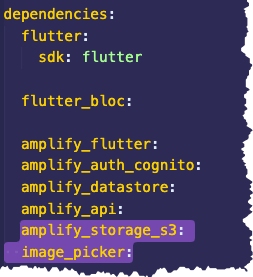
After adding the new libraries of image_picker and amplify_storage_s3 , our pubspec.yml should now look like this:
Once the libraries are added and our backend is provisioned, the final part is to wrap the storage API calls in a repository.
storage_repository.dart

As you can see this is similar to all the other repository’s in the application, for this storage repository was are wrapping the Storage.uploadFile() and Storage.getURL() methods in Amplify.Storage api calls — Also notice that we are not re-downloading the file to view the Image, but rather using the Flutter NetworkImage widget (see profile_view.dart above)
Adding Analytics
Now in the final part of our journey we will add some analytics into our application so we can track how our users actually use the application in the wild. To do this we are going to implement a quick set of analytics to track user behaviour using Amplify’s Analytics category. We first need to add this to our project by following the usual steps, namely
- In the terminal run ‘ amplify add analytics ’ — and fill out the prompts as below
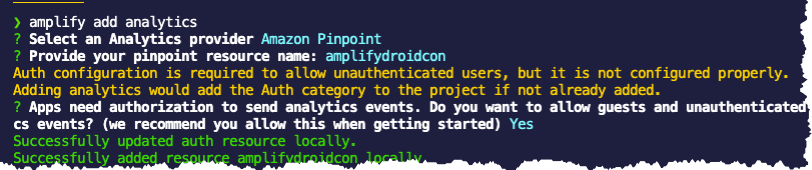
In the terminal run ‘ amplify push -y ’ — to deploy the changes to the back end. Like all other Amplify categories the Analytics category abstracts away a service from the developer, to reduce the complexity of provisioning. In the case of Analytics the service is Amazon Pinpoint that we are provisioning as the back end Analytics service. You can also stream the Analytics events into an Amazon Kenesisstream and then implement another provider to act on these events in the stream.
Next, add the ‘ amplify_analytics_pinpoint ’ dependency to pubspec.yml

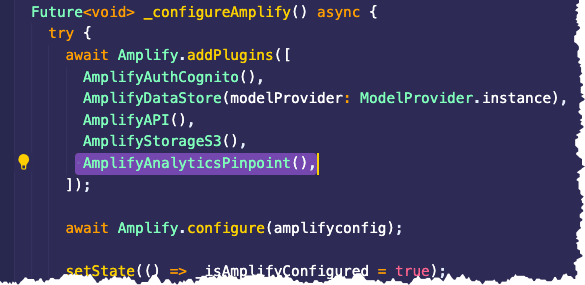
- Finally, update amplify configure code in main.dart, to include the new category of Analytics
| Note: If everything is done correctly then re-launching the app should work — if this doesn't work as expected, check the contents of amplifyconfiguration.dart in this file are all the configuration details for the Amplify categories. If configuration values are not there for categories that are added to your project then the app will throw an exception on startup with details of what is missing.
Assuming everything is working and the application is starting the next step is to decide on what event to capture. For the purposes of this app, we are going to be interested in shopping items as they are added to the Shopping List by each user. A great feature of Amplify Analytics is that it can introspect the user details and easily add them to the event we want to track. So lets set that event up now
shoppinglistItem_view.dart

Here we are intercepting the UI call by the user to create the new item in their shopping list. The recordNewEvent method will then decorate the event and send it to Pinpoint.
shoppinglistItem_view.dart
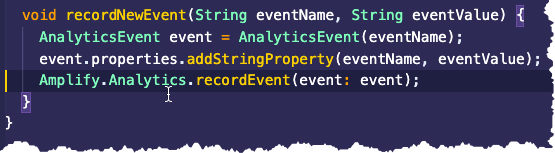
This does some minor decoration before registering the event which by default will be flushed every 30 seconds to the Pinpoint servuce. This default can be changed inside amplifyconfiguration.dart if desired. See here for more information and details on the information we can capture using the Amplify Analytics category.
Summing Up
So that is it for our journey building out our Android Flutter application to store our shopping list data, in this final part we added functionality to upload our profile images and to track our user behaviour with analytics. We talked about the ability to pull in existing components from flutter pub.get to interact with native controls. Then we added the Storage category from Amplify to the project which provisioned an Amazon S3 bucket with the correct permission to store our applications images. Finally we added the Analytics category to provision an Amazon Pinpoint instance to store any events we want to track of user interaction on the device.
During the course of this series we have seen how well Flutter and AWS Amplify can be used in tandem to really accelerate the application development and delivery lifecycle. So that ultimately you can deliver applications with great features into the hands of users quicker than ever.
If you want to follow along with this blog and build this application yourself, remember the finished code can be cloned from https://github.com/deekob/flutter_droidcon and you can also follow along with Kyle (aka Kilo Loco) in his excellent #30daysofflutter you-tube playlist
Thanks for reading, please reach out on twitter if you have any questions.
Until next time…

Top comments (0)