
Abstract
This post provides an overview of Amazon EC2 Spot Instances, as well as best practices for using them on AWS EKS effectively
Table Of Contents
- What to know about spot instances?
- The life cycle of a Spot Instance
- How to Launch Spot Instances
- Spot Instance Termination Notice
- Deploy the node termination handler
- Spot Instance Best Practices
- Solution
- Conclusion
🚀 What to know about spot instances?

🚀 The life cycle of a Spot Instance
1. You (or an application running on your behalf) submits a bid to run a desired number of EC2 instances of a particular type. The bid includes the price that you are willing to pay to use the instance for an hour.
2. When your bid price exceeds the current Spot price (which varies based on supply and demand), your instances are run.
3. Spot instance is interrupted or reclaimed for one of following reasons:
- Price – The Spot price is greater than your maximum price.
- Capacity – If there are not enough unused EC2 instances to meet the demand for On-Demand Instances, Amazon EC2 interrupts Spot Instances. The order in which the instances are interrupted is determined by Amazon EC2.
- Constraints – If your request includes a constraint such as a launch group or an Availability Zone group, these Spot Instances are terminated as a group when the constraint can no longer be met.
🚀 How to Launch Spot Instances
The most recommended service for launching Spot Instances is Amazon EC2 Auto Scaling especially Amazon EKS node group
If you require more flexibility, have built your own instance launch workflows, or want to control individual aspects of the instance launches or the scaling mechanisms, you can use EC2 Fleet in Instant mode.

🚀 Spot Instance Termination Notice
The best way for you to gracefully handle Spot Instance interruptions is to architect your application to be fault-tolerant. To accomplish this, you can take advantage of Spot Instance interruption notices. A Spot Instance interruption notice is a warning that is issued two minutes before Amazon EC2 stops or terminates your Spot Instance.
It's recommended to check for these interruption notices every 5 seconds. eg.
Polling http://169.254.169.254/latest/meta-data/spot/termination-time every 5 second(s)
🚀 Deploy the node termination handler
We will deploy a pod on each Spot Instance to detect the instance termination notification signal so that we can both terminate gracefully any pod that was running on that node, drain from load balancers and redeploy applications elsewhere in the cluster.
The Helm chart we will use to deploy AWS Node Termination Handler on each Spot Instance uses a DaemonSet. This will monitor the EC2 meta-data service on each of the EC2 Spot Instances to capture EC2 interruption notices.
-
Within the Node Termination Handler DaemonSet, the workflow can be summarized as:
- Identify that a Spot Instance is being reclaimed.
- Use the 2-minute notification window to gracefully prepare the node for termination.
- Taint the node and cordon it off to prevent new pods from being placed.
- Drain connections on the running pods.
- Replace the pods on remaining nodes to maintain the desired capacity.
In this post, I would like to enable SpotInterruptionDraining on SPOT instances only. Read more AWS Node Termination Handler
Using helm deploy
aws-node-termination-handlerwith enableenableSpotInterruptionDrainingandenableRebalanceMonitoring, plus webhookURL to send notification to slack, apply for spot instances only. We use--set nodeSelector.lifecycle=spotto tell the all daemon sets where to place the node-termination-handler pods but the autoscaling group need to add the labellifecycle=spotto it nodes or you can use any labels that matche the requirement
helm repo add eks https://aws.github.io/eks-charts
helm upgrade --install aws-node-termination-handler \
  --namespace kube-system \
  --set enableSpotInterruptionDraining="true" \
  --set enableRebalanceMonitoring="true" \
  --set enableScheduledEventDraining="false" \
  --set nodeSelector.lifecycle=spot \
  --set webhookURL=https://hooks.slack.com/services/<ID> \
  eks/aws-node-termination-handler
- Check the pods ```
$ kubectl get pod -n kube-system |grep aws-node-termination-handler
aws-node-termination-handler-2gsq2 1/1 Running 0 2m 10.3.254.49 ip-10-3-254-49.ap-northeast-2.compute.internal
aws-node-termination-handler-8tn5w 1/1 Running 0 2m 10.3.158.85 ip-10-3-158-85.ap-northeast-2.compute.internal
aws-node-termination-handler-j8xf6 1/1 Running 0 2m 10.3.141.203 ip-10-3-141-203.ap-northeast-2.compute.internal
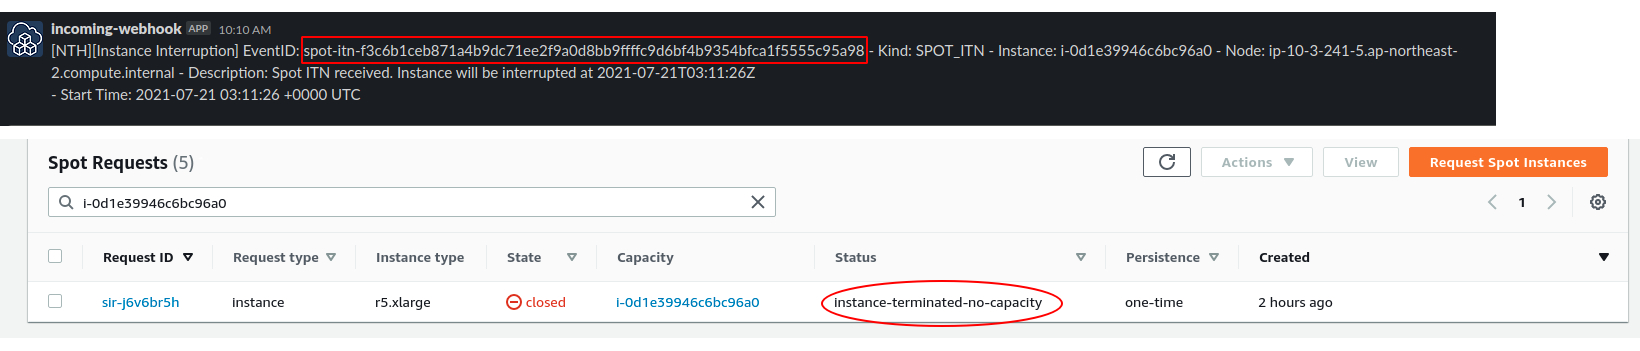
- Slack alarm
- Rebalance recommendation

- Spot interruption event
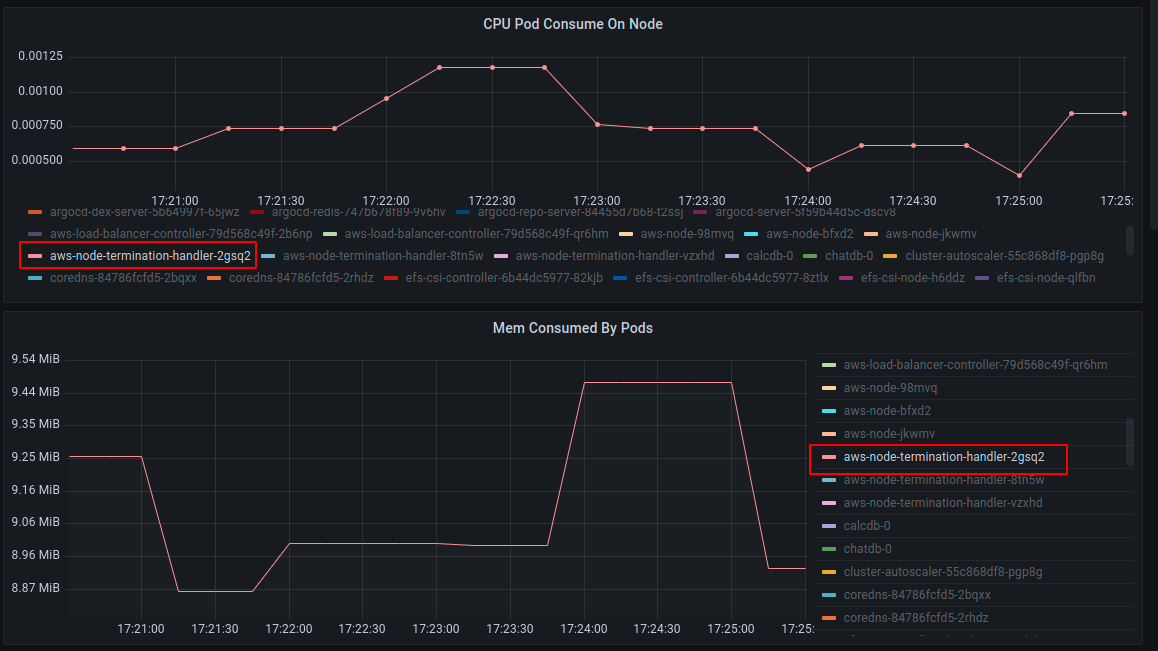
- Check CPU and mem cost by the pod
## 🚀 **Spot Instance Best Practices** <a name="Spot-Instance-Best-Practices"></a>
- Flexible about instance types, for example, my applications almost run in java and they require much memory so I choose R5 type and its family could be r5.xlarge, r5a.xlarge, etc.
- Flexible of Availability Zone, here I give the case of using EKS node group.
- Configure multiple node groups, scope each group to a single Availability Zone, and enable the `--balance-similar-node-groups` feature in [cluster autoscaler](https://dev.to/awscommunity-asean/kubernetes-cluster-autoscaler-with-irsa-3bg5) so that we will have at least each node in different zones and guarentee the HA. Especially when the PVC is attached to an AZ, the pod need to be start on a spot instance in same zone.
eg. Create two node groups in different AZ using AWS cdk
```
self.eks_cluster.add_nodegroup_capacity(
id="EksNodeGroupStateless",
capacity_type=eks.CapacityType.SPOT,
desired_size=1,
disk_size=20,
instance_types=[ec2.InstanceType("r5a.xlarge"), ec2.InstanceType("r5.xlarge")],
labels={'role': 'worker', 'type': 'stateless', 'lifecycle': 'spot'},
max_size=2,
min_size=1,
nodegroup_name='eks-node-group',
node_role=worker_role,
subnets=ec2.SubnetSelection(subnet_type=ec2.SubnetType.PRIVATE, availability_zones=['ap-northeast-2a'])
)
self.eks_cluster.add_nodegroup_capacity(
id="EksNodeGroupStateful",
capacity_type=eks.CapacityType.SPOT,
desired_size=1,
disk_size=20,
instance_types=[ec2.InstanceType("r5a.xlarge"), ec2.InstanceType("r5.xlarge")],
labels={'role': 'worker', 'type': 'stateful', 'lifecycle': 'spot'},
max_size=2,
min_size=1,
nodegroup_name='eks-node-group-stateful',
node_role=worker_role,
subnets=ec2.SubnetSelection(subnet_type=ec2.SubnetType.PRIVATE, availability_zones=['ap-northeast-2b'])
)
Prepare individual instances for interruptions: The best way for you to gracefully handle Spot Instance interruptions is to architect your application to be fault-tolerant, in EKS we can use HPA to ensure the number of available pods if one node down, and use cluster autoscaler to request new node.
Max price: We recommend that you do not specify a maximum price, but rather let the maximum price default to the On-Demand price. A high maximum price does not increase your chances of launching a Spot Instance. See EC2 Spot pricing model

Ref:
- https://dev.to/awsmenacommunity/overview-of-amazon-ec2-spot-instances-3kph
- https://instances.vantage.sh/
- https://d1.awsstatic.com/events/reinvent/2019/REPEAT_1_Save_up_to_90_percent_and_run_production_workloads_on_Spot_Instances_CMP331-R1.pdf


Oldest comments (0)