
A few weeks ago I’ve shared the first part of this series where I analyzed in depth some less common ways to invoke AWS Lambda such as Cognito User Pools, AWS Config, Amazon Kinesis Data Firehose, and AWS CloudFormation. You can find [Part 1] here!
In the second part I will describe four more:
- AWS IoT Button — 1-Click handlers
- Amazon Lex — Fulfillment activities
- Amazon CloudWatch Logs — Subscriptions
- Amazon Aurora — Triggers and external data
5. AWS IoT Button (1-Click)
Since early 2018, you can trigger Lambda functions from simple IoT devices, with one click. We called it AWS IoT 1-Click.

![]()

All you need is one of the IoT buttons above and a few lines of code in your favorite programming language to implement a Lambda Action.
Of course, these devices encrypt outbound data using TLS and communicate with AWS via API to invoke your functions.
Once you’ve claimed your devices on the AWS Console — or via the mobile app — they will appear on your AWS Console and you can map their click events to a specific action.
There are three possible action types:
- Send SMS — it lets configure the phone number and message
- Send Email — it lets you configure the email address, subject, and body
- Trigger Lambda function — it lets you select a Lambda function in any region
Additionally, you can configure custom attributes (similar to tags) for each deployed device.
Please note that SMS and emails are two very common scenarios that AWS provides as built-in options, but under the hood there will always be a Lambda Function implementing the click logic (in these two cases, using Amazon SNS for delivering the message).
If you need something more sophisticated than SMS or email, you can implement your own logic with AWS Lambda. For example, you may want to invoke a 3rd-party API, send a voice message rendered by Amazon Polly, or simply store a new item on Amazon DynamoDB.

Before we start coding, let’s mention a few important details:
- Our Lambda function will receive two types of events: buttonClicked and deviceHealthMonitor
- The input event always contains useful information about the device such as its ID, its custom attributes, the remaining lifetime, etc.
- For buttonClicked events we receive two additional pieces of information: clickType ( SINGLE , DOUBLE , or LONG ) and reportedTime (an ISO-formatted date). The idea is that we may want to implement different behaviors for single, double, and long clicks. Alternatively, we could simply ignore some click types, or even treat them as a generic click event
- As you can imagine, deviceHealthMonitor events are triggered when the health parameters are below a given threshold; they allow you to take appropriate actions when the device expected lifetime is too low
This is what the typical click event will look like:
Let’s now implement a simple Lambda function that will store a new (daily) item into DynamoDB on click, and delete it on double-click.
Because we may want to run the same business logic on other computing platforms — such as EC2 instances, ECS containers, or even Kubernetes — here is a platform-agnostic implementation in Python :
In the code snippet above, I’m defining a new ClickHandler class, which abstract some details for the concrete DailyClickHandle class. Its constructor will receive the buttonClicked event as input. Once we create a new DailyClickHandler object, we can invoke its run() method to perform the correct logic for single, double, or long clicks.
I am creating a new DynamoDB Item on-single-click, using the current date as the primary key and storing the most recent reported time as well. On-double-click I am deleting the same daily item.
Note: I am not keeping track of the number of daily clicks for this simple use case, but that would be a nice improvement and a useful exercise for you — let me know if you manage to implement it and share your results!
Since I’ve encapsulated the main business logic into a stand-alone class/module, my Lambda handler will be pretty minimal, just a simple adapter:
The Lambda handler above will check if the current event is a health-check or an actual click. If it’s an actual click, it will create a new DailyClickHandler object and invoke its run() method.
The next step before we can deploy everything is to define our CloudFormation template (IaC).
We will need to define a new AWS::IoT1Click::Project resource and map its onClickCallback attribute to our Lambda function (full CloudFormation reference here):
Please note that the CloudFormation template above will create a new IoT 1-Click project and its configuration, but you’ll still need to add your IoT devices to the project either manually (on the AWS Console) or via the UpdateProject API.
If you want to take this sample code as a starting point for your own project, maybe you could keep track of hourly or weekly tasks (instead of daily) by storing an hourly/weekly item on DynamoDB. Or you could extend the Lambda function to start a new CodePipeline deployment (haven’t you always wanted a physical “ deploy button ” on your desk?).
Let me know what you’ll build with AWS IoT 1-Click!
6. Amazon Lex (fulfillment activity)
Amazon Lex allows you to build chatbots and conversational interfaces, powered by the same tech as Alexa.
Lex supports both voice and text I/O, and it comes with advanced natural language understanding (NLU) capabilities. These capabilities help you extract and store the right information from the conversation so that you can focus your time on improving the interface itself rather than wasting time and energy on edge cases, input parsing, and error handling.
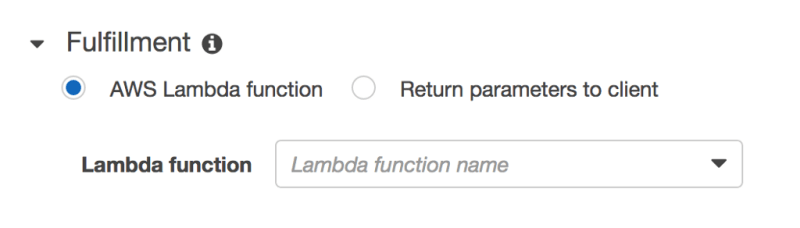
Once Lex has collected all the information you need from the conversation, you can configure your bot to invoke a Lambda function to fulfil the user’s intentions , which could be something like creating a hotel reservation, rescheduling an appointment, requesting assistance on a given topic, etc.

To understand how we can integrate Lambda with Lex we need to understand a few important concepts:
- Intents — the different actions/goals that you bot can perform (for example, “Book a hotel”, “Rent a car”, “Reschedule an appointment”, etc.)
- Slots — the individual pieces of information/fields that your bot will collect during the conversation (for example, “Location”, “Arrival Date”, “Car type”, etc.) — Some slots have built-in types such as cities, dates, phone numbers, sports, job roles, etc. And you can also define your own custom slot types
- Sample utterances — typical sentences and hints about how a user might convey the intent, potentially by providing slot values all together (for example, “Book a hotel room in {Location}” or “Book a hotel room for {N} nights in {Location}”)
- Channels — the messaging platforms where you can integrate Lex with just a few clicks, such as Facebook Messenger, Slack, Kik, and Twilio SMS
There are two main ways to integrate Lamdba with Lex:
- Input initialization & validation — it allows you to validate each slot value as soon as it is collected by Lex, and eventually prompt an “invalid value message” to request a different value
- Fulfillment activity — it lets you process the collected values and proceed with the actual business logic
Since you often want to re-validate your inputs before proceeding with the fulfillment, many developers like to implement a single Lambda function to take care of both validation and fulfillment. In some specific scenarios — for example if you have optional slots or very heavy validation logic — you may want to implement two independent Lambda functions.
Let’s now assume that we are implementing a BookHotel intent and we want to implement two independent Lambda functions for data validation and fulfillment. Here are the slots we’ll be collecting during the conversation:
- Location — the city where we need a hotel
- CheckInDate — the date when we’ll check-in at the hotel
- Nights — the number of nights we’ll stay at the hotel
- RoomType — a custom slot with values such as queen, king, deluxe, etc.
In a real-world use case, we’ll need to make sure that the four collected slots are semantically valid. For example, the Location needs to be a city supported by our booking system; the CheckInDate must be in the future; the number of Nights must be greater than zero (and maybe lower than a maximum allowed number?); RoomType needs to be a valid type supported by our booking system; and so on.
In the code snippet below I am implementing the BookHotel intent in Python. Because I’d like you to focus on the core business logic, I’ve moved most of the “boring” validation logic and utilities to reusable external modules (you can find the three files here).
As you can see in the snippet above, the Lambda handler itself is only a simple wrapper/adapter for the book_hotel business logic. In this case, we are handling both single slots validation and final fulfillment with one function.
The main logic looks like this: load session data (this is given in the input event), validate individual slot, elicit slots if missing/invalid data, delegate the next step to Lex until we reach the final fulfillment. Then, we can finally book the hotel through our backend or 3rd-party API.
The full code snippet is available here, and it is actually a refactor of the lex-book-trip-python Lambda blueprint that you can find in the AWS Console:
Once you’ve deployed this Lambda function, you can use it as your bot’s validation code hook and fulfillment directly in the Lex console, as shown in the next screenshots:

Unfortunately, Amazon Lex is not supported by CloudFormation yet, but here you can find a set of CloudFormation templates that will deploy a Lex bot using custom resources.
7. Amazon CloudWatch Logs (subscriptions)
Whenever you functions print or console.log something, you will find the corresponding logs on CloudWatch Logs. And the same happens for over 30 services that can natively publish logs into CloudWatch, including Amazon Route 53, Amazon VPC, Amazon API Gateway, AWS CloudTrail, etc.
Not to mention all those on-premises servers that publish logs into CloudWatch using the CloudWatch Agent.
But that’s *NOT* the reason why CloudWatch is on this list.
You can also use CloudWatch Logs as an event source for Lambda. In fact, CloudWatch allows you to define filtered subscriptions on log groups and implement your own Lambda function to process those logs.

For example, you may want to process all the (filtered) logs generated by an Amazon EC2 instance and correlate those logs with the corresponding trace from AWS X-Ray. Finally, you could store the processed information on Amazon S3, maybe send an email report, or even open a new issue on GitHub with all the information required for debugging the problem.
Let’s look at the structure of CloudWatch Logs events:
Well, we can’t see much until we base64-decode and unzip the incoming data. The good news is that you can achieve that with built-in libraries for most runtimes, including Node.js and Python.
Once decoded, the CloudWatch Logs payload will look like the following object:
The payload contains some meta-data about the event itself, such as the name of the corresponding logStream, logGroup, and subscriptionFilters.
The actual payload you want to process is the list of logEvents , each one with its id , timestamp , and message. Please note that, depending on the subscription filter you define, you will likely receive only a subset of the logs corresponding to a given process/task/function execution. That’s why you may want to fetch additional information from the same log stream, especially if you are filtering errors or exceptions for debugging them later.
The following code snippets is a sample implementation in Python:
A few notes on the code snippet above:
- It’s assuming that you’ve created a decode.py file with the decode function we’ve seen earlier in this article
- The code is sleeping for 5 seconds, waiting for all the logs to be collected in the corresponding stream; this way, we can collect a few more lines of logs before and after this match
- We could implement a fetch_traces function to fetch X-Ray traces based on some sort of Request Id (which is automatically added for Lambda function execution logs, but you may have a different format in your own custom logs)
- Ideally, we would like to avoid time.sleep at all and instead define a proper state machine with AWS Step Function; this way, we wouldn’t pay for the 5-10 seconds of idle execution because Step Functions allows us to define Wait states (up to a whole year) while charging only for state transitions
You can also find a similar implementation in Node.js here.
Ok, now that we have a better understanding of the moving parts and a sample implementation, it’s time to define a CloudFormation template for our logs processing application.
The best part is that we don’t have to define any special CloudFormation resource because AWS SAM will do most of the work for us. All we need to do is defining a CloudWatchLogs event for our processing function.
Without AWS SAM, we’d need to manually create an AWS::Logs::SubscriptionFilter resource, as well as an additional AWS::Lambda::Permission resource to grant CloudWatch permissions to invoke our function. AWS SAM will transform our CloudWatchLogs event into those resources and it allows us to use a much simpler syntax.
You can learn more about the built-in event sources supported by AWS SAM on GitHub!
Also, don’t forget to provide your processing function the correct permissions as well. In the YAML template above, I’m providing fine-grained permissions to invoke only logs:GetLogEvents on one log group. Alternatively, I could have used a managed IAM policy such as CloudWatchLogsReadOnlyAccess.
You can find a full reference architecture for errors processing here, which also includes AWS X-Ray traces.
8. Amazon Aurora (triggers & external data)
Aurora is a cloud-native relational database engineered from the ground up, with a MySQL and PostgreSQL-compatible interface. It comes with up to 15 read-replicas and different flavours based on your application needs, such as Aurora Global Databasefor multi-region apps requiring high resiliency and data replication, or Aurora Serverless for infrequent, intermittent, or unpredictable workloads.
We can integrate Aurora MySQL with Lambda in two different ways:
- synchronously — useful to fetch data from other AWS services in our MySQL queries;
- asynchronously — useful to perform tasks when something happens, for example via triggers
Asynchronous invocation — Example: external data or API

By invoking Lambda functions synchronously you can retrieve data stored in other services such as S3, Elasticsearch, Redshift, Athena, or even 3rd-party API’s.
For example, we could fetch today’s weather to make some of our queries dynamic.
First of all, we’ll need to give the Aurora cluster access to Lambda by setting the aws_default_lambda_role cluster parameter with a proper IAM role. In case your cluster isn’t publicly accessible, you’ll also need to enable network communication. Then we can grant invoke permissions to the database user:
Now we can finally invoke our Lambda functions using lambda_sync:
The code snippet above is selecting all fields from a weather_mapping table, assuming that we are storing the mapping between some parameter of our system and the current weather in a given location (which could be parametrized). For example, our application could use different images, welcome messages, or even prices based on the current weather.
Please also note that the Lambda function FetchWeather should return an atomic value — in this case a string — since Aurora MySQL doesn’t support JSON parsing.
Disclaimer 1 : lambda_sync and lambda_async are available Aurora MySQL version 1.6 and above. For older versions, you can use the stored procedure mysql.lambda_async.
Disclaimer 2 : the functionality above could be implemented at the application layer as well, and I’m pretty sure you will come up with more creative use cases for synchronous invocations :)
Asynchronous invocation — Example: triggers

By invoking Lambda functions asynchronously you can implement something very similar to Amazon DynamoDB Streams, for those scenarios where you need to react to specific queries or events happening in the database.
For example, you may want to send an email every time a new record is inserted into a DemoContacts table. In this case you could achieve the same by sending the email from your application code. But in some other scenarios you might need to add too much logic to your application code (or even just modify too many files/modules), so it would be simpler to use a database trigger to extend the behaviour of the application.
In practice, you can define a MySQL trigger that will invoke your Lambda function asynchronously.
First of all, we’ll need to give the Aurora cluster access to Lambda by setting the aws_default_lambda_role cluster parameter with a proper IAM role. In case your cluster isn’t publicly accessible, you’ll also need to enable network communication. Then we can grant invoke permissions to the database user:
Now we can define a MySQL trigger:
The code snippet above defines a trigger named TR_contacts_on_insert that collects the inserted values of email and fullname, and then invokes a Lambda function asynchronously. The built-in function lambda_async requires a function ARN and a JSON payload, here built by concatenating strings.
In case you want to reuse the invoke logic above for other similar triggers, you may want to create a reusable stored procedure as well.
Conclusions
That’s all for part 2!
I hope you’ve been inspired to build something new with AWS IoT 1-Click, Amazon Lex, Amazon CloudWatch Logs, and Amazon Aurora.
Now you can serverlessly handle IoT buttons clicks, implement the fullfillment logic of your chatbots, process logs in real-time, and implement MySQL triggers and or fetch data from external services/databases into Aurora.
In the 3rd (and last) part of this series I will discuss the last four less common ways to invoke your Lambda functions, including AWS CodeDeploy, AWS CodePipeline, Amazon Pinpoint, and more! Stay tuned and let me know if you’d like to read about other Lambda integrations.
Thank you for taking the time to read such a long article.
Feel free to share and/or drop a comment below :)
Originally published on HackerNoon on Jul 1, 2019.


Top comments (0)