In my last post, we discussed how to upload files to AWS S3 in JMeter using Groovy. We have also seen Grape package manager on JMeter. Recently, k6 announced its next iteration with a lot of new features and fixes. In this blog post, we are going to see how to upload files to AWS S3 in k6.
What's new in k6 0.38.1?
k6 0.38.1 is a minor patch. To view all the new features, check out k6 0.38.0 tag. Following are the noteworthy features in 0.38.0.
- AWS JSLib
- Tagging metric values
- Dumping SSL keys to an NSS formatted key log file
- Accessing the consolidated and derived options from the default function
AWS JSLib Features
Amazon Web Services is one of the widely used public cloud platforms. AWS JSLib packed with three modules (as of today's writing) :
- S3 Client
- Secrets Manager Client
- AWS Config
S3 Client
S3Client modules help to list S3 buckets, create, upload, and delete S3 objects. To access the AWS services, each client (in this case S3Client) uses the AWS Credentials such as Access Key ID and Secret Access Key. The credentials must have required privileges to perform the tasks, otherwise the request will fail.
Prerequisites to upload objects to S3
The following are the prerequisites to upload objects to S3 in k6.
- The latest version of k6 0.38.0 or above
- AWS Access Key ID and Secret Access Key which has relevant S3 permissions.
- Basic knowledge in k6
https://www.youtube.com/playlist?list=PLJ9A48W0kpRJKmVeurt7ltKfrOdr8ZBdt
How to upload files to S3?
Create a new k6 script in your favorite editor and name it as uploadFiletoS3.js. To upload files to S3, the first step is to import the following directives to your k6 script.
import exec from 'k6/execution'

import {
    AWSConfig,
    S3Client,
} from 'https://jslib.k6.io/aws/0.3.0/s3.js'
The next step is to read the AWS credentials from the command line. It is not recommended to hard code the secrets into the code, which will raise a security concern. Using the __ENV variables, it is easy to pass the values into the k6 script. To pass the AWS config such as region, access key, and secret, use the object AWSConfig as shown below.
const awsConfig = new AWSConfig(
    __ENV.AWS_REGION,
    __ENV.AWS_ACCESS_KEY_ID,
    __ENV.AWS_SECRET_ACCESS_KEY
)
The next step is to create a S3 client by wrapping AWSConfig into it using the below code.
const s3 = new S3Client(awsConfig);S3Client s3 has the following methods:
- listBuckets()
- listObjects(bucketName, [prefix])
- getObject(bucketName, objectKey)
- putObject(bucketName, objectKey, data)
- deleteObject(bucketName, objectKey)
Now, we know the s3 methods. The next step is to create a dummy file to upload. Create a file with sample contents and save it in a current directory, e.g. test.txt
After creating a dummy file to upload, we need to load that file into the script using the open() method. Copy and paste the below code:
const data = open('test.txt', 'r')
const testBucketName = 'k6test'
const testFileKey = 'test.txt'
open() method reads the contents of a file and loads them into memory which will be used in the script. open() method takes two arguments: file path and the mode. By default, it will read it as text r, to read it as binary use b.
The above open method works only in an init context. Please make a note.
The above variables data, testBucketName and testFileKey hold the data to upload, bucket name in S3, and file key respectively.
The next step is to define the main() context. Let us begin with the listing of the buckets. The below variable buckets will return the array which will contain each bucket object.
const buckets = s3.listBuckets()Optionally, if you would like to loop through the bucket, use the below code snippet.
for (let bucket in buckets) {
        console.log(buckets[bucket].name);
}
Or you can use filter() method as shown below.
buckets.filter(bucket => bucket.name === testBucketName)Let us add a checkpoint whether the bucket is present or not. If the bucket is present, it will proceed to upload, else the execution will abort. Copy and paste the below snippet.
if (buckets.filter((bucket) => bucket.name === testBucketName).length == 0) {
        exec.test.abort()
}
The next step is to upload the object to S3 using putObject() method.
s3.putObject(testBucketName, testFileKey,data)Here is the final script.
import exec from "k6/execution";

import { AWSConfig, S3Client } from "https://jslib.k6.io/aws/0.3.0/s3.js";

const awsConfig = new AWSConfig(
  __ENV.AWS_REGION,
  __ENV.AWS_ACCESS_KEY_ID,
  __ENV.AWS_SECRET_ACCESS_KEY
);

const s3 = new S3Client(awsConfig);

const data = open("test.txt", "r");
const testBucketName = "k6test";
const testFileKey = "test.txt";

// main function
export default function () {
  const buckets = s3.listBuckets();


  if (buckets.filter((bucket) => bucket.name === testBucketName).length == 0) {
    exec.test.abort();
  }

  s3.putObject(testBucketName, testFileKey, data);
  console.log("Uploaded " + testFileKey + " to S3");

}
Save the above script and execute the below command.
k6 run -e AWS_REGION=ZZ-ZZZZ-Z -e AWS_ACCESS_KEY_ID=XXXXXXXXXXXXXXX -e AWS_SECRET_ACCESS_KEY=YYYYYYYYYYYYYYYYY uploadFiletoS3.jsTo store the variables in PowerShell, you can use the below command e.g.
Set-Variable -Name "AWS_REGION" -Value "us-east-2"To execute, you can use the below command.
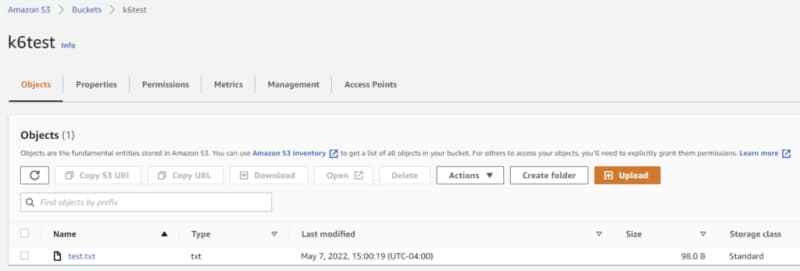
k6 run -e AWS_REGION=$AWS_REGION -e AWS_ACCESS_KEY_ID=$AWS_ACCESS_KEY_ID -e AWS_SECRET_ACCESS_KEY=$AWS_SECRET_ACCESS_KEY uploadFiletoS3.jsNavigate to the S3 console and go to the bucket to check the file object. You can download the file to verify the contents.
Congratulations! You successfully uploaded the file to S3. If you would like to delete the file object, use the below code snippet.
s3.deleteObject(testBucketName, testFileKey)To read the content from S3 bucket, you can use the below snippet.
const fileContent = s3.getObject(testBucketName, testFileKey);
console.log(fileContent.data);
Final Thoughts
The k6 AWS library is neatly designed with frequently used AWS services and methods. Right now, it supports S3 Client, Secret Manager Client, and AWS Config. Hopefully, the k6 team will add more services which will help developers and performance engineers.


Top comments (0)