
When you run performance tests using JMeter on cloud instances, you typically do not need to launch the user interface of JMeter. Especially if your CI/CD pipelines are designed properly, the JMeter scripts will be checked out from git repo for further execution. In some cases, you may need to open the user interface from a cloud instance for a quick edit or to validate the settings. In this blog article, we will see how to install and launch JMeter GUI on AWS EC2.
Prerequisites
The following are the prerequisites to install and launch JMeter GUI on AWS EC2.
- an AWS Instance
- Java
- JMeter
- xauth
- Putty or Mobaxterm
Installing Java and JMeter
Spin up an Amazon Linux 2 EC2 instance and ssh into it. Instructions to launch EC2 are beyond the scope of this blog article. Once the ssh is successful, issue the commands below which will update the packages, install Java and JMeter.
sudo yum update -y
sudo yum install java-17-amazon-corretto -y

# validate java
java -version

# download JMeter 5.5
wget https://dlcdn.apache.org//jmeter/binaries/apache-jmeter-5.5.tgz

# download JMeter 5.5 checksum
sha512sum apache-jmeter-5.5.tgz

# validate checksum
if [[ $(cat apache-jmeter-5.5.tgz.sha512 | awk '{print $1}') -eq $(sha512sum apache-jmeter-5.5.tgz | awk '{print $1}') ]] ; then echo "Valid checksum. Proceeding to extract."; else echo "Invalid Checksum, please download it from secured source." ; fi ;

# extracting JMeter
tar -xf apache-jmeter-5.5.tgz
rm apache-jmeter-5.5.tgz

# validate JMeter
cd apache-jmeter-5.5/bin/
./jmeter -v
Congratulations! You have successfully installed Java and JMeter on AWS EC2.
SSH Client Configuration
The next step is to install MobaXterm or Putty. Installing MobaXterm and Putty is straightforward. Here are the links for MobaXterm and Putty. Both MobaXterm and Putty have packed with X11 package.
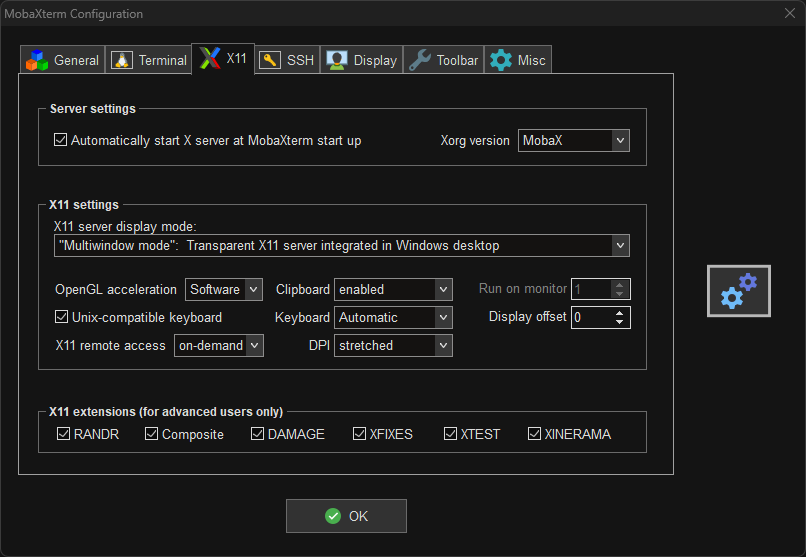
In MobaXterm, go to Settings > Configuration, then click X11 tab to view the X11 settings.
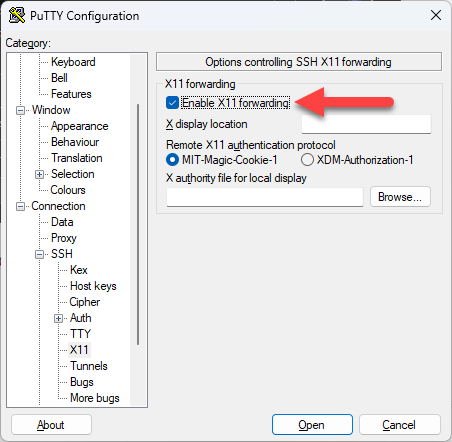
In Putty, you need to enable X11 explicitly by navigating to Connection > X11, then check Enable X11 forwarding as shown below.
Installing X and Launching J
The next step is to install xauth in EC2. SSH into EC2 using either MobaXterm or Putty, then issue the commands below to install xauth and configure the DISPLAY parameter.
sudo yum install xauth -y

export DISPLAY=localhost:10.0

# validate X11 forwarding
# this should print `X11Forwarding yes`
sudo cat /etc/ssh/sshd_config | grep X11

# reboot
sudo reboot
After rebooting successfully, ssh again, then navigate to apache-jmeter-5.5/bin/, then run ./jmeter.
It will launch the JMeter GUI as shown below.

Similarly, you can also leverage Putty to ssh into it, then launch the GUI.
Final Words
As mentioned above, it is easy and straightforward to launch JMeter GUI on AWS EC2 for a quick edit. With this setup, there is no need to download the test plan locally then launch it using a local installation of JMeter. For macOS, you can use XQuartz.

Latest comments (1)
Thanks! This is exactly what I needed.
For me there was just one missing piece
I ran into the following error when launching JMeter:
It turned out that
java-11-amazon-correttowas already installed on the EC2 instance, was running as the default version of Java, and lacked a certain library that JMeter needs.I read Amazon Corretto 17 Installation Instructions for Amazon Linux 2 and Amazon Linux 2022 to learn how to fix it.
I ran the command
sudo alternatives --config javaand choosejava-17-amazon-correttoat the prompt. This changes the default Java version to the one we want.Now it works!