Setting up a secure WordPress website can be quite hard with all the scattered information out there on the web. This article sums up the best methods to properly harden your WordPress website on AWS Lightsail in combination with Cloudflare.
To defend against 99% of the most common but most impactful threats you need to restrict firewall access on port 22 (ssh). Set up end-to-end encryption using SSL and block everyone from accessing your wp-admin dashboard with a Cloudflare firewall rule. Down below we dive deeper into the details and explain how to properly harden your WordPress website.
Table Of Contents
- Prerequisites
- Deploying WordPress on Lightsail
- Optimizing and securing WordPress
- Cloudflare end-to-end encryption
- Setting up security headers
- Cloudflare firewall rules
- WordPress is hardened now!
Prerequisites
For this guide, we’re going to deploy a WordPress instance using AWS Lightsail. Lightsail is ideal for simpler workloads, quick deployments, and getting started on AWS. It’s designed to help you start small, and then scale as you grow. So before we begin you’ll need the following:
- Domain name
- An AWS account
- A Cloudflare account
Deploying WordPress on Lightsail
In the console, you press “create an instance”. In the next window, you get to select the platform and blueprint. The platform is either Linux or Windows, for our use case, we select Linux. Then we select WordPress as the type of Operating System + Application.
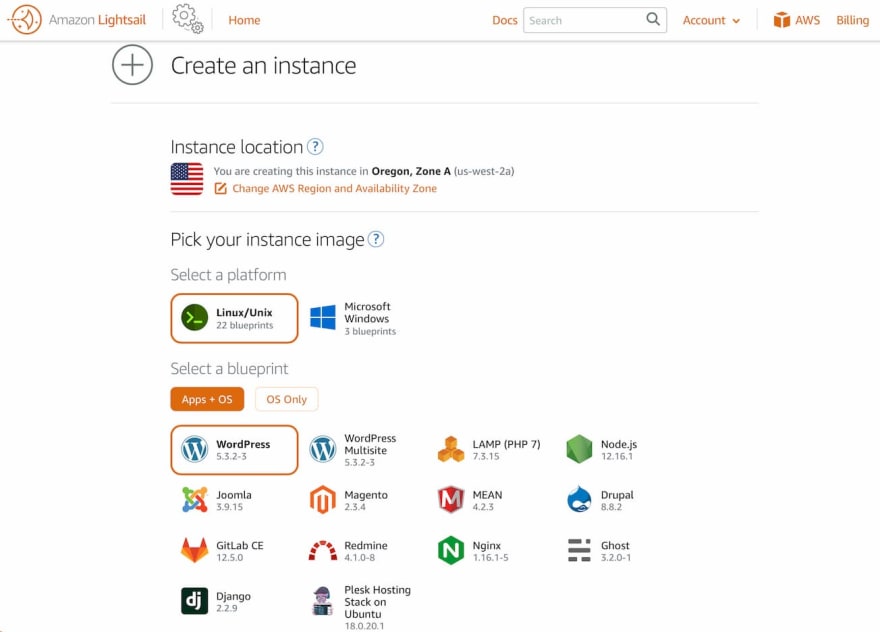
This image is a pre-configured, ready-to-run image for running WordPress on Amazon Lightsail supplied by Bitnami. You get to pick the region to which you want to deploy your instance. Choose a region that is the closest to your audience/readers.
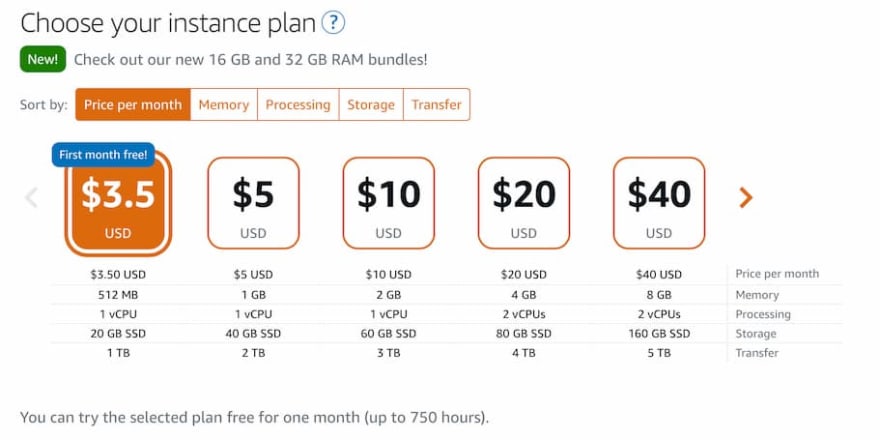
In the next step, we want to choose our instance type (basically the horsepower of the machine).
When you create the instance, it starts to boot up with the WordPress image. You will see that it has an external IP address. But it’s only a dynamic address which means you will lose it once you stop/start the machine. This can become a problem if you point your DNS’s A record to the IP address and you decide to stop/start the server. The A record will still point to the old dynamic IP address. To fix this, you should assign a static IP address in the networking tab.

Creating a static IP is free of charge when it’s attached to the instance. When you don’t attach it, AWS starts charging you for reserving the IP address.
Before we’re going to optimize the WordPress configuration on the server, we’re going to update the Lightsail instance’s firewall to protect it from outsiders. By default Port 22/80/443 is allowed for everyone, which is something that’s not considered best practice for security measures!
You should restrict access to port 22 (SSH) for your IP address. Getting your own IP can be fetched using this simple trick in your terminal:
curl ipinfo.io/ip
AWS also supplies terminal access through the browser console, if you’d rather use that, then you can disable port 22 on the firewall.
Optimizing and securing WordPress
We can easily log in through the connect tab within the AWS Lightsail console.

The first you want to do is to obtain the WordPress credentials from the server so you can log in on the wp-admin interface:
cat bitnami_credentials
The command displayed above is also supplied in the Bitnami documentation. The documentation contains lots of information on what has been configured and how you can tweak more settings, so it’s highly recommended that you’d read that.
We want to focus on end-to-end encryption. This requires the WordPress server to have a trusted CA certificate installed. To enable this we need to install a Let’s Encrypt certificate on this server. Luckily for us, Bitnami supplied us with a tool to generate the certificate from Let’s Encrypt automatically and also automatically renews it for us. We need to run it as follows:
sudo /opt/bitnami/bncert-tool
You need to follow the wizard in order to generate your Let’s Encrypt certificate. Supply you DNS e.g. example.com and choose to redirect www to non-www, and redirect HTTP to HTTPS. The config get’s saved in the following file /opt/bitnami/apache2/conf/bitnami/bitnami.conf in which we need to make one adjustment in the following block:
  # BEGIN: Enable HTTP to HTTPS redirection
  RewriteEngine On
  RewriteCond %{HTTPS} !=on
  RewriteCond %{HTTP_HOST} !^localhost
  RewriteCond %{HTTP_HOST} !^[0-9]+.[0-9]+.[0-9]+.[0-9]+(:[0-9]+)?$
  RewriteCond %{REQUEST_URI} !^/\.well-known
  #RewriteRule ^/(.*) https://%{SERVER_NAME}/$1 [R,L]
  RewriteRule ^/(.*) https://example.com/$1 [R=301,L]
  # END: Enable HTTP to HTTPS redirection
We commented out the original rule RewriteRule ^/(.*) https://%{SERVER_NAME}/$1 [R,L] and added the rewrite rule below which contains our domain without www and set up a permanent redirect by changing [R,l] to [R=301,L]. Now we established an efficient redirect that redirects your request in a single hop to your non-www domain.
Then we need to update our WordPress address and Site address in wp-config:
vim /opt/bitnami/apps/wordpress/htdocs/wp-config.php
Update the following two lines:
define('WP_SITEURL', 'http://' . $_SERVER['HTTP_HOST'] . '/');
define('WP_HOME', 'http://' . $_SERVER['HTTP_HOST'] . '/');
to:
define('WP_SITEURL', 'https://example.com');
define('WP_HOME', 'https://example.com');
Save your changes and restart apache:
sudo /opt/bitnami/ctlscript.sh restart apache
We completed the SSL security for your domain successfully for this WordPress website. The next step is to set up the DNS correctly using Cloudflare.
Cloudflare end-to-end encryption
We’re going to manage our DNS with Cloudflare, it’s free to use and has a lot of performance benefits i.e. caching and security. We dive deeper into the security aspect and set up the best security settings to harden a WordPress website.
In the Cloudflare interface, we have the SSL/TLS tab and the only thing we need to do is; enable Full encryption mode.

If the apache settings were set up correctly you should now have end-to-end encryption (Cloudflare -> WordPress Lightsail instance) enabled.
Note: Please make sure to disable Cloudflare’s Always Use HTTPS feature.

Otherwise, Cloudflare will redirect your HTTP to HTTPS which is inefficient if you redirect from www to non-www. For example, if you go to http://www.example.com Cloudflare will redirect to https://www.example.com and then redirect to https://example.com. It will redirect twice which is inefficient, so we let our apache server handle the redirection and do it in a single hop.
Setting up security headers
Another important aspect to highlight is the security headers. By default your website is missing a couple of important security headers as you can see here:
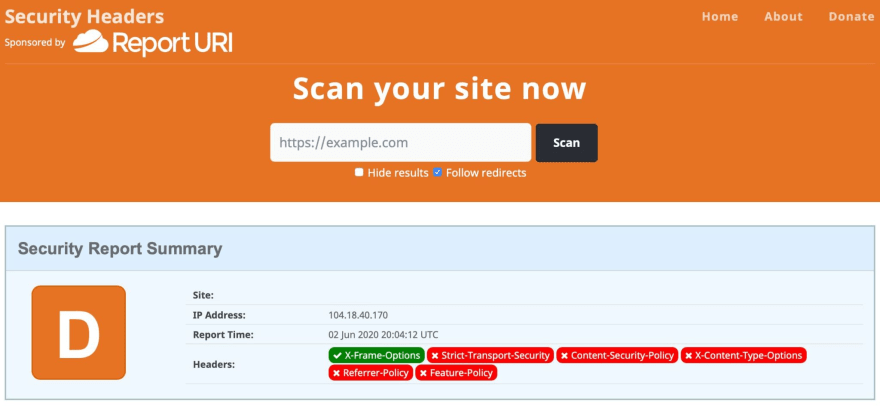
The following security headers are missing:
- Content-Type-Options
- Referrer-Policy
- Feature-Policy
- HTTP Strict-Transport-Security (HSTS)
- Content-Security-Policy
In order to fix the first 3 security headers, we can add the following to our .htaccess file:
# Extra Security Headers
<IfModule mod_headers.c>
    Header set X-XSS-Protection "1; mode=block"
    Header set X-Content-Type-Options nosniff
        Header set Referrer-Policy "same-origin"
        Header set Feature-Policy "geolocation 'self'; vibrate 'none'"
        Header set Content-Security-Policy "default-src 'unsafe-inline' https: 'self' data:; upgrade-insecure-requests; frame-ancestors 'self';"
</IfModule>
Note: The .htaccess file is disabled by default on the WordPress Bitnami image for AWS Lightsail. To enable it, change the following in /opt/bitnami/apps/wordpress/conf/httpd-app.conf:
AllowOverride None
to:
AllowOverride All
After making the change, restart apache: sudo /opt/bitnami/ctlscript.sh restart apache
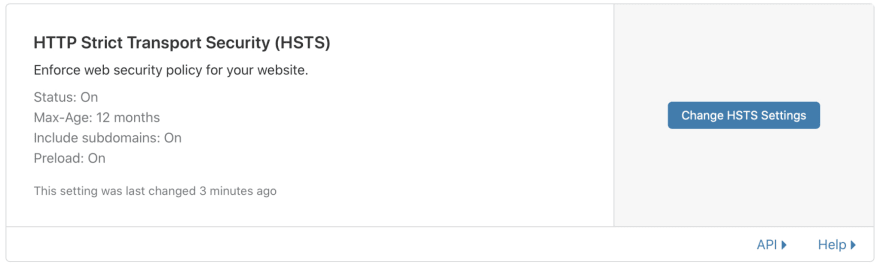
The next feature that we want to enable is HTTP Strict Transport Security (HSTS). HTTP Strict Transport Security (HSTS) is a header that allows a website to specify and enforce security policy in client web browsers. This policy enforcement protects secure websites from downgrade attacks, SSL stripping, and cookie hijacking. You can find more information here.
On this site, we can check if HSTS for our domain is enabled: https://hstspreload.org/. We can submit the form and include our domain on the preload list.
Updating the Content-Security-Policy (CSP) security header is a specific setting that’s custom for your use case. Unfortunately, this can’t be solved with a default rule. Because this header tells which dynamic sources are allowed for the user. If you need more information on setting the right CSP for your situation please check this source.
If you’ve followed the steps correctly, this should be your end result:

Cloudflare firewall rules
Cloudflare Firewall Rules is a firewall offered by Cloudflare and is a powerful and flexible security tool to filter web application traffic. We can set up 5 firewall rules for free.
A Firewall Rule consists of two parts: Matching and Action.
- Matching: A defined filter that runs and match your traffic for a string or pattern
- Action: the action performed on the matched traffic (block, challenge, captcha, allow)
You can also order the firewall rules to override the default sequence which is based on the rule’s action.
We want to set up the following 4 firewall rules:
- Allow the owner to access wp-admin
- Block everyone else from accessing wp-admin
- Block bad bots
- Block No-Referer requests to plugins
I’ll be sharing the expression rules, so you can easily copy/paste them into your own firewall rule.
1. Allow the owner to access wp-admin
You can use the following expression:
(lower(http.request.uri.path) contains "/wp-admin" and ip.src in {x.x.x.x}) or (lower(http.request.uri.path) contains "/wp-login.php" and ip.src in {x.x.x.x})
Replace x.x.x.x with your own IP address. To explain the expression rule we just described: when your request URI contains /wp-admin or /wp-login with your own IP address, you will be allowed access.
2. Block everyone else from accessing wp-admin
In the first rule, we allowed access for you, now we want to block the outside world from trying to access your admin interface. You wouldn’t normally think about it but there are a lot of bots out there that are trying to break into your site.
![]()
You can use the following expression to guard against that:
((http.request.uri.path contains "/xmlrpc.php") or (lower(http.request.uri.path) contains "/wp-login.php") or (lower(http.request.uri.path) contains "/wp-admin/" and not http.request.uri.path contains "/wp-admin/admin-ajax.php" and not http.request.uri.path contains " /wp-admin/theme-editor.php"))
Once the request URI matched with the above private locations it will get blocked, except for the allow rule which we defined as rule number 1. The rule order is important because if we switched the ordering, it would actually block our allow rule before allowing us.
3. Block bad bots
If you go to the settings page of your firewall, there is a feature called Bot Fight Mode. This will block or slow down non-legitimate bots by challenging them with compute-intensive challenges.

4. Block No-Referrer requests to plugins
Plugins are built by the community and can sometimes be insecure if it’s badly programmed or not maintained/patched well enough. So we want to protect it with the following firewall rule.
(http.request.uri.path contains "/wp-content/plugins/" and not http.referer contains "example.com" and not cf.client.bot)
We block everyone’s access to the plugin directory except for your domain and known bots (e.g. google crawler).
WordPress is hardened now!
We deployed a WordPress instance using AWS Lightsail, we closed unnecessary ports for the outside world. We’ve set up a Let’s Encrypt certificate on the server which gets updated automatically and configured Apache to use the new SSL certificate we generated.
On the DNS side, we used Cloudflare to enable Full encryption mode which makes sure we have end-to-end encryption from our browser to our AWS Lightsail instance. At last, we set up 4 (free) firewall rules to block access from the bad guys.
👋 Enjoyed this article? Reach out in the comments below or on Twitter to let me know what you think of it.
If you found some value in reading this, please consider showing your support by sponsoring me. Thanks to your support, I'm able to continue doing what I enjoy the most, which is sharing my learnings with the Cloud Community.


Top comments (2)
Details information 👍🏻👍🏻
Thank you!