Many AWS customers run their applications within a Amazon Virtual Private Cloud (Amazon VPC) for security reasons. This can be achieved with the use of an Internet Gateway or using a NAT Gateway or a NAT Instance if you have an EC2 in a private subnet/network, where you need to read/write data to S3/DynamoDB (for example).
But some companies are strict about data security will not allow to use NAT to connect to S3 or DynamoDB.
Moreover, use of NAT will cause high cost (1$ per hour), the bottleneck for IGW (huge data transfer).
So, in this situation a VPC endpoint can be used. It uses AWS Private network to communicate with your private EC2 to S3/DynamoDB and doesn’t require an IGW and NAT. This not only makes it secure but also saves costs.
You can use VPC Peering to achieve this, but what if the service provider which monitors databases (Dynamodb and other AWS services) has huge number of customers? Then we can’t use VPC Peering (VPC CIDR block should be unique).
In the VPC Endpoint service, the customer/consumer EC2 uses an endpoint interface network and then reaches the target (services provider) EC2 thru a Load Balancer.
I am going to use a Network Load Balancer for this.
Please visit my GitHub Repository for EC2/VPC articles on various topics being updated on constant basis.
Let’s get started!
We will be creating a target VPC (VPC 1) with a public subnet which contains a Network load balancer with one EC2 Instance having a sample webpage and then create a VPC Endpoint service for the Network Load balancer.
For the customer side, we will be creating a customer VPC (VPC 2) with a public subnet and create a VPC Endpoint and test the connectivity using an EC2 Instance.
Objectives:
1. Create a target VPC Infra-structure
2. Create a webserver (an EC2 Instance) and a Network Load Balancer.
3. Create an Endpoint service.
4. Create a customer VPC Infra-structure
5. Create an Customer EC2 Instance.
6. Create a VPC Endpoint.
7. Test the connectivity.
Pre-requisites:
- AWS user account with admin access, not a root account.
- AWS CLI installed.
Resources Used:
Read from VPC Endpoints
Steps for implementation to this project:
1. Create a target VPC Infra-structure
- Create a target VPC with
CIDR 192.168.0.0/16in us-east-1 -target_vpc - Create and attach an Internet Gateway -
target_igw - Create a Public subnet CIDR 192.168.1.0/24 -
target_pubsub1 - Create a Public Route Table
target_rtand associate it with thetarget_pubsub1 - Add the public Route in the Route table (attach
target_igw).

2. Create a webserver (an EC2 Instance) and a Network Load Balancer.
Create a webserver (an EC2 Instance)
Create an EC2 Instance
webserverin us-east-1 withAmazon Linux 2 AMI, instance type -t2.micro, key_pair -NVirKey.ppkin thetarget_vpc,webserver_sgwith3 Security group rules (SSH, TCP, 22, 0.0.0.0/0 and HTTP, TCP, 80, 0.0.0.0/0 and HTTPS, TCP, 443, 0.0.0.0/0)user_data
#!/bin/bash
sudo su
yum update -y
yum install httpd -y
systemctl start httpd
systemctl enable httpd

echo "<html><h1> Welcome to Webserver! </h1><html>" >> /var/www/html/index.html

systemctl restart http
- Launch Instance

Create a Network Load Balancer
Network Load Balancer network-LB, internet-facing in us-east-1, target_vpc, listeners(TCP, 80), Create Target Group (network-TG, instance, 80, TCP, in the Advance health settings - interval 10 seconds), select webserver, include as pending below, create target group, Create Network Load Balancer
- Wait till the target becomes healthy

- Note down the DNS name of the Network_LB
network-LB-17c73e77c9981032.elb.us-east-1.amazonaws.com

- Paste the DNS name in your web browser to see the web page

3. Create an Endpoint service.
- Create endpoint service, Available Load Balancers : Check network-LB checkbox from the list.
Require acceptance for endpoint : Make sure this is selected.
- Create
Note : By enabling the Acceptance option, every customer who creates the vpc endpoint using this Endpoint Service, the service provider need to accept the connection.
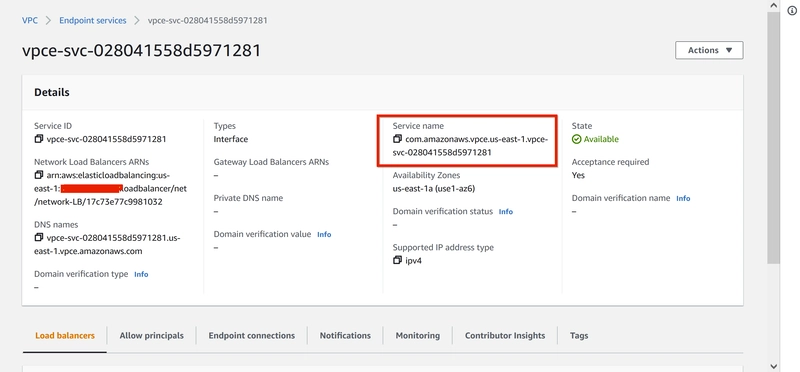
- copy the Endpoint Service name - and place it in your notepad texteditor. This is needed to create the VPC Endpoint.
com.amazonaws.vpce.us-east-1.vpce-svc-028041558d5971281
4. Create a customer VPC Infra-structure
- Create a customer VPC
customer_vpcwithCIDR 10.0.0.0/16 - Create and attach an Internet Gateway -
customer_igw - Create a Public subnet
customer_pubsub1with CIDR 10.0.1.0/24 in us-east-1 - Create a Public Route Table
customer_rtand associate it with the public subnet - Add the public Route in the Route table (attach
customer_igw)

5. Create an Customer EC2 Instance.
Create an EC2 Instance
customer_ec2in us-east-1 withAmazon Linux 2 AMI, instance type -t2.micro, key_pair -NVirKey.ppkin the customer_vpc,customer_ec2_sgwith 3 Security group rules(SSH, TCP, 22, 0.0.0.0/0 and HTTP, TCP, 80, 0.0.0.0/0 and HTTPS, TCP, 443, 0.0.0.0/0)Launch Instance

6. Create a VPC Endpoint.
Create endpoint, Other endpoint services (copy
Endpoint Service name from Step #3), Verify service,customer_vpc,us-east-1,customer_pubsub1,IPv4, checkcustomer_ec2_sgCreate Endpoint
status of your endpoint will be in
pending acceptancestatus.

Go back to Endpoint Service under Virtual Private Network.
Select the
Endpoint Serviceand select the tabEndpoint connectionsfrom below.Click on the
Actionbutton and selectAccept endpoint connection request, typeacceptClick Accept

- Now Go back again to
Endpoints - Wait 3 to 4 Min to see the status as available.

7. Test the connectivity.
- Select the endopoint, select Subnet, copy the IPv4 Address
10.0.1.82

- SSH to customer_ec2
sudo su

curl <endpoint IPv4 Address>

curl 10.0.1.82
You will be able to get the Web Server output from Network Load balancer.

Cleanup
- Delete EC2 Instances
- Delete customer endpoint
- Delete endpoint service
- Delete Network Load Balancer and Target Group
- Delete VPCs
What we have done so far
We have successfully demonstrated on how to implement end to end VPC Endpoint service.

Oldest comments (0)