Introduction
In this blog, we will provide a brief introduction to data governance and show how to implement it on AWS using DataZone. We will walk through a practical example involving a multi-account setup to manage and share data stored in S3 and Redshift, highlighting key steps and best practices along the way.
What is Data Governance?
Data governance is everything you do to ensure data is secure, private, accurate, available, and usable that helps organizations accelerate data-driven decisions. Key steps in implementing data governance typically include:
- Data mapping and classification. Data mapping involves documenting data assets and understanding how data flows through an organization’s systems. This process enables the identification of different data sets, which can then be classified based on various factors, such as whether they contain personal information or other sensitive data. These classifications directly influence the application of data governance policies to each data set, ensuring appropriate levels of security and compliance.
- Business glossary. A business glossary provides standardized definitions for business terms and concepts used within an organization. For instance, it might define what constitutes an active customer. By establishing a common vocabulary for business data, a business glossary supports consistent understanding and interpretation, which is crucial for effective governance across the organization.
- Data catalog. A data catalog is a comprehensive, indexed inventory of an organization’s data assets, created by collecting metadata from various systems. It typically includes details on data lineage, search functionalities, and collaboration tools. Data catalogs often integrate information about data governance policies and offer automated mechanisms for policy enforcement, ensuring that data is used in accordance with established governance standards.
What is AWS DataZone?
DataZone is a data management service that makes it faster and easier for customers to catalog, discover, share, and govern data stored across AWS accounts. With DataZone, administrators and data stewards who oversee an organization’s data assets can manage and govern access to data using fine-grained controls. These controls are designed to ensure access with the right level of privileges and context. DataZone makes it easier for engineers, data scientists, product managers, analysts, and business users to access data throughout an organization so that they can discover, use, and collaborate to derive data-driven insights.
Key concepts and Capabilities:
- Data Portal This is a web application where different users can go to catalog, discover, govern, share, and analyze data in a self-service fashion.
- Business Data Catalog In your catalog, you can define the taxonomy or the business glossary. You can use this component to catalog data across your organization with business context and thus enable everyone in your organization to find and understand data quickly.
- Data Projects & Environments You can use projects to simplify access to the AWS analytics by creating business use case–based groupings of people, data assets, and analytics tools. DataZone projects provide a space where project members can collaborate, exchange data, and share data assets. Within projects, you can create environments that provide the necessary infrastructure to project members such as analytics tools and storage so that project members can easily produce new data or consume data they have access to.
- Governance and Access Control You can use built-in workflows that allow users across the organization to request access to data in the catalog and owners of the data to review and approve those subscription requests. Once a subscription request is approved, DataZone can automatically grant access by managing permission at underlying data stores such as Lake Formation and Redshift.
Setting up DataZone
Prerequisites
Set up Redshift Serverless clusters in both the Producer and Consumer accounts. This is essential for enabling database sharing across accounts.
Now that we’ve explored the fundamentals of data governance and the key concepts of DataZone, let’s move forward with the setup process.
Architecture
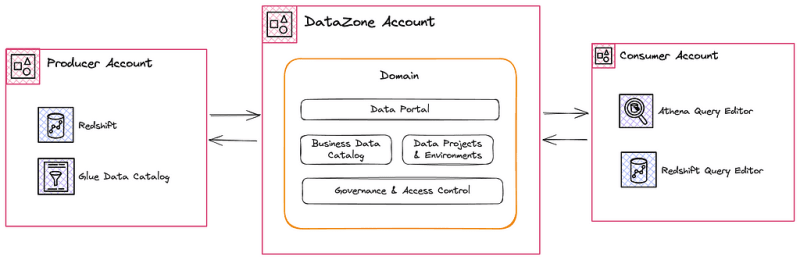
DataZone Account
In an organization, a central Data Team is typically responsible for setting up and managing the data marketplace using DataZone. Their key responsibilities include:
- Building Security Controls : Implementing robust security measures to protect data assets.
- Developing and Operating the Platform : Ensuring the data marketplace is built and maintained for seamless operation.
- Simplifying Onboarding : Facilitating the onboarding process by creating training materials and actively engaging with the community.
To begin setting up a Data Marketplace, the first step is to create a domain.
Create DataZone Domain:
- Login to the AWS Console as an administrator user, then navigate to Amazon DataZone.
- Click on the Create domain button.

- On the Create domain page, provide values for the following fields:
- Domain Name: The name of the domain.
- Description: This is an optional field where you can provide a description for this root domain.
- Service access: DataZone will create a new service role for you if there is no suitable role exists in your AWS account. This role includes necessary permissions that authorize DataZone to make API calls on behalf of users within the domain.

- Quick set up: Select this option as it automatically creates required service roles and S3 bucket required for DataZone.

- Click on Create domain. Once the domain is created click Open data portal.
Associate Producer and Consumer accounts:
Associating your AWS accounts with DataZone domains enables you to publish data from these AWS accounts into the DataZone catalog and create DataZone projects to work with your data across multiple AWS accounts. Now the Data Portal is ready lets associate the producer and the consumer accounts.
- Go to the domains, click on the Account associations and click Request association
- Enter the Producer account id and click Request association. Repeat this step to associate the Consumer account.

Create Projects:
Projects enable a group of users to collaborate on various business use cases that involve publishing, discovering, subscribing to, and consuming data assets in the Amazon DataZone catalog. We will create projects for producer and consumer.
- Log in to the Data Portal and navigate to the Create Project option. Enter a name for your project and click Create. Repeat this process to create the Consumer project as well.

With the projects set up and the Producer and Consumer accounts linked, the next step is to enable blueprints in both the Producer and Consumer accounts. Once this is done, we’ll return to the DataZone account to create environments, establish a business catalog, and then publish and subscribe to data assets.
Create Environments:
In DataZone projects, environments are defined as collections of configured resources — such as S3 buckets, Glue databases, or Athena workgroups — each associated with a specific set of IAM principals (user roles) who are granted owner or contributor permissions to manage those resources.
In our setup, we will create two environments: one for Athena (linked with S3) and another for Redshift.
Athena Environment:
- Log in to the Data Portal, select the Producer project, and then navigate to the Environments tab. Click on Create Environment to proceed.

- Enter the name and choose DataLakeProfile as environment profile and click Create Environment.
- Enter a name for the environment, select DataLakeProfile as the environment profile, and click Create Environment.

Redshift Environment:
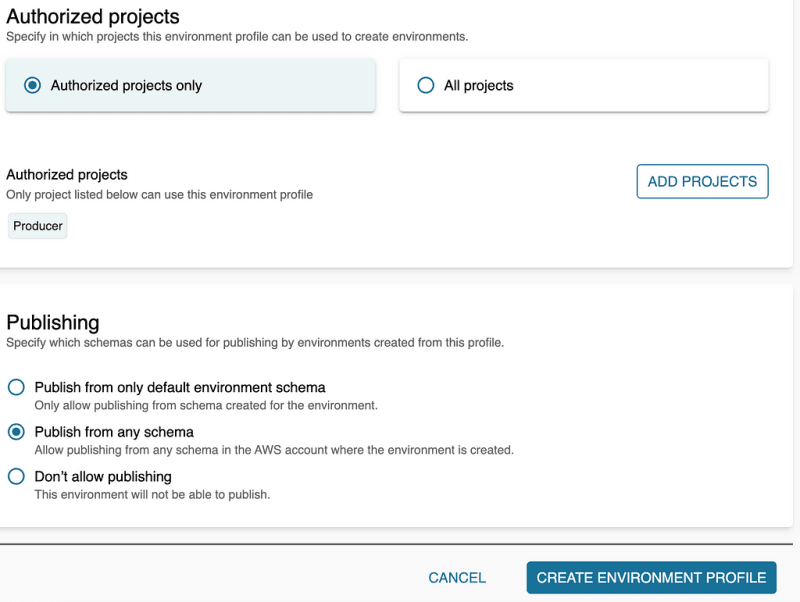
- Navigate to the Environments tab and click Create Environment Profile. Enter a name for the profile and select Default Data Warehouse as the blueprint.

- Under the Parameter set section, select the parameter set you created earlier.

- Click Create Environment Profile to complete the setup.
Producer and Consumer Account
Enable Blueprints:
A blueprint with which the environment is created defines what AWS tools and services (eg, Glue or Redshift) members of the project to which the environment belongs can use as they work with assets in the DataZone catalog.
Go to DataZone service click View Associated Domain and under the Blueprints tab enable Default Data Lake and Default Data Warehouse blueprints.
Create Parameter Set for Redshift:
Parameter set is a group of keys and values, required for DataZone to establish a connection to your Redshift cluster and is used to create data warehouse environments. These parameters include the name of your Redshift cluster, database, and the secrets manager that holds credentials to the cluster.
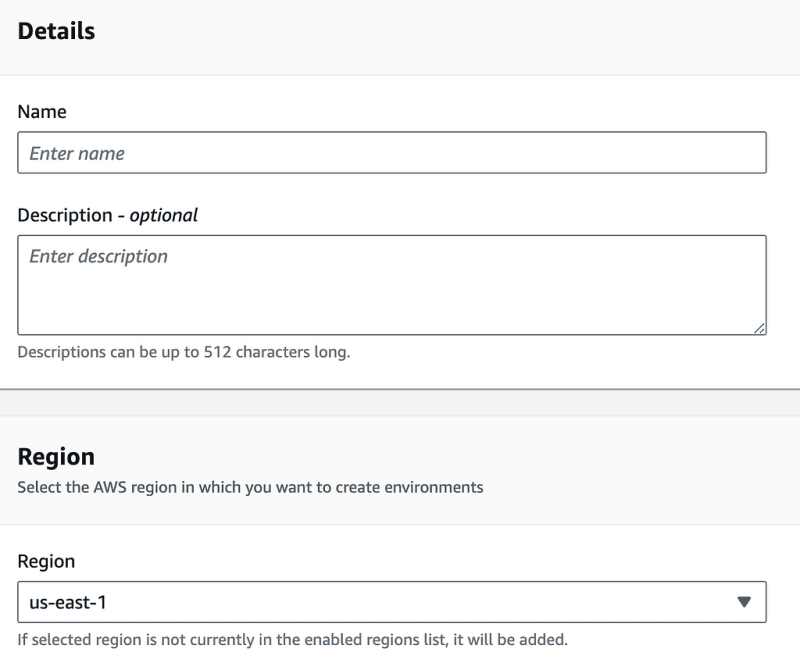
- Click on the Default Data Warehouse blueprints and under the Parameter sets click Create parameter set. Enter the name, description and choose the region.
- Select either Amazon Redshift cluster or Amazon Redshift Serverless.
- Select the secrets manager ARN that holds the credentials to the selected Redshift cluster or the Redshift Serverless workgroup. The AWS secret must be tagged with the AmazonDataZoneDomain : [Domain_ID] tag in order to be eligible for use within a parameter set.
- Click Create parameter set.
Make sure the Redshift Manage Access Role has permissions to read the secret.

Repeat the above steps in the Consumer account to mirror the setup.
Publishing & Cataloging data product
Prerequisites
For this tutorial create two datasets in the Producer account.
Claims: Create a dataset in S3 that contains information on insurance claims filed. Additionally, use the Glue Data Catalog to catalog this data.
Customer: Create a dataset in Redshift that includes personal information and relevant details about customers.
With the projects and environments now created, we can proceed to import existing data, catalog it, and ultimately publish it and then will make the data easy to understand with business glossary and business name generation.
Publish Claims data
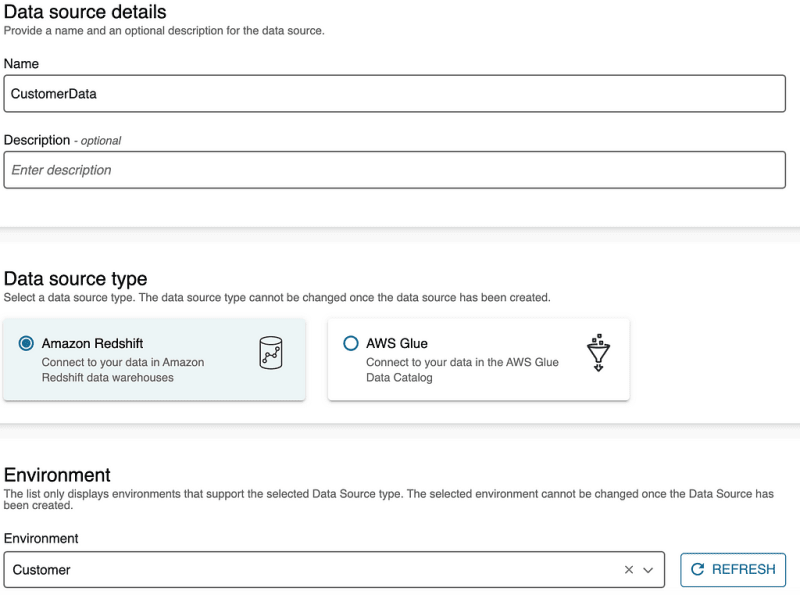
- Log in to the Data Portal, navigate to the Data Sources tab, and click on Create Data Source.
- Enter a name for the data source, select AWS Glue as the type (since the claims data is stored in S3), and choose the environment you just created.

- Enter the name of the Glue database, then proceed through the subsequent tabs with the default settings. Click Create to finalize the setup.

- Once the Data Source is created, initiate it to allow DataZone to import the Glue catalog into the Data Portal. After the process completes, you will see the imported asset in the portal.
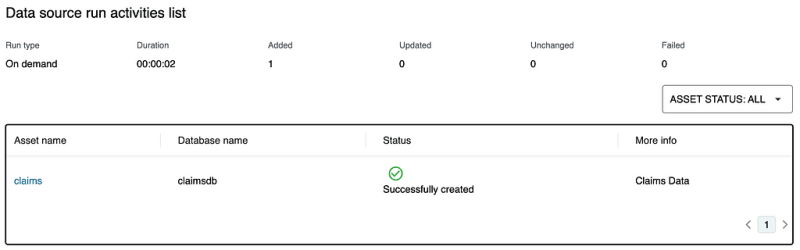
- Click on the asset to verify its details. The tables created have technical column names. DataZone provides a feature called Business Name Generation , which converts technical names into more user-friendly business data names. Review these generated names, and if they meet your expectations, click Accept All to apply the business data names automatically.
- Business Glossary: In DataZone, a business glossary is a curated collection of business terms designed to enhance the clarity and understanding of data assets. These glossaries are created within the catalog’s root domain and can be linked to metadata forms across various domains. A business glossary can either be a flat list of terms or a hierarchical structure, where any term can have an associated sublist of related terms. This feature ensures that data is easier to interpret and aligns with business concepts.
- If needed, you can create and attach Business Glossary terms to the data asset. Once everything is in place, click Publish Asset to make the data asset available for consumption.

Publish Customer data
- Navigate to the Data Sources tab, create a new data source and choose Amazon Redshift as the type.
- Click Next , enter the appropriate schema name, and leave the remaining settings as default. Click Create and then run the data source. Once the run is complete, you should see the imported asset. Click on the asset and then select Publish to finalize the process.

Having published both datasets, the next step is to subscribe from the Consumer account. Once subscribed, you can analyze the data using Athena and Redshift.
Discovering and subscribing data product
Data Consumer searches for data and discovers the data needed for the business use case. They also request access to the data through data subscription. Once the Data Product Owner approves the subscription, the data asset is available for use by the Data Analyst.
Claims data
Create subscription:
- Use the search bar to locate the claims data and click Subscribe.

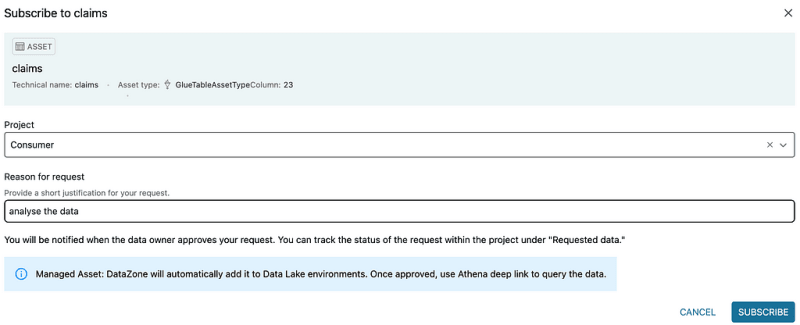
- Navigate to the Producer project, where a notification for the subscription request should appear. Click View Request to review the details and approve it. You can choose to grant full access to the data or apply column/row filters as needed.


Analyze and Visualize data in Athena:
- Return to the Consumer project, where you should now see the subscribed asset listed.

- Click on the subscribed asset, then go to the My Subscription tab and select Query Data to view the data.


Customer data
Create subscription:
- Repeat the process to search for and subscribe to the customer data. Switch back to the Producer project to approve the request. Once approved, DataZone will add the asset to the existing environment.

Analyze and Visualize data in Redshift:
- Click Query Data to run queries on the Customer data in Redshift.

- For authentication, select Federated User and use dev for the database. You should see a datazone_ schema with a view created under that schema.

Conclusion
This blog covered setting up data governance with AWS DataZone, including creating datasets, configuring environments, and managing data access. With these steps, you can now efficiently manage and analyze data across your organization, enhancing data-driven decision-making.


Top comments (0)