
AWS LightSail
- Fixed-cost per month
- Easier to setup
- Usecase: VPS/Web hosting
LightSail is the virtual private server/web hosting service from AWS. If you want to have a private server for your application/website and need a fixed cost per month, LightSail is the way to go. This product is aimed at people who are currently hosting their apps/site on a web hosting provider like GoDaddy/Heroku etc. The console is simplified and redesigned to look and feel more friendly and be accessible to people with may have less knowledge on how AWS or Cloud operations work. This also means that it provides less config options than, say an EC2, and it is intentionally so. It is a great first step for someone moving to Cloud. Lightsail also has a fixed cost per month, so someone moving to cloud for the first time is not hit with the bill surprise.
Currently AWS provides 3 month free lightsail instances at the starting config levels.
AWS LightSail Bundles or Operating Systems
Lightsail provides 2 options to choose from: A pre-configured bundle of apps for the most common usecases, or a clean-slate OS-only instance. For eg: lamp by bitnami option will give you an instance where LAMP (Linux, Apache, MySQL, PHP) stack is already installed and configured for you. All components would already be working together. We will be using this option for our POC today.
PHPBB on AWS LightSail
We would be creating a good-old discussion forum using PHPBB on AWS LightSail for this demo. PhpBB needs LAMP stack to work, it will be hosted on Apache Web server and use MySQL to persist the data.
Creating a LAMP stack instance on AWS Lightsail is very easy. Click on Create instance in LightSail and select Blueprint. Blueprint can be App+OS or OS only. App+OS gives you options for bundles, and you can see a lot of CMS options like Drupal, Joomla etc. Or you can select OS only and get a bare linux/windows machine.

Select the instance plan to set your monthly billing amount. First 3 plans are currently free for 3 months (May-2023). SSH key need to be specified as well.

Once instance is created you can SSH to your instance from either AWS console itself or from your local terminal using the SSH key you specified during creation. Console icon below will open an SSH session in browser.

We selected a LAMP stack instance packaged by bitnami, and here is the documentation from bitnami: https://docs.bitnami.com/aws/infrastructure/lamp/
ssh from local system: (bitnami is the default user)
ssh -i "/Mumbaikey.pem" bitnami@3.6.87.242 #change ip
To Find OS version:
cat /etc/os-release
Find which db is installed:
test -d /opt/bitnami/mariadb && echo "MariaDB" || echo "MySQL"
Since apache is already configured, up and running, you can go to the IP address of the instance in browser to open the index.html of the apache. This page also has links to documentation

main Apache configuration file located at /opt/bitnami/apache/conf/httpd.conf
default website virtual host directory is /opt/bitnami/apache/htdocs
By default, apache loads the index.html or other index file kept inside the virtual host directory.
Now let us do some db setup for phpbb to work.
first, see app/db password:
cat bitnami_application_password
To login to mysql:
mysql -u root -p #use password from above
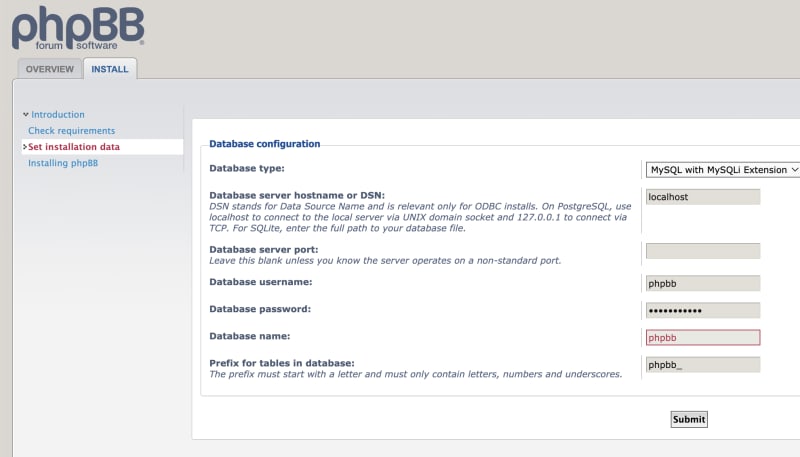
create database phpbb run below commands inside mysql prompt:
create database phpbb;
grant all privileges on phpbb.* TO 'phpbb'@'localhost' identified by 'phpadmin123';
flush privileges;
This does 2 things: It creates a user called phpbb with the password phpadmin123. It creates a database called phpbb and grants all access privileges on it to this user. This database will be used by the phpbb to persist its data. Enter exit command to exit the mysql prompt.
Below command can be used to check if your db setup was valid:
mysql -u phpbb -p #enter the phpadmin123 when prompted for password
Now we are ready to setup phpBB!
Install phpBB
Below command will download phpbb 3.3.10 (latest as of this writing)
and unzips it. Then we set owner to daemon user, as apache runs with this user in bitnami image.
wget https://download.phpbb.com/pub/release/3.3/3.3.10/phpBB-3.3.10.zip
unzip phpBB-3.3.10.zip
sudo chown -R daemon:daemon phpBB3 #apache runs as daemon:daemon user
sudo apt-get install php-gd imagemagick zlib1g zlib1g-dev #additional php packages for phpbb
Just to make things easier, copy the contents of phpBB3 folder into the /opt/bitnami/apache/htdocs
sudo mv phpBB3/* /opt/bitnami/apache/htdocs/
Now navigate to http://hostname/install in the browser to install phpbb.
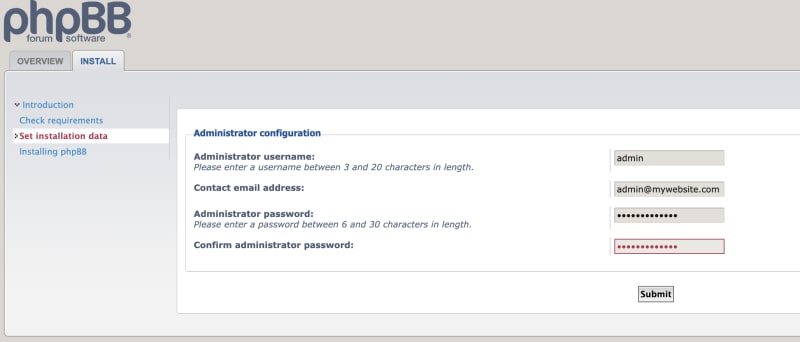
Here you give the password for phpbb user we created earlier:

Set cookie secure to No as our site is not https-yet.

Email will be done using email functionality in linux.
On the success screen, click on ACP to goto Admin Control Panel for the BB.

After phpBB is installed, we will do the configuration in the Admin Control Panel.
Disable the board till we are done:
General Tab -> Board Configuration -> Board settings - disable board - yes
Disable user registration till we are done:
General Tab -> Board Configuration -> User registration settings
disable registration: Yes
General -> Board Configuration -> Board settings -> Server URL settings
Main website URL: http://www.MyDomain.com
Main website text: MyDomain.com
General -> Server Configuration -> Server settings -> Server URL settings
Protocol: http://
Domain Name: www.MyDomain.com
General -> Server Configuration -> Security settings:
Select "Check IP against DNS Blackhole List: Yes
Select "Session IP validation: All
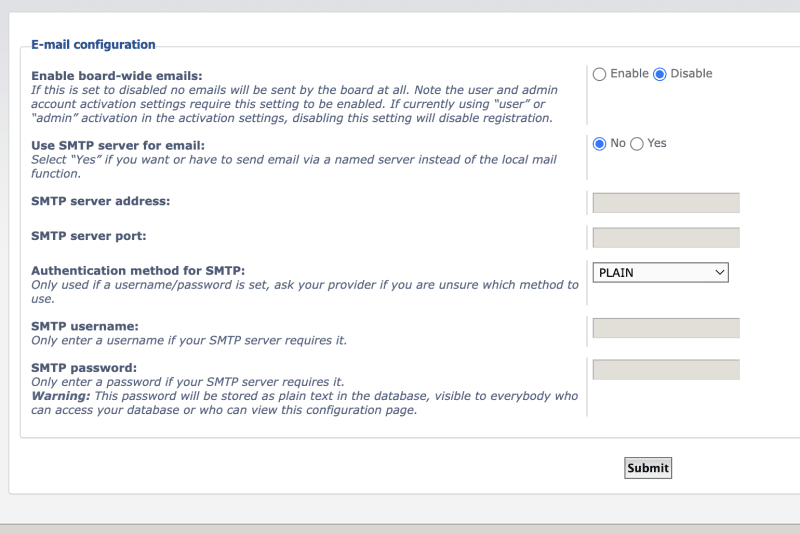
General -> Client Communication -> Email settings
Contact email address: dude@mydomain.com
Return email address: dude@mydomain.com
Enable board-wide emails: disable
Remove the install folder of phpbb.Otherwise only ACP will be available.
rm -rf /opt/bitnami/apache/htdocs/install
Remove index.html from the /htdocs so that by default index.php of the bb application will be loaded.
rm /opt/bitnami/apache/htdocs/install/index.html
Below commands will download the oneall plugin for social media login, and unzip and copy it to the /ext folder where phpBB is installed. (All plugins for phpbb will go inside /ext). Also file owner has to be daemon so that Apache can access the folder.
wget https://github.com/oneall/social-login-phpbb/raw/phpbb/3.1%2B/phpbb-3.1----oneall_social_login.zip
unzip phpbb-3.1----oneall_social_login.zip
sudo mv oneall /opt/bitnami/apache/htdocs/ext/
sudo chown -R daemon:daemon /opt/bitnami/apache/htdocs/ext/oneall
Configuration:
- Go to Admin panel and select the "CUSTOMIZE" tab.
- Select the "Enable" link for the "OneAll Social Login" extension.
- Purge the cache (General - middle of page under Resynchronize)
Follow the oneall guide to setup the social media login:
https://docs.oneall.com/plugins/guide/social-login-phpbb/3.1/#4
You need to create an account on the oneall, and an key on the social media site of choice, then add the keys back in the phpBB.
DNS Settings
Get a domain name from a registrar of your choice like namecheap.
create 2 A records in your dns settings of your domain registrar.
| Host | Value |
|---|---|
| www | IP Address |
| @ | IP Address |
Now your site should be available on the domain name on browser with www and without www added to it. Wait for DNS propagation to complete before next step.
Create SSL Certificate
Bitnami provides a tool that creates a LetsEncrypt free SSL certificate and applies to the server. Run below command:
sudo /opt/bitnami/bncert-tool
- Enter your www domain name (www.example.com) and bare domain name(example.com)
- Select to have http-to-https and non-www to www redirections enabled.
This will create your SSL certificate and apply to the server.
Now if you go to your domain you should see that it is an https connection and the padlock symbol is appearing in the browser URL bar.
Finish setting up Forum
Now we can create forum categories from Forums -> Manage Forums. Create all the categories you want and give permission on the group to the member groups. Once you are satisfied with all settings, you can turn the board back on from the ACP:
Disable the board till we are done:
General Tab -> Board Configuration -> Board settings - disable board - No
Disable user registration till we are done:
General Tab -> Board Configuration -> User registration settings
disable registration: No
Congratulations! You have created a webapp from scratch on the AWS Lightsail and setup the domain, and made it secure.

Top comments (0)