
The time has come for Part 3 in the series of creating a Serverless Connected BBQ as SaaS. In this third post we'll look into tenant creation, authentication, and authorization. We will create a new tenant service and tie it together with the user service from part two.
If you have not already checked it out, here is part one and part two
Tenants in a SaaS
In a Software as a Service (SaaS) solution, a tenant is the organization or individual that subscribe to and use the service.
One of the most crucial parts of an multi-tenant SaaS solutions, is tenant data isolation, ensuring that each tenant’s data remains separate and secure from others within the same environment. This is especially important in maintaining data privacy, complying with regulations, and protecting against data breaches.
Approaches for Tenant Data Isolation in AWS
To isolate tenant data there are several different approaches we can use.
Dedicated database / data store per tenant
Each tenant has a separate database instance or data store, like S3. This provides the strongest isolation since each tenant’s data is entirely segregated at the database / data store level. In this approach we can also use separate KMS keys for each tenant, making sure that data is secured even on an encryption level.
Some of the challenges with this approach would be higher cost due to multiple database instances. Scaling can become complex as the number of tenants grows.
Table per tenant
Each tenant has a separate table in the database. For a data store like S3 each tenant can have a unique prefix that data is stored under. To use separate KMS keys data need to be encrypted on the client level and not on the storage level, which can add even more isolation.
This approach provides a good compromise between cost and isolation. and easier to enforce data isolation at the table level.
Some of the challenges with this approach are that it still requires careful management of table names and schema evolution. Performance could be impacted.
Row-Level Security (RLS)
Data for all tenants is stored in a single table, but with row-level access controls to ensure that each tenant can only access their own data. This access control can be on the data storage level with built in RLS or on a client level with authorization checks with services like Amazon Verified Permissions. For a data store like S3 each tenant still can have a unique prefix that data is stored under.
Some of the challenges with this approach are that it's more complex to enforce correctly; any bugs in logic could expose data. Performance can be impacted by complex query filtering.
What approach should I use?
The approach you use depends on your use case, level of compliance you need, and customer requirements.
In this series of BBQ data I will take the approach and use row-level security.
Architecture Overview
In this architecture we continue to build on the event-driven setup introduced in part 2. When a user signs up, is created, an event will be sent from the user service onto an EventBridge event-bus, this will now invoke the tenant service. The tenant service has two primary DynamoDB tables, one that store the tenant information, ID, name, etc and one that map users access to a tenant. The service will start by creating an tenant ID store it and then map the user to this new tenant.

Our tenant service can be called via two separate APIs. One for our web application that will fetch and update the tenant information, and one admin API that will not only be used by SaaS admins but also for inter service communication. We will introduce the first round of API authorization in this post, IAM for machine-2-machine and Oauth and JWT token validation for the web application API. We will dig deeper into both the APIs and authorization further down in this post.

Tenant creation
First let's create the tenant creation resources needed. Here we create two new DynamoDB tables. In one table we store the tenants and information for it like tenant name etc. In the second table we will store a mapping between tenants and users for access. We also need to query which tenants a user has access to, for this we also setup a index for the table.
AWSTemplateFormatVersion: "2010-09-09"
Transform: "AWS::Serverless-2016-10-31"
Description: Connected BBQ Application Tenant Service
Parameters:
  ApplicationName:
    Type: String
    Description: Name of owning application
    Default: bbq-iot
  CommonStackName:
    Type: String
    Description: The name of the common stack that contains the EventBridge Bus and more

  TenantTable:
    Type: AWS::DynamoDB::Table
    Properties:
      TableName: !Sub ${ApplicationName}-tenants
      AttributeDefinitions:
        - AttributeName: tenantid
          AttributeType: S
      KeySchema:
        - AttributeName: tenantid
          KeyType: HASH
      BillingMode: PAY_PER_REQUEST

  TenantUserTable:
    Type: AWS::DynamoDB::Table
    Properties:
      TableName: !Sub ${ApplicationName}-tenant-users
      AttributeDefinitions:
        - AttributeName: tenantid
          AttributeType: S
        - AttributeName: userid
          AttributeType: S
      KeySchema:
        - AttributeName: tenantid
          KeyType: HASH
        - AttributeName: userid
          KeyType: RANGE
      GlobalSecondaryIndexes:
        - IndexName: user-index
          KeySchema:
            - AttributeName: userid
              KeyType: HASH
            - AttributeName: tenantid
              KeyType: RANGE
          Projection:
            ProjectionType: ALL
      BillingMode: PAY_PER_REQUEST
When a user is created we need to create the tenant that this user owns. User service will send an event on the application event-bus when a user is created, so here we keep building on a event-driven saga pattern and create the tenant.
Using StepFunctions makes it easy to write to DynamoDB and post an event for the next part to take over.

After the tenant has been created and stored we need to map the first admin user to it, basically the user who owns the tenant. This StepFunction is invoked by the event that the tenant was created.

Final step in this StepFunction also publish to EventBridge for future use.
Let's add these to StepFunctions to our template.
  TenantCreateExpress:
    Type: AWS::Serverless::StateMachine
    Properties:
      DefinitionUri: create-tenant-statemachine/statemachine.asl.yaml
      Tracing:
        Enabled: true
      Logging:
        Destinations:
          - CloudWatchLogsLogGroup:
              LogGroupArn: !GetAtt TenantCreateStateMachineLogGroup.Arn
        IncludeExecutionData: true
        Level: ALL
      DefinitionSubstitutions:
        EventBridgeBusName:
          Fn::ImportValue: !Sub ${CommonStackName}:eventbridge-bus-name
        TenantTable: !Ref TenantTable
        ApplicationName: !Ref ApplicationName
      Policies:
        - Statement:
            - Effect: Allow
              Action:
                - logs:*
              Resource: "*"
        - EventBridgePutEventsPolicy:
            EventBusName:
              Fn::ImportValue: !Sub ${CommonStackName}:eventbridge-bus-name
        - DynamoDBCrudPolicy:
            TableName: !Ref TenantTable
      Events:
        CreateTenantEvent:
          Type: EventBridgeRule
          Properties:
            EventBusName:
              Fn::ImportValue: !Sub ${CommonStackName}:eventbridge-bus-name
            Pattern:
              source:
                - !Sub ${ApplicationName}.user
              detail-type:
                - created
      Type: EXPRESS


  TenantAddFirstAdminExpress:
    Type: AWS::Serverless::StateMachine
    Properties:
      DefinitionUri: add-tenant-first-admin-statemachine/statemachine.asl.yaml
      Tracing:
        Enabled: true
      Logging:
        Destinations:
          - CloudWatchLogsLogGroup:
              LogGroupArn: !GetAtt TenantAddFirstAdminStateMachineLogGroup.Arn
        IncludeExecutionData: true
        Level: ALL
      DefinitionSubstitutions:
        EventBridgeBusName:
          Fn::ImportValue: !Sub ${CommonStackName}:eventbridge-bus-name
        TenantUserTable: !Ref TenantUserTable
        ApplicationName: !Ref ApplicationName
      Policies:
        - Statement:
            - Effect: Allow
              Action:
                - logs:*
              Resource: "*"
        - EventBridgePutEventsPolicy:
            EventBusName:
              Fn::ImportValue: !Sub ${CommonStackName}:eventbridge-bus-name
        - DynamoDBCrudPolicy:
            TableName: !Ref TenantUserTable
      Events:
        CreateTenantEvent:
          Type: EventBridgeRule
          Properties:
            EventBusName:
              Fn::ImportValue: !Sub ${CommonStackName}:eventbridge-bus-name
            Pattern:
              source:
                - !Sub ${ApplicationName}.tenant
              detail-type:
                - created
      Type: EXPRESS
Comment: Tenant service - Create Tenant On User Created
StartAt: Debug
States:
  Debug:
    Type: Pass
    Next: Genetate Tenant ID
  Genetate Tenant ID:
    Type: Pass
    Parameters:
      tenantid.$: States.UUID()
    ResultPath: $.TenantID
    Next: Create Tenant
  Create Tenant:
    Type: Task
    Resource: arn:aws:states:::dynamodb:putItem
    Parameters:
      TableName: ${TenantTable}
      Item:
        tenantid:
          S.$: $.TenantID.tenantid
    ResultPath: null
    Next: Prepare Event
  Prepare Event:
    Type: Pass
    Parameters:
      tenantId.$: $.TenantID.tenantid
      email.$: $.detail.email
      userName.$: $.detail.userName
      name.$: $.detail.name
    ResultPath: $.TenantData
    Next: Post Event
  Post Event:
    Type: Task
    Resource: arn:aws:states:::events:putEvents
    Parameters:
      Entries:
        - Source: ${ApplicationName}.tenant
          DetailType: created
          Detail.$: $.TenantData
          EventBusName: ${EventBridgeBusName}
    End: true
Comment: Tenant Service - Create Tenant Admin User Mapping
StartAt: Debug
States:
  Debug:
    Type: Pass
    Next: Create Tenant User Mapping
  Create Tenant User Mapping:
    Type: Task
    Resource: arn:aws:states:::dynamodb:putItem
    Parameters:
      TableName: ${TenantUserTable}
      Item:
        tenantid:
          S.$: $.detail.tenantId
        userid:
          S.$: $.detail.userName
        name:
          S.$: $.detail.name
        email:
          S.$: $.detail.email
        role: admin
    ResultPath: null
    Next: Prepare Event
  Prepare Event:
    Type: Pass
    Parameters:
      tenantId.$: $.detail.tenantId
      email.$: $.detail.email
      userName.$: $.detail.userName
      name.$: $.detail.name
      role: admin
    ResultPath: $.TenantUser
    Next: Post Event
  Post Event:
    Type: Task
    Resource: arn:aws:states:::events:putEvents
    Parameters:
      Entries:
        - Source: ${ApplicationName}.tenant
          DetailType: adminUserAdded
          Detail.$: $.TenantUser
          EventBusName: ${EventBridgeBusName}
    End: true
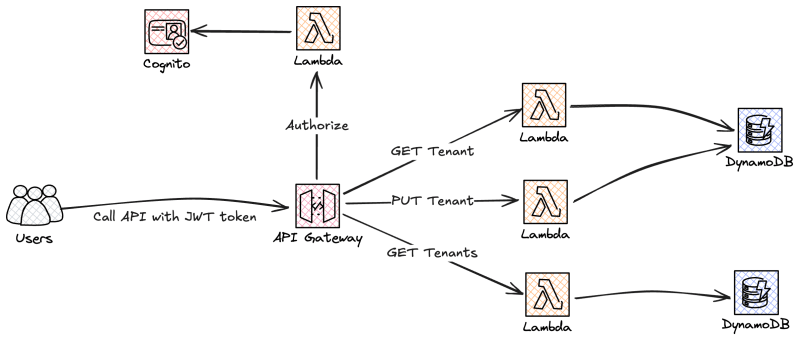
APIs
The tenant service have two separate APIs. First of all an API that is used by the web application to load, display, and update information about the tenant. This API will be central in coming parts as we extend how users get access to tenants. The second API is a management admin API that can be used for special service and system integration.
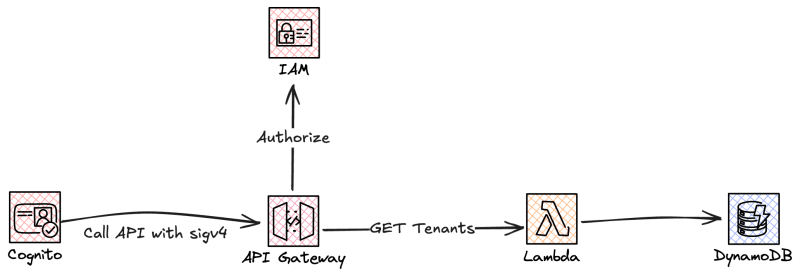
For the application API we will use the tokens issued by Cognito to authorize the users, and for the management API we will use machine-2-machine authorization with AWS Iam, at least for no.
Both of the APIs will be backed by Lambda functions for implementation of the business logic.
To start let us create the application API. Users will call the API with the token they got from Cognito. API Gateway have three Lambda integrations that will fetch the correct data, and we have a Lambda Authorizer to validate the token.
Let's start by adding the API definition to the template, we will use AWS::Serverless::Api resources and these MUST be defined in the same template as the Lambda functions for us to easy create the integration.
  TenantAPi:
    Type: AWS::Serverless::Api
    Properties:
      Name: !Sub ${ApplicationName}-tenant-api
      StageName: prod
      EndpointConfiguration: REGIONAL
      Cors:
        AllowMethods: "'GET,PUT,POST,DELETE,OPTIONS'"
        AllowHeaders: "'Content-Type,Authorization,X-Amz-Date,X-Api-Key,X-Amz-Security-Token'"
        AllowOrigin: "'*'"
      Auth:
        AddDefaultAuthorizerToCorsPreflight: false
        Authorizers:
          LambdaRequestAuthorizer:
            FunctionArn: !GetAtt LambdaApiAuthorizer.Arn
            FunctionPayloadType: REQUEST
            Identity:
              Headers:
                - Authorization
          LambdaUserRequestAuthorizer:
            FunctionArn: !GetAtt LambdaApiUserAuthorizer.Arn
            FunctionPayloadType: REQUEST
            Identity:
              Headers:
                - Authorization
        DefaultAuthorizer: LambdaRequestAuthorizer
Next we create the Lambda functions that will back out application API.
  LambdaTenantInfoGet:
    Type: AWS::Serverless::Function
    Properties:
      CodeUri: Lambda/Api/TenantInfoGet
      Handler: get.handler
      Policies:
        - DynamoDBReadPolicy:
            TableName: !Ref TenantTable
      Environment:
        Variables:
          DYNAMODB_TABLE_NAME: !Ref TenantTable
      Events:
        GetTenantInfoApi:
          Type: Api
          Properties:
            Path: /tenant/{tenantId}
            Method: get
            RestApiId: !Ref TenantAPi

  LambdaTenantInfoPut:
    Type: AWS::Serverless::Function
    Properties:
      CodeUri: Lambda/Api/TenantInfoPut
      Handler: put.handler
      Policies:
        - DynamoDBCrudPolicy:
            TableName: !Ref TenantTable
      Environment:
        Variables:
          DYNAMODB_TABLE_NAME: !Ref TenantTable
      Events:
        PutTenantInfoApi:
          Type: Api
          Properties:
            Path: /tenant/{tenantId}
            Method: put
            RestApiId: !Ref TenantAPi

  LambdaGetTenants:
    Type: AWS::Serverless::Function
    Properties:
      CodeUri: Lambda/Api/TenantsList
      Handler: get.handler
      Policies:
        - DynamoDBReadPolicy:
            TableName: !Ref TenantUserTable
      Environment:
        Variables:
          DYNAMODB_TABLE_NAME: !Ref TenantUserTable
          DYNAMODB_INDEX_NAME: user-index
      Events:
        GetTenantsForUserApi:
          Type: Api
          Properties:
            Path: /tenants/{userId}
            Method: get
            RestApiId: !Ref TenantAPi
            Auth:
              Authorizer: LambdaUserRequestAuthorizer
Next we can move over to the management API, which will AWS Iam to authorize the calls and have one Lambda based integration to fetch all tenants for a user.
  AdminTenantAPi:
    Type: AWS::Serverless::Api
    Properties:
      Name: !Sub ${ApplicationName}-tenant-admin-api
      StageName: prod
      EndpointConfiguration: REGIONAL
      Cors:
        AllowMethods: "'GET,PUT,POST,DELETE,OPTIONS'"
        AllowHeaders: "'Content-Type,Authorization,X-Amz-Date,X-Api-Key,X-Amz-Security-Token'"
        AllowOrigin: "'*'"
      Auth:
        DefaultAuthorizer: AWS_IAM

  LambdaGetTenantsForUser:
    Type: AWS::Serverless::Function
    Properties:
      CodeUri: Lambda/Internal/GetTenantForUser
      Handler: handler.handler
      Policies:
        - DynamoDBReadPolicy:
            TableName: !Ref TenantUserTable
      Environment:
        Variables:
          DYNAMODB_TABLE_NAME: !Ref TenantUserTable
          DYNAMODB_INDEX_NAME: user-index
      Events:
        GetTenantsForUserApi:
          Type: Api
          Properties:
            Path: /tenants/{userId}
            Method: get
            RestApiId: !Ref AdminTenantAPi
            Auth:
              AuthorizationType: AWS_IAM
Cors cors cors everywhere
Let me start by quoting the one and only Eric Johnson. If CORS had a face I would punch it in its nose that basically sums up my feeling around CORS.
First of all we need to ser CORS on our API, by specifying AllowMethods, AllowHeaders, AllowOrigin on our API resource, this will add OPTIONS allowing preflight fetching from the browser.
TenantAPi:
    Type: AWS::Serverless::Api
    Properties:
    ......
      Cors:
        AllowMethods: "'GET,PUT,POST,DELETE,OPTIONS'"
        AllowHeaders: "'Content-Type,Authorization,X-Amz-Date,X-Api-Key,X-Amz-Security-Token'"
        AllowOrigin: "'*'"
If you set a authorizer on the API resource and you don't explicit set AddDefaultAuthorizerToCorsPreflight: false authorization will be added to OPTIONS which in most cases will make the preflight fail generating a cors error in the browser.
But, since we use a proxy Lambda integration setting cors on the API is not enough. The Lambda function is responsible for setting and returning the cors headers, so we need to add them to the return in our functions as well.
return {
    "statusCode": 200,
    "body": json.dumps(response["Items"]),
    "headers": {
        "Access-Control-Allow-Origin": "*",  # Allow all origins
        "Access-Control-Allow-Headers": "Content-Type,Authorization",
        "Access-Control-Allow-Methods": "GET,POST,OPTIONS,PUT,DELETE",  # Allowed methods
    },
}
User authorization
In this part we slowly start to introduce APIs and for that we of course need some form of user authorization. We will use Lambda Authorizer on the public web application API. In the first version and fairly primitive functionality we will rely on the User Pool enriching the JWT token with a tenant ID.
Cognito Pre Token Generation
To add custom claims and enrich the JWT token we hook into the User Pool authentication flow and use the Pre Token Generation hook. Right now I'm using the version 1 of this hook which will add the claims to the ID Token. It was not that long ago that the possibility to customize the access token was added. In later parts we will expand on this and move over to version 2 of the event which will customize both the ID and access token.
During the process we will call the tenant API and fetch the tenant ID for the user and add this to the token.

Now, when using the version 1 event it's still only possible to add custom string values, it's not possible to add arrays, which I feel is a bit of a drawback.
For machine-2-machine authorization we will rely on AWS IAM, which means we need to sign our requests using sigv4.
import boto3
import os
import json
import requests
from requests_aws4auth import AWS4Auth

api_endpoint = os.environ.get("TENANT_API_ENDPOINT")

def handler(event, context):
    user_id = event["request"]["userAttributes"]["sub"]
    try:
        # Get AWS credentials
        session = boto3.Session()
        credentials = session.get_credentials().get_frozen_credentials()

        # Set up AWS4Auth using the credentials
        region = os.environ["AWS_REGION"]
        auth = AWS4Auth(
            credentials.access_key,
            credentials.secret_key,
            region,
            "execute-api",
            session_token=credentials.token,
        )

        response = requests.get(api_endpoint + "/tenants/" + user_id, auth=auth)

        if response.status_code == 200:
            tenants = response.json()["tenants"]

            event["response"]["claimsOverrideDetails"] = {
                "claimsToAddOrOverride": {"tenant": tenants[0]}
            }
            return event
        else:
            print(f"Error fetching tenant: {response.status_code}")

    except requests.RequestException as e:
        # Handle any exceptions that occur during the API call
        print(f"Error making API request: {str(e)}")

    return event
Custom Lambda Authorizers
To authorize the calls and ensure that the user making the call to fetch tenant data, actually has access to that tenant, we use a custom Lambda Authorizer on our API. We will rely on the User Pool adding the tenant ID to the JWT token during the authentication process. We will therefor decode the JWT token, and validate the signature of the token, and read out the tenant id from the token. The tenant ID in the token will then be checked against the tenant the user try to access. It's a bit primitive but it works for our current use-case.
In later parts of this series we will create a central authorization service that will validate and authorize calls in all parts of the system.
import os
import json
import jwt
from jwt import PyJWKClient


def handler(event, context):
  token = event["headers"].get("authorization", "")

    if not token:
        raise Exception("Unauthorized")

    token = token.replace("Bearer ", "")
    try:
        path_tenant_id = event["pathParameters"]["tenantId"]

        jwks_url = os.environ["JWKS_URL"]
        jwks_client = PyJWKClient(jwks_url)
        signing_key = jwks_client.get_signing_key_from_jwt(token)

        # Decode the JWT and validate the signature
        decoded_token = jwt.decode(
            token,
            signing_key.key,
            algorithms=["RS256"],
            audience=os.environ["AUDIENCE"],
        )

        token_tenant_id = decoded_token.get("tenant")

        if token_tenant_id == path_tenant_id:
            return generate_policy(
                decoded_token["sub"], "Allow", event["methodArn"], decoded_token
            )

    except Exception as e:
        print(f"Authorization error: {str(e)}")
        raise Exception("Unauthorized")

    # Generate a default policy that deny access
    return generate_policy(
        decoded_token["sub"], "Deny", event["methodArn"], decoded_token
    )

def generate_policy(principal_id, effect, resource, context):
    auth_response = {
        "principalId": principal_id,
        "policyDocument": {
            "Version": "2012-10-17",
            "Statement": [
                {"Action": "execute-api:Invoke", "Effect": effect, "Resource": resource}
            ],
        },
        "context": context,
    }
    return auth_response
Dashboard
We extend the dashboard with one more page that show the tenant information, and that have the possibility to set a new name on the tenant.

Get the code
The complete setup with all the code is available on Serverless Handbook
Final Words
This was a post where I go through part three in the series about connected BBQ as Saas and discuss tenants and tenant creation.
Check out My serverless Handbook for some of the concepts mentioned in this post.
Don't forget to follow me on LinkedIn and X for more content, and read rest of my Blogs
As Werner says! Now Go Build!

Top comments (1)
Awesome level of detail!