
In this blog, I will discuss how to build and release container image to Amazon Elastic Container Registry (ECR) using service that by the time this blog is released, the service is quite new which is Amazon CodeCatalyst.
Before continue further, I would like to explain briefly about Amazon CodeCatalyst. As referred from Amazon CodeCatalyst documentation:
Amazon CodeCatalyst is an integrated service for software development teams adopting continuous integration and deployment practices into their software development process. CodeCatalyst puts the tools you need all in one place. You can plan work, collaborate on code, and build, test, and deploy applications with continuous integration/continuous delivery (CI/CD) tools.
Scenario
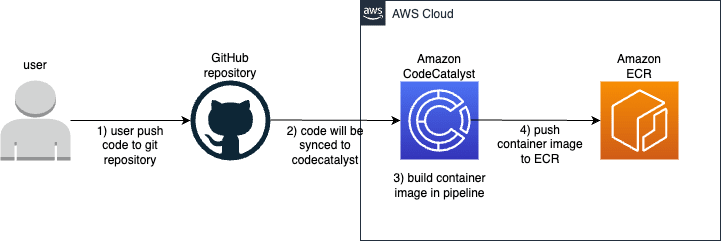
In this blog, I will discuss how to build and release container image with GitHub as source code repository. Then Amazon CodeCatalyst will run pipeline/workflow used for build and release container image, then later container image will be sent to ECR. The topology would be like this:
Prerequisites
- Before starting configuration, if you have not got AWS Builder ID account, please sign up first
- After sign up, go to Amazon CodeCatalyst web console to start project and configuration
- Create repository for container image in Amazon ECR
Configuration Steps
Amazon ECR Repository Configuration
In this blog, I created ECR repository using Terraform with remote backend (Terraform Cloud). ECR repository created with reference from terraform public module terraform-aws-modules/terraform-aws-ecr.
Below is file or directory structure used by Terraform codes:
└── ecr/
    └── region-name/
        ├── files/
        │   └── policies/
        │       └── expire-untagged-images.json
        ├── main.tf
        ├── resources.tf
        └── variables.tf
Here are the configuration steps:
-
Define Terraform configuration inside file main.tf. In this configuration, I declared remote backend (Terraform Cloud), workspace used by Terraform, provider and its version and also AWS region that declared from variable
########################### # Terraform Configuration # ########################### terraform { backend "remote" { hostname = "app.terraform.io" organization = "my-organization" workspaces { name = "my-ecr-workspace" } } } terraform { required_providers { aws = { source = "hashicorp/aws" version = "~> 5.11.0" } } required_version = ">= 1.3.0" } provider "aws" { region = var.aws_region } -
Define variable inside file variables.tf
variable "aws_region" { type = string description = "AWS Region" default = "ap-southeast-1" } -
Define ECR repository creation using public module reference as mentioned above. I also defined repository lifecycle policy so that untagged image will be expired after period amount of time. This configuration is defined in file resources.tf
#################### # ECR Repositories # #################### module "my_repository" { source = "terraform-aws-modules/ecr/aws" version = "1.6.0" repository_name = "my-repository" repository_lifecycle_policy = file("${path.module}/files/policies/expire-untagged-images.json") tags = { Name = "my-repository" "my:environment" = "my-environment" } } -
Policy file reference expire-untagged-images.json is contain this instruction
{ "rules": [ { "rulePriority": 1, "description": "Expire images older than 14 days", "selection": { "tagStatus": "untagged", "countType": "sinceImagePushed", "countUnit": "days", "countNumber": 14 }, "action": { "type": "expire" } } ] } -
Next commit and push terraform codes to the repository. After that run Terraform plan and Terraform apply from Terraform Cloud workspace so that infrastructures or resources can be provisioned. This activity will not be explained in detail and I will only show the simulation. If you are interested in how to configure Terraform Cloud workspace and how to run Terraform plans and apply for the provision of AWS resources, please check out my other blog post here.

Amazon CodeCatalyst Pipeline/Workflow Configuration
Before starting configuration, please make sure space on Amazon CodeCatalyst has been created. More details on space, please check Spaces in CodeCatalyst
-
Connect Amazon CodeCatalyst space with AWS account. In space page, go to menu Settings > AWS accounts. Click Add an AWS account button

-
Input required values such as AWS account ID, then display name. Next click Associate AWS account button

Next We will be redirected to Amazon CodeCatalyst page in AWS web console. Insert token that has been generated by CodeCatalyst (image for this is not displayed in this blog). Verify space has been connected
-
Back to AWS account page in CodeCatalyst web console, verify account has been connected as well

-
Add IAM role that will be used to run workflow. Go to account details page by clicking account name in previous point. Then click Manage roles from AWS Management Console button

-
In this blog, I created administrator IAM role because I just need for development only. On production environment, please bear in mind to always use least privileged method for security concern. Next, set role name and click Create development role button

-
Verify IAM role has been created

-
Go back to CodeCatalyst space page and create project by clicking Create project button

-
In this blog, I created project with bring your own code method. The codes has been stored in GitHub. Choose GitHub account that will be connected, then choose GitHub repository name. After that, set project name used by CodeCatalyst. If all set, click Create project button

-
Verify GitHub repository has been connected. In project page, go to menu Code > Source repositories.

-
Create environment that will be used by CI/CD workflow/pipeline. Go to menu CI/CD > Environment. Then click Create environment button

-
In Create environment page, input environment name, environment type and AWS account connection (optional). If all set, click Create environment button

-
Define CI/CD workflow/pipeline. CodeCatalyst need workflow definition file for pipeline creation. This file can be created by several methods, for example create via CodeCatalyst web console or using code/text editor. Further details about workflow in CodeCatalyst, please check CodeCatalyst documentation Workflows concepts

-
Before creating workflow file, I would like to inform that there are several pre-defined workflow definition files that has been provided. To check those files, go to menu Create workflow > in Actions section, find template file that suitable with your needs. In this blog, for example I will use pre-defined template for workflow push to Amazon ECR. This pre-defined template will help me to simplify build and push container image to Amazon ECR

-
We can see the details of each pre-defined template file. For example documentation about how to use, YAML preview etc. To see the details, click pre-defined template name and next will be redirected to detail page

-
We also can see the preview of YAML and also the details for example variables used by the template

Next You can adjust with your preference, whether you want to create configuration using visual editor on web console or using code/text editor
-
In this blog, I created configuration using code/text editor and I will explain the details of workflow file
# - I created workflow name build-container # - Workflow created using reference from pre-defined template `codecatalyst-labs/push-to-ecr@v1.0.1` with source from WorkflowSource which in this blog is GitHub repository # - Workflow will run in sandbox environment with AWS account reference as explained above and IAM role that associated within that account # - Define ECR repository name, image tag and AWS region Name: build-container SchemaVersion: "1.0" Actions: build-and-push-to-ecr: # Identifies the action. Do not modify this value. Identifier: codecatalyst-labs/push-to-ecr@v1.0.1 # Specifies the source and/or artifacts to pass to the action as input. Inputs: # Required Sources: - WorkflowSource # This specifies that the action requires this Workflow as a source # Required; You can use an environment, AWS account connection, and role to access AWS resources. Environment: Name: sandbox Connections: - Name: lanandra-sandbox Role: CodeCatalystWorkflowDevelopmentRole-lanandra-sandbox # Defines the action's properties. Configuration: # Required; type: string; description: The name to use for the repository. # The repository name may be specified on its own (such as nginx-web-app) # or it can be prepended with a namespace to group the repository into a category (such as project-a/nginx-web-app) RepositoryName: steampipe-container-agent ImageTag: v0.1.0 AWSRegion: ap-southeast-1 -
Run workflow. In this blog, I did not configured trigger event for workflow that can make workflow run automatically. Thus, I need to run the workflow manually. Go to menu CI/CD > Workflows. In tab Workflows, choose GitHub repository name, branch name and workflow name. Then in Action drop down list, choose Run

-
Next workflow will be running. Verify it by choosing workflow name as mentioned in previous point, then choose tab Runs

-
Go to workflow run. Verify run has been running and succeeded. Details of run can be seen inside tab Logs

-
Verify container image has been created and uploaded to Amazon ECR. Go to ECR service page, then go to repository used or defined in workflow

Summary
We have reached the last section of this blog. Here are some key takeaways that can be summarized:
- Amazon CodeCatalyst is service by AWS that provide Continues Integration/Continues Delivery or Deployment (CI/CD) in one place
- CodeCatalyst can be used as alternative for CI/CD engine/tools that have seamless experience if we want to deploy our application to AWS environment
- Currently there are some integration or template that can simplify user for creating CI/CD pipeline
Please check out my GitHub repository to see source code example that used in this blog:
- Terraform code for ECR creation: ecr
- Amazon CodeCatalyst workflow: codecatalyst
Please comment if you have any suggestions, critiques, or thoughts.
Hope this article will benefit you. Thank you!

Top comments (0)