In this two part series I am going to explore how to develop chrome extensions. The easiest way to get this tutorial going is to say that there are two things we can do with an extension. We can have it change the behaviour of the websites we visit or have it be a small web app in it's own right.
Looking through the extensions I have installed, two that explain what I mean are, the adblocker and 1passport. Whilst their development is far from the scope of this tutorial, adblocker basically changes the behaviour of the actual site we visit (by removing adverts), and 1passport is just a little window that pops up, it could be a website in it's own right.
The extension we are going to build today is something which is going to block websites which might make you prograstinate. The point is not to actually make a production ready extension, but, playfuly, highlight how extensions can be created.
Setting up
Every extension needs a manifest.json file. For now it can be as simple as this:
{
    "manifest_version": 2,
    "name": "SomeName",
    "description": "To stop you from waisting time",
    "version": "1.0",
}
All that is generic, it gives users information about our extension. So it's like what package.json is to node apps or even the metadata at the top of the main stylesheet in wordpress themes.
manifest_version field is required and used by Chrome internally. It used to be required to be set at 1 now to 2. As stated in the documentation version 1 is deprecated as of Chrome 18. Which of course means if your target audience can't upgrade you'd use 1.
Install the extension
Whilst we haven't created anything yet, the manifest.json file gives enough information for chrome to recognise it as an extension.
In your browser, navigate to chrome://extensions/ then enable Developer mode and finally select Load unpacked extension which will enable you to upload the folder in which the above manifest file is at.
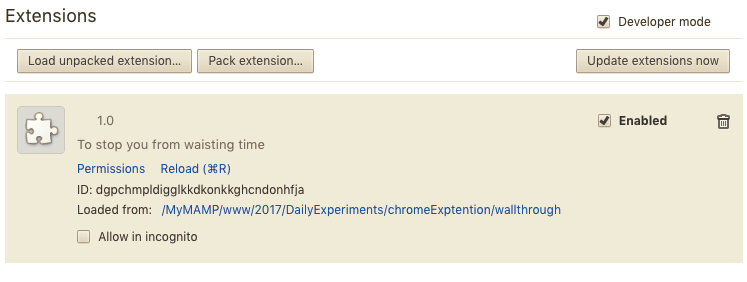
The end result is something like this:
Note the version number and the description correspond to the manifest file. Also note that you could add your own icon, which I haven't specified here, it can be done by adding an icon field to the JSON file
{
    ...
    "icons": {
        "16": "icon16.png",
        "48": "icon48.png",
        "128": "icon128.png"
    }
}
The icon sized 16 would go on the extensions bar, the 48 would go on the the extensions page (replacing the above placeholder), as for the 128, probably in the extensions store.
From now on, as we build on the extension, you will just need to reload the extension (see the screenshot for the reload link) when ever you might want to test your progress.
Let's start building the conCrastinator
Everything we intend to do has to be specified in the manifest.js, so just edit it by adding the following.
"content_scripts": [
    {
        "matches": [
            "*://*.facebook.com/*",
            "*://*.twitter.com/*"
        ],
        "js": ["myscripts.js"]
    }
]
We are telling chrome that this extension should run only when visiting any page on the facebook and twitter pages. Then myscripts.js should be run.
Now we just need to create the myscripts.js file and add anything we want in there. Anything that you can do in the browser's console can go here. A fun and useless ego booster could be this for twitter:
document.querySelectorAll('.ProfileCardStats-stat')[2]
    .querySelector('.ProfileCardStats-statValue').innerHTML = '34K'
When you then visit twitter, you'd get this:
You'll be like "Meh, overnight success is so yesterday" (you could even add a timer where that number increases every week).
Anyway, scrap that, this is the actual code we want in the myscripts.js file:
document.body.innerHTML = `
<!doctype html>
<html>
  <body>
<div class="wrap"
style="background-image: url('${chrome.runtime.getURL("danger.jpeg")}')">
        <h1>Get back to work you little ...</h1>
</div>
  </body>
</html>`
Just like your everyday JavaScript. When you visit facebook or twitter, you are going to get a blank page with the text "Get back to work you little ..." (fill in the blanks).
Styling the page
The page is now missing styling. This is what I want the end result to look like:
(Image taken from unsplash)
To achieve that we need a style sheet and an image. Again as with the JavaScript file, we have to edit the manifest.json to inform chrome that it should access more files.
"content_scripts": [
    {
        ...
        "css": ["mystyles.css"]
    }
],
"web_accessible_resources": [
    "danger.jpeg"
]
With that mystyles.css just runs after the page loads and the one image we want access to needs to be specified in web_accessible_resources. Of course we can use wild cards such as *.jpg and anything can be added in there - custom fonts and all that good stuff.
There's no point in printing the css here, you can see it in the repo, but basically any css which we write in mystyles.css is applied to the page
However, we are unable to use the the image in the css file, but we can access it through js like so:
chrome.runtime.getURL("danger.jpeg")
Hence, I simply edited the JavaScript code where I apply an inline background-image style:
<div class="flex-container"

    style="background-image: url('${chrome.runtime.getURL("danger.jpeg")}')">
Conclusion
There you have it. That is part one of developing Chrome extensions. Remember that whilst developing and testing the extension you will need to reload the extension to reflect the changes.
In part two we'll create an extension where an icon has to be clicked in order to open a pop-up window.
You can get the code over at github


Oldest comments (4)
I've been curious about Chrome extensions for some time, will make sure to add this article to my reading list! I'll let you know how it went if I give it a try.
Nice writeup. helped a lot
content scripts are executed only after the content of the web-pages is loaded completely, how can I execute while the page loading time
And I am curious to know how can I set up preloaders in any websites using chrome extensions?
Thanks :)