
Introduction
In this article, we will discuss how to create an AWS lambda function to send Slack notifications when the CPU utilization of an AWS instance reaches 50%.
AWS Lambda is a serverless compute service offered by Amazon Web Services (AWS). It lets you run code without having to provision or manage servers yourself.
It is event-driven i.e. your code executes in response to events triggered by other AWS services like a file upload completed in s3, an HTTP request from Amazon API Gateway or various other triggers.
In this, we will be discussing how to set up Amazon Cloudwatch to monitor and collect metrics from an EC2 instance, Cloudwatch alarms based on those metrics to trigger a notification when a certain threshold or condition is met, Amazon Simple Notification service to receive these notifications and finally a lambda function subscribed to the SNS topic, which will process the notification and send a slack message.
Prerequisite
To follow along with this, the reader should have basic knowledge and understanding of
- Golang
- AWS and its services ### Setting up the project First, we will start by writing out the function to send these notifications to Slack.
Create a new go project and call it whatever you want, I called mine “lambdaFunction” in your main.go file, paste the following piece of code
import (
   "bytes"
   "context"
   "encoding/json"
   "fmt"
   "github.com/aws/aws-lambda-go/events"
   "github.com/aws/aws-lambda-go/lambda"
   "net/http"
)

type slackMessage struct {
   Text string `json:"text"`
}

func handleRequest(ctx context.Context, snsEvent events.SNSEvent) error {
    webhookURL := "https://hooks.slack.com/services/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"
    for _, record := range snsEvent.Records {
        snsRecord := record.SNS
        sendSlackNotification(webhookURL, snsRecord.Message)
    }
    return nil
}

func sendSlackNotification(webhookURL, message string) {
   slackMessage := slackMessage{Text: "Cpu usage is above 50%" + message}
   slackBody, _ := json.Marshal(slackMessage)
   req, err := http.NewRequest(http.MethodPost, webhookURL, bytes.NewBuffer(slackBody))
   if err != nil {
      fmt.Printf("Error creating request: %v\n", err)
      return
   }
   req.Header.Set("Content-Type", "application/json")

   client := &http.Client{}
   resp, err := client.Do(req)
   if err != nil {
      fmt.Printf("Error sending request: %v\n", err)
   }
   defer resp.Body.Close()
   if resp.StatusCode != http.StatusOK {
      fmt.Printf("Error response from slack: %v\n", resp.StatusCode)
   } else {
      fmt.Printf("Successfully sent Slack notification: %v\n", resp.StatusCode)
   }
}


func main() {
   lambda.Start(handleRequest)
}
Run go mod
Let's try to understand what going on
The handleRequest function
- First, we create a struct named
slackMessageto represent the message format sent to Slack, it has a single field Text which holds the message content - The handleRequest function is the main function executed by the lambda runtime. It takes in two argument context and
snsEvent events.SNSEventcontaining details about the incoming SNS notification. - The function iterates through each snsRecord within the snsEvent, it retrieves the message content from the sns.message field and calls
sendSlackNotificationwith the slack webhook URL and the message content
sendSlackNotification function
- This function takes two arguments
webhookURL: the URL where the Slack notifications are sent andmessage: the message content to be sent to Slack. - I provided a predefined message “cpu usage is above 50%” appended to the provided message.
It then marshals the the slackMessage struct into JSON format using
json.marshal. - An HTTP post request is created using
http.NewRequestwith the slack webhook URL, the JSON formatted body and the content type header set toapplication.json*Therequestis sent using an http.client and the response is received The main function is only used for local testing. In a lambda environment lamba.start function is automatically called with handleRequest as the entry point
Getting slack webhook URL
To obtain the Slack webhook URL that allows you to send messages to Slack, navigate to https://api.slack.com/apps. Make sure you are signed in to your Slack account before proceeding.
- Click on “Create new app” on the top right side A dialog box will appear. Select "From scratch" to create a new app. Following that, another dialog box will pop up. Here, you can name your app "cpu-alert" and then choose the specific Slack workspace where you want the messages to be sent. I already created a test workspace “site reliability test”
- Click “Create app”
- In the “Add features and functionality” section select “Incoming webhooks”
- Toggle the activate incoming webhook button to “on” Navigate back again and scroll to the “install app section”
- Click "install to Workspace" then we will choose the channel we want Slack to send messages to. Then click allow.
- Go back to “Add features and functionality” and select “Incoming webhooks”
- Scroll down to find our webhook URL, then copy and paste it into our code.
The next step is to create a deployment package for our Go app
We will build the application.
- Open a terminal in the project's working directory.run
GOOS=linux go build -o main main.go - Create a ‘bootstrap’ file Create a file named ‘bootstrap’ in the project root directory with the following content ```
!/bin/sh
./main
Make the bootstrap file executable
* Run `chmod +x bootstrap`
* Zip the executable and the bootstrap file by running `zip function.zip main bootstrap`
Uploading the lamba function
* Navigate to the AWS management console
* Search for lambda, and create a new function
* Give it a name of your choice
* Select “Author from scratch”
* For the runtime, select Amazon linux 2023
* Click select function
* When the function is done creating scroll down and locate the “Upload from” option
* Select your function.zip file NOT the entire folder containing the code
* Save it
* Locate the runtime setting section and click on edit
* Set the handler to bootstrap and save it
In the next step, we'll configure a trigger for the Lambda function. This trigger defines the event that will prompt the function to send a message to Slack
As I mentioned earlier that trigger will be when cpu usage of a virtual machine is >= 50%
To achieve this functionality, the first step involves creating an EC2 instance.
When this is done we need to configure Cloudwatch to monitor and collect metrics
* Search for Cloudwatch and open it
* Select create alarms
* Choose Select metrics
* Select ec2
* Select per instance metrics
* Select CPUUtilization metric
In the condition section
* Select Greater/Equal for the threshold
* Define the threshold value as “50”
* Click next
On the next page locate the notification section
* We will leave the alarm state trigger as it is “In Alarm”
* Select the “create new topic” option
* Enter a unique name, you can also enter an email to receive notifications
* Select Create topic
* On the next page enter a unique alarm name
Then create alarm
We will head back to our lambda function
* Select “add trigger”
* In the “Select a source” field, Search for "sns" and select it
* Select the topic you created earlier and click "add"
### Testing
We’ve finished putting together the different parts of our simple infrastructure, now it's time to test.
To test that this works, we need to put our VM under a sort of stress test. This test generates a high CPU load. To perform this test we are going to be using the “stress” tool in linux.
First and foremost we need to install "stress" tool in our EC2 inatance.connect to the EC2 instance and Run the following commands
`sudo apt-get update`
`sudo apt-get install stress`
Use the following command to stress test your CPU
`stress --cpu 4 --timeout 300`
This example uses 4 CPU workers(number of parallel processes or threads) for 300 seconds(5 mins). You can adjust the number of workers and seconda as it suits you.
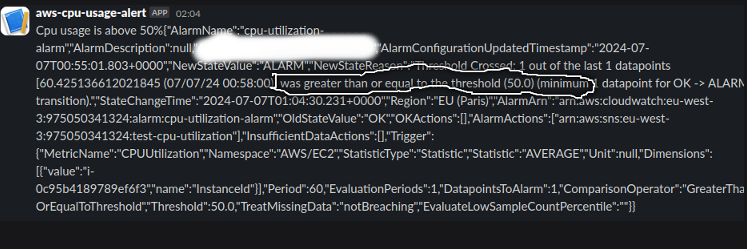
Open Slack and wait you should get an alert that looks like this
### Common Errors you might Encounter
While running your stress test, you might notice the state of Cloudwatch change to “insufficient data” which might cause the alarm to delay for a bit. To fix this
* Open the Cloudwatch console
* Navigate to alarms and select your specific alarm
* Click on action then edit
* Scroll down to the missing data treatment section
* Select “Treat missing data as ignore(maintain the current state)”
* Save the alarm
### Conclusion
So far, we have explored how to write and set up a simple Lambda function in Go. Additionally, we’ve configured CloudWatch to monitor and collect metrics, set up CloudWatch alarms to trigger when specific thresholds are met, and established an SNS topic to receive these alarms. The purpose of the SNS topic is to trigger our Lambda function, which sends a Slack message.
I trust you found this enjoyable and informative. Should there be any errors or if any part was not explained clearly or you think I missed something, please feel free to reach out. Your feedback is highly valued. Thank You!
the link to the github repository is found [Here](https://github.com/audu97/lambdaFunction)

Top comments (0)