Welcome to Week 3 of the COVIDiary project! If you’re just joining us or missed a post, here’s what we’ve done so far:
This week, our focus will be on the back end. All work will be completed in the COVIDiary-api repository. By the end of today, we will:
- Create our Rails API
- Initialize the PostgreSQL database
- Add User and Entry models
- Seed the database with dummy data
1. Create the Rails API
Because we are only using rails for the back end of our application, there are many unnecessary files included in the usual rails new command. Fortunately, we can add the --api flag to our command to reduce some of that bloat and properly configure our back end to cooperate with our React front end (more on that next week, hopefully). We will also add an additional flag, --database=postgresql so our API knows we want to use PostgreSQL for our database.
In your terminal, make sure you are in the /CD-api directory. Then, enter the following command:
rails new . --api --database=postgresql
It may take a few seconds, but you’ll soon see Rails automatically created a whole host of files for you. Time for a mini dance party!

2. Database Initialization
Now, let’s get our database up and running. This is an easy one. In your terminal, enter:
rails db:create
3. Add User Resource
Our database needs users. For the moment, we’re going to create a User resource with all the demographic information we want. When we set up authentication with Auth0 in a future post, we will have to tweak the User table slightly, but we’ll cross that bridge when we get there.
For now, run the following command:
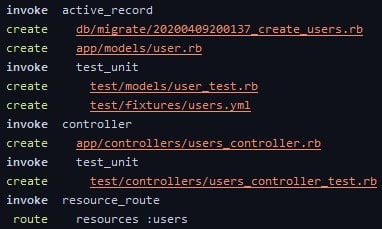
rails g resource user
You should see something along these lines:

Now, open that create_users migration file you just created (the first one in the screenshot). We’re going to add some information to our User table.
class CreateUsers < ActiveRecord::Migration[6.0]

  def change

    create_table :users do |t|

      # basic user info

      t.string :name

      t.string :email

      t.string :first_name

      t.string :last_name

      t.datetime :birth_date

      # info more specific to COVID-19

      t.string :occupation

      t.boolean :essential?

      t.datetime :isolation_start

      t.datetime :isolation_end

      t.text :about


      t.timestamps

    end

  end

end
Once you’ve got all the table columns entered, run rails db:migrate to add the User table to your database. You should see something like this:

4. Add Entry Resource
Next, we’ll repeat the process for our Entry resource. The Entry table will store all the diary entries created on our application. Each entry will belong to a specific User.
rails g resource entry user:references
By including user:references, Rails did some extra configuration for us. Your models/entry.rb file should look like this:
class Entry < ApplicationRecord

  belongs_to :user

end
We still need to add the corresponding has_many association in the models/user.rb file, like this:
class User < ApplicationRecord

  has_many :entries

end
Now, let’s add some extra information to our create_entries migration:
class CreateEntries < ActiveRecord::Migration[6.0]

  def change

    create_table :entries do |t|

      t.references :user, null: false, foreign_key: true


      # user personal assessments

      t.integer :health_rating

      t.boolean :symptoms_present?

      t.text :health_comments

      t.integer :mental_health_rating

      t.text :mental_health_comments


      # actual diary entry

      t.text :diary_entry

      t.timestamps

    end

  end

end
Once that’s done, run rails db:migrate again to add your Entry table to the database.
5. Seed the Database
Woo! We have a database! Unfortunately, it’s empty. Let’s fix that by seeding it with some dummy data.
First, we need to add the Faker gem so we can easily populate the database with random information. Add gem ‘faker’ to your Gemfile and run bundle install in your terminal. Next, open up your seeds.rb file. At the very top, we need to add require ‘Faker’ so our new gem will work.
We are going to create 10 users with 3 entries each, using loops.
# create 10 Users

10.times do

  user = User.create(

      email: Faker::Internet.safe_email,

      first_name: Faker::Name.first_name,

      last_name: Faker::Name.unique.last_name,

      birth_date: Faker::Date.between(from: 100.years.ago, to: Date.today),

      occupation: Faker::Job.title,

      essential?: Faker::Boolean.boolean,

      isolation_start: Faker::Date.between(from: 3.months.ago, to: Date.today),

      about: Faker::Lorem.paragraphs(number: 2))

  # create 3 diary Entries for user

  3.times do

    Entry.create(

        health_rating: Faker::Number.between(from: 1, to: 5),

        symptoms_present?: Faker::Boolean.boolean,

        health_comments: Faker::Lorem.paragraphs(number: 1),

        mental_health_rating: Faker::Number.between(from: 1, to: 5),

        mental_health_comments: Faker::Lorem.paragraphs(number: 1),

        diary_entry: Faker::Lorem.paragraphs(number: 4),

        user_id: user.id)

  end

end
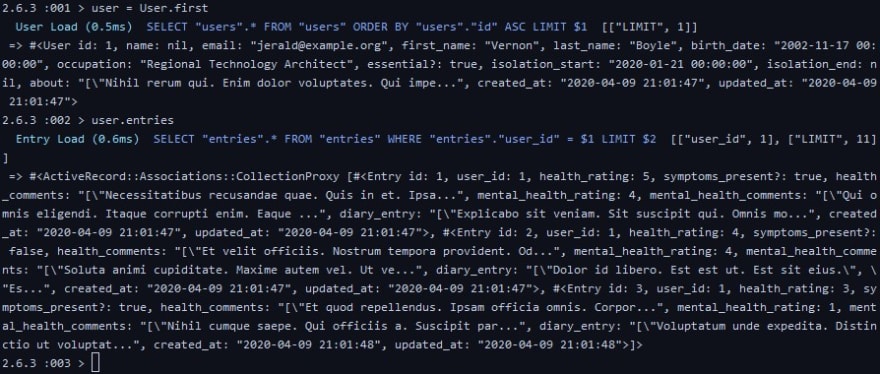
Now, run rails db:seed in your terminal! To check that it worked, open the Rails console using rails c. You can see all the users in your database by entering User.all. I just wanted to see the first user and its entries. Here’s my console:

Coming Up
Okay, friends, we’re making progress! Next week, we’ll delve into user authentication and HOPEFULLY start building the front end. I had to take care of some family things this week, so I didn’t have as much time as I’d have liked for our little project.
I will talk to you all soon. In the meantime, stay safe and healthy!


Top comments (0)