
Docker has made the life of a Software engineer easy. The whole "It was working on my machine" problem has a one-stop solution. Docker has introduced a way of standardizing the isolation of software into a container. This isolation helps developers to define dependencies and have predictable behavior of the developed software.
For many developers today Docker is a defacto standard to build a containerized application. But what makes Docker so good at what it does. Docker uses virtualization to accomplish the isolation of software from other processes.
Let's see how OS runs on the system:
The kernel is the central module of an Operating System. It is the part of the operating system that loads first and remains in the main memory. Processes running on the system communicate with the kernel that in turn talks with the hardware.
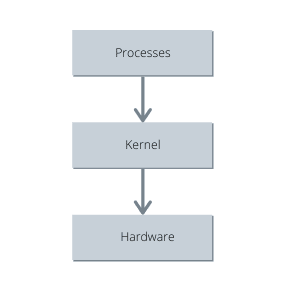
Processes talks using System calls. A System call commonly knowns as syscalls is a programmatic way in which a process or a computer program requests a service from the kernel of the operating system on which it is executed. Using Namespaces we can segment out harddrive to have different versions or isolated resources per process or a group of processes.
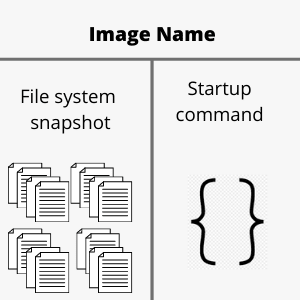
Docker leverages these techniques to isolate the software from the underlying hardware. Docker works by making images of the software in a container with the required amount of dependencies and hardware, required to run the software not more or less. Images are basically a snapshot of the filesystem, a Startup command, and the required dependencies in a closed and concealed container providing developers to expect predictable behavior of the environment the software is running in.
One can create a Docker image using a Dockerfile. Dockerfile is a set of instructions that leads to the creation of a Docker image and later on, can be used to create any number of Docker containers to run the application. As the set of instructions remains the same after the creation of the image it's behavior remains unchanged.
Building a Doker image is fairly simple if one knows what is required for the piece of code to run perfectly. One can follow the steps and can create Docker images with ease.
What is a Docker image
Docker image is more like a blueprint for creating containers of sorts. We can compare it with java classes only with memory allocated to the images on the hard drive. These images act as a template or basis to create a docker container which actually runs the application.
How to create a Docker Image:
#Dockerfile

FROM node:alpine     # Getting the base image

WORKDIR "/app".      # Specifying the working Directory

COPY package.json .  # Copying the required files

RUN npm install      # Installing the Dependencies/ Running some configuration

COPY . .             # Copying the rest of the code

CMD ["npm", "start"] # Specifying the Startup command
Getting the base image
It is the most important step of the docker image creation process to define the base image. This helps us to leverage the benefits of using an already built image of sorts. In the above example, I have used a Node image to start with. The node image is pulled from a public repository called the Docker Hub. By using a node image I don't have to do the manual work of installing node into my image it is preconfigured by the node image provider.
The FROM command takes in the name of an image and the tag if we want to specify. By default, if not specified the docker daemon pulls up the latest version of the image available. We can specify different tags that are available to us on the Dockerhub. The syntax is:
FROM <image_name>:<image_tag>
Alpine Linux is a Linux distribution built around musl lib and busybox. The size of an Alpine image is about 5MB and has access to a package repository making it a great image base for utilities. We could have used an Alpine image as a base image and then installed node into it, but it would increase the number of lines we. need to write in the docker file.
Specifying the working Directory
Specifying a working directory is such a handy tool to avoid conflict between the filesystem snapshots file names and user-specified file names. A working directory can be specified at any point in time in the Dockerfile, after which every command we specify for example COPY or RUN or CMD will be executed only in the specified working directory.
Suppose we have a file named lib in our application which is very common and if we copy the code into the root directory of our docker image the lib folder will override the filesystem's lib folder creating conflict and unexpected behavior. It is recommended to specify a working directory to separate application files and fS files.
We can specify a working directory using this syntax:
WORKDIR /app #Or any folder name you want to give
Copying the required files
While copying the files into the docker image we can directly copy the whole project into the image or we can copy only the files required to install the dependencies into the image FS.
We might not understand the signification of this step first time, but when we rebuild the image docker uses the cache to rebuild the image and only executes the steps after something is modified.
We generally don't change the dependencies and therefore it is not required to install the dependencies every time we rebuild the image. Although if we copy the entire project it will force docker to reinstall dependencies as the code we write changes.
It is wise to copy files like package.json beforehand and install the dependencies as they change less frequently.
We can use the COPY command to copy the files
COPY <file in the system> <copy location>
"." is a wildcard that can be used to copy all the files in the current directory.
Running configuration
Using this step we can certain commands in the docker image such as installing dependencies or getting something from the internet. This step helps us to do anything in the image which we would generally do in our local machine to make sure that our program runs properly.
We can make use of RUN command to run the configuration or any other command such as npm install.
RUN npm install
Specifying Startup command
This step is a crucial step for the creation of a docker image as it specifies the default command which is to be used while creating and starting the container. The Startup command is what docker runs when we create a container out of a Docker image and try to run it. We can specify the startup command using CMD command.
CMD npm start
This can be anything such as java -jar myjar.jar if we want to execute a jar as our primary command
Command to create a docker image from a Dockerfile:
$ docker build -t <tag> <build-context>
We can create a docker image using the above syntax in the terminal. The -t flag helps us to specify tags to the created image for later use. We can start the container using the tags we specify while building the image.
Command to run a Docker image
$ docker run <image_id>
OR
$ docker run <tag>
When we build an image in docker we get back an image id which can be used to fire up a container. we can also use the tag we used while building the image. If the Docker daemon doesn't find an image with the specified tag, It will look into docker hub repo for the tagged image. If an image is found on the Dockerhub docker will pull that image and start a container from it.
Conclusion
This is just a gist of what Docker has to provide. This blog is just for getting started with Docker. There is a lot more that we can do by leveraging the features and tools provided by Docker.

Top comments (0)