
Getting Started with APIs
An API, or Application Programming Interface, is a server that we can use to retrieve and send data to using code. APIs are most commonly used to retrieve data, and that will be the focus of this beginner tutorial.
When we want to receive data from an API, we need to make a request. Requests are used all over the web. For instance, when you visited this blog post, your web browser made a request to the iRead web server, which responded with the content of this web page.
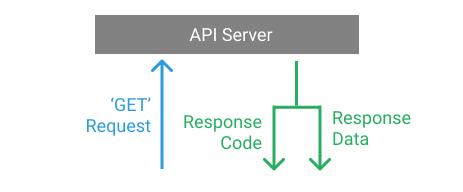
API requests work in exactly the same way – you make a request to an API server for data, and it responds to your request.
Making API Requests in Python
In order to work with APIs in Python, we need tools that will make those requests. In Python, the most common library for making requests and working with APIs is the requests library. The requests library isn’t part of the standard Python library, so we need to install it to get started.
We can install requests using the following command:
pip install requests
nce you’ve installed the library, you’ll need to import it. Let’s start with that important step:
import requests
Now that we’ve installed and imported the requests library, let’s start using it.
Making Our First API Request
There are many different types of requests. The most commonly used one, a GET request, is used to retrieve data. Because we’ll just be working with retrieving data, our focus will be on making ‘get’ requests.
When we make a request, the response from the API comes with a response code which tells us whether our request was successful. Response codes are important because they immediately tell us if something went wrong.
 To make a ‘GET’ request, we’ll use the
 requests.get() function, which requires one argument — the URL we want to make the request to. We’ll start by making a request to an API endpoint that doesn’t exist, so we can see what that response code looks like.
response = requests.get("https://api.open-notify.org/this-api-doesnt-exist")
The get() function returns a response object. We can use the response.status_code attribute to receive the status code for our request:
print(response.status_code)
404
The ‘404’ status code might be familiar to you — it’s the status code that a server returns if it can’t find the file we requested. In this case, we asked for this-api-doesnt-exist which (surprise, surprise) didn’t exist!
Let’s learn a little more about common status codes.
API Status Codes
Status codes are returned with every request that is made to a web server. Status codes indicate information about what happened with a request. Here are some codes that are relevant to GET requests:
-
200: Everything went okay, and the result has been returned (if any). -
301: The server is redirecting you to a different endpoint. This can happen when a company switches domain names, or an endpoint name is changed. -
400: The server thinks you made a bad request. This can happen when you don’t send along the right data, among other things. -
401: The server thinks you’re not authenticated. Many APIs require login ccredentials, so this happens when you don’t send the right credentials to access an API. -
403: The resource you’re trying to access is forbidden: you don’t have the right permissions to see it. -
404: The resource you tried to access wasn’t found on the server. -
503: The server is not ready to handle the request.
You might notice that all of the status codes that begin with a ‘4’ indicate some sort of error. The first number of status codes indicate their categorization. This is useful — you can know that if your status code starts with a ‘2’ it was successful and if it starts with a ‘4’ or ‘5’ there was an error. If you’re interested you can read more about status codes here.
Working with JSON Data in Python
JSON (JavaScript Object Notation) is the language of APIs. JSON is a way to encode data structures that ensures that they are easily readable by machines. JSON is the primary format in which data is passed back and forth to APIs, and most API servers will send their responses in JSON format.
You might have noticed that the JSON output we received from the API looked like it contained Python dictionaries, lists, strings and integers. You can think of JSON as being a combination of these objects represented as strings.
[
    {
        "model": "core.post",
        "pk": 25,
        "fields": {
            "title": "5 Quick Python Projects",
            "slug": "5-quick-python-projects",
            "timestamp": "2021-05-29T14:32:58.787Z"
        }
    },
    {
        "model": "core.post",
        "pk": 24,
        "fields": {
            "title": "What is Bitcoin or Cryptocurrency and how does it work? ",
            "slug": "what-is-bitcoin-or-cryptocurrency-and-how-does-it-work",
            "timestamp": "2021-05-28T11:42:59.758Z"
        }
    }
]
Python has great JSON support with the json package. The json package is part of the standard library, so we don’t have to install anything to use it. We can both convert lists and dictionaries to JSON, and convert strings to lists and dictionaries. In the case of our ISS Pass data, it is a dictionary encoded to a string in JSON format.
The json library has two main functions:
-
json.dumps()— Takes in a Python object, and converts (dumps) it to a string. -
json.loads()— Takes a JSON string, and converts (loads) it to a Python object.
Using an API with Query Parameters
The https://api.open-notify.org/astros.json endpoint we used earlier does not take any parameters. We just send a GET request and the API sends back data about the number of people currently in space.
It’s very common, however, to have an API endpoint that requires us to specify parameters. An example of this the https://api.open-notify.org/iss-pass.json endpoint. This endpoint tells us the next times that the international space station will pass over a given location on the earth.
If we look at the documentation, it specifies required lat (latitude) and long (longitude) parameters.
We can do this by adding an optional keyword argument, params, to our request. We can make a dictionary with these parameters, and then pass them into the requests.get function. Here’s what our dictionary would look like, using coordinates for New York City:
parameters = {
    "lat": 40.71,
    "lon": -74
}
We can also do the same thing directly by adding the parameters directly to the URL. like this: https://api.open-notify.org/iss-pass.json?lat=40.71&lon;=-74.
It’s almost always preferable to setup the parameters as a dictionary, because requests takes care of some things that come up, like properly formatting the query parameters, and we don’t need to worry about inserting the values into the URL string.
Let’s make a request using these coordinates and see what response we get.
response = requests.get("https://api.open-notify.org/iss-pass.json", params=parameters)

print(response.json())
{
    'message': 'success',
    'iss_position': {
         'longitude': '-173.5025',
         'latitude': '-50.8654'
    },
    'timestamp': 1622818043
}
API Example : Getting Vaccination Appointment Availability using Co-WIN API
Since, we have now learnt what APIs are and know how to use requests library to make API calls, let us test our knowledge with a real example.
Suppose we are building a web app where we want to show users the current available slots for vaccination in a particular PIN Code to the user. For this, we need to fetch data from the API built by API Setu and process it accordingly.
Let's implement this. For this, first we need to import the requests library as :
import requests
The Base API provided by API Setu is : https://cdn-api.co-vin.in/api and the API endpoint we need to fetch is : /v2/appointment/sessions/public/findByPin
We also need to pass two required parameters : pincode and date. As discussed above, we can pass them as :
parameters = {
    "pincode": 823003,
    "date": "05-06-2021"
}
Let us also create a function that accepts json data as argument and prints the same data in a way that is easier to read and understand.
def print_json(data):
    text = json.dumps(data, sort_keys=True, indent=4)
    print(text)
Now that we have our endpoint, parameters and print function ready, we are ready to make the API call :
import requests
import json

def print_json(data):
    text = json.dumps(data, sort_keys=True, indent=4)
    print(text)

parameters = {
    "pincode": 823003,
    "date": "05-06-2021"
}

response = requests.get(
    "https://cdn-api.co-vin.in/api/v2/appointment/sessions/public/findByPin", params=parameters)

print_json(response.json())
The above code has nothing different than what we have discussed above. We're making a GET request on the API with our parameters and then passing the JSON response to the print_json function that makes the output readable.
Our response looks like :
{
    "sessions": [
        {
            "address": "CHC Manpur",
            "available_capacity": 188,
            "available_capacity_dose1": 94,
            "available_capacity_dose2": 94,
            "block_name": "Manpur",
            "center_id": 589831,
            "date": "05-06-2021",
            "district_name": "Gaya",
            "fee": "0",
            "fee_type": "Free",
            "from": "09:00:00",
            "lat": 24,
            "long": 85,
            "min_age_limit": 45,
            "name": "CHC Manpur Covaxin",
            "pincode": 823003,
            "session_id": "61952335-bb69-4fc9-82a0-89f36cd2be3b",
            "slots": [
                "09:00AM-10:00AM",
                "10:00AM-11:00AM",
                "11:00AM-12:00PM",
                "12:00PM-03:00PM"
            ],
            "state_name": "Bihar",
            "to": "15:00:00",
            "vaccine": "COVAXIN"
        },
        {
            "address": "CHC Manpur",
            "available_capacity": 0,
            "available_capacity_dose1": 0,
            "available_capacity_dose2": 0,
            "block_name": "Manpur",
            "center_id": 563407,
            "date": "05-06-2021",
            "district_name": "Gaya",
            "fee": "0",
            "fee_type": "Free",
            "from": "09:00:00",
            "lat": 24,
            "long": 85,
            "min_age_limit": 45,
            "name": "CHC Manpur Covishield",
            "pincode": 823003,
            "session_id": "a26a5fb8-fcb3-41af-b5f7-c3175ab7d679",
            "slots": [
                "09:00AM-10:00AM",
                "10:00AM-11:00AM",
                "11:00AM-12:00PM",
                "12:00PM-03:00PM"
            ],
            "state_name": "Bihar",
            "to": "15:00:00",
            "vaccine": "COVISHIELD"
        }
    ]
}
The response is a dictionary that has a key sessions and its value is a list of available slots.
You can check other APIs from API Setu here.
Conclusion
In this tutorial, we learned:
- What an API is
- Types of requests and response codes
- How to make a get request
- How to make a request with parameters
- How to display and extract JSON data from an API
These fundamental steps will help you to start working with APIs. Remember that key to each time we used the API was to carefully read the API documentation and use that to understand what request to make and what parameters to provide.
Try working with some data from this list of Some Unique and Fun APIs — we recommend selecting an API that doesn’t require authentication as a good first step.


Top comments (0)