
Writing code is always a wonderful feeling! But what about when the front end we build doesn't work the way it should? Several things come to mind: Is my logic right? Did I program it correctly?
Many of us programmers suffer from the much-feared code anxiety, and we want to get to the tools before thinking about the solution. And there are interface tests for that. With them, we can easily propose a logic for our page even before it was built. And that we call TDD (
Test Driven Development) and this can make our code extremely more functional and performance.
In this article, we will take the first steps of a TDD using the Jest tool, well known among Javascript programmers.
The React programmer routine
Let's start by creating our project from the famous create-react-app, it will help us speed things up with the ready configuration of Webpack and Babel, in addition to having Jest already included in its package. Open your terminal and start a project with create-react-app with the name tdd:
# With npm
npm i -G create-react-app
npx create-react-app tdd


# With yarn
yarn global add create-react-app
yarn create react-app tdd
We will use the standard structure and thus create a folder inside the src called tests that will keep our tests. Create-react-app already has a test file but you can delete it as we will build it from the beginning as well. Our structure will look like this:

Creating our first test and understanding Jest
In the tests folder, we will create our first test. By convention, the tests must have the same name as the component to be tested, and have the extension .test.js, that is, we will create a file called App.test.js and in it, we will import 3 modules that follow below.
import React from "react";
import { render } from "@testing-library/react";
import App from "../App";
We import React, our App component and the render method from the react-testin-library, an implementation of react to render components in an isolated environment and will basically work like the common render of the application.
Test format
The construction of a test file is based on two premises, a test suite and the tests related to it. The test suite refers to the functional set of activities for that component and the tests would be its unitary functionality. The code structure that differs the two is as follows:
// Describe is a test suite
describe("Testing app functionalities", () => {

// It is an individual test
  it("renders learn react link", () => {

  });
});
The separation of both helps to inform, in cases of several test files, which set of your application is failing, facilitating the correction if necessary.
Rendering and testing
The first thing to add to our file is the render method to fetch our component. This can be done by calling the method, and for that, we can search for elements in several possible ways. The most widely used of these is getByText which automatically searches for inserted text. We also have getByTextId that looks for the data-testid attribute that we can insert into elements in our own component:
    const { getByText } = render(<App />);
    // Search in component the 'Learn React' text
    const learReact = getByText("Learn React");
Understanding the expect
Jest provides us with a tool called expect() that would be conditional for our test to pass or not. The official documentation of jest has several parameters that can be used with expect. We will use one of them, .toBeVisible(). Our App.test.js code will look like this:
import React from "react";
import { render } from "@testing-library/react";
import App from "../App";

describe("App working", () => {
  it("renders learn react link", () => {
    const { getByText } = render(<App />);
    const learnReact = getByText("Learn React");
    expect(getByText("Learn React")).toBeVisible();
  });
});
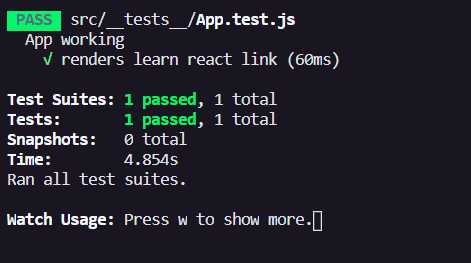
Okay, our first test is complete! To run the tests we use the command npm run test or yarn test in another terminal, and it must execute the test file, which in this case will pass, because the element is visible.
There, we tested our first functionality. Now let's add a test that will fail on purpose. For that, we can copy the test we did above and use the expect parameter .not.
import React from "react";
import { render } from "@testing-library/react";
import App from "../App";

describe("App working", () => {
  it("renders learn react link", () => {
    const { getByText } = render(<App />);
    const learnReact = getByText("Learn React");
    expect(getByText("Learn React")).toBeVisible();
  });

  it("renders learn react link that will fail", () => {
    const { getByText } = render(<App />);
    const learnReact = getByText("Learn React");
    expect(getByText("Learn React")).not.toBeVisible();
  });
});
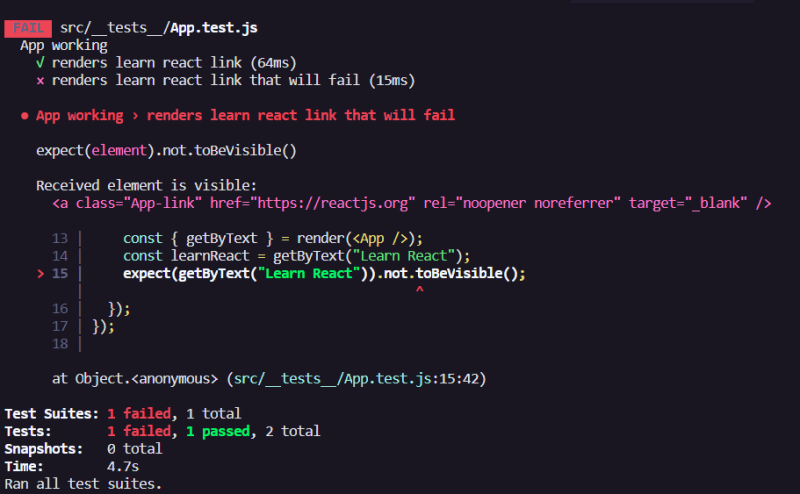
Realize that the test suite completely fails when one of the tests in it fails.
We come to the end of the article with a basic structure for using Jest. In the next articles, we will understand more complex ways to use expect and understand what is mock and how we can use it in our tests.
Thanks for reading!


Top comments (0)