Google Chrome has become a leader in the number of browser users, and with that, many of us have already used some extension geared towards it. From a simple theme to a Netflix party extension. But, have you ever wondered how to create one? We will now learn how to create a Chrome extension and how it works.
How does the architecture of a browser extension work?
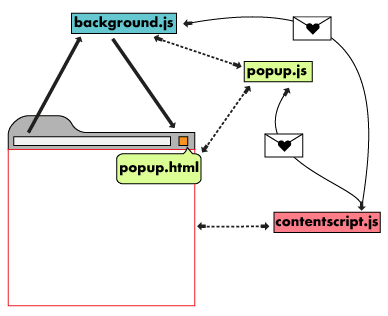
Chrome extensions work with 3 distinct areas that communicate: Background, content and inner scripts. Each of them has their area of expertise within the page and serves several functions.
The content script acts in the area which the user visits and can serve to communicate information about the current state of the page. Any information can be obtained from it and sent to the extension in order to change its behavior.
The background script acts in the browser area, it is the extension's event handler. This is where all event listeners that are important to the extension are stored. It remains inactive until an event is triggered and executes the logic that has been assigned to it.
Finally, the inner script (in the image above, the popup.js) is responsible for the visual functionalities of the extension, interacting directly with the HTML of the extension and in conjunction with the background script, it can perform, for example, calls to an API and data return something.
And how do I build one?
The first action to be taken is the creation of a node project, in order to add all the features available today in terms of Javascript. Therefore, execute the creation of your project with the command:
npm init   //For NPM
yarn init  //For Yarn
With the project created, also create a folder called scripts that contains the 2 essential scripts of the extension, background.js and content.js. For the moment leave them empty.
In addition, we will also need an HTML file for our extension's user interface. Create a basic structure like the one provided below:
  <!DOCTYPE html>
  <html>
    <head>
      <style>
        button {
          height: 30px;
          width: 30px;
          outline: none;
        }
      </style>
    </head>
    <body>
      <button id="changeColor"></button>
    </body>
  </html>
It is possible to add css and js files to style your extension as you like, as well as using frameworks like React, and bundlers like Webpack.
With everything ready, all we need now is the addition of a file, containing the necessary settings for Chrome to understand that what we are building is an extension aimed at it. This file will be called manifest.json. His structure should be as follows:
{
    "name": "Creating my first extension",
    "version": "1.0",
    "description": "Build an Extension!",
    "background": {
      "scripts": ["scripts/background.js"],
      "persistent": false
    },
    "content_scripts": {
      "js": ["scripts/content.js"]
    },
    "permissions": ["storage"],
    "browser_action": {
        "default_icon": "favicon.png",
        "default_popup": "./src/extension/popup.html"
    }
    "manifest_version": 2
}
Let's browse through the sections of this file and understand each one. In addition to basic information such as name and version of the extension (which the user designates them), we also see the two scripts, background and content designated with their respective paths. If you want to insert them in another location, just change the path of the folder where they are in the file manifest.json.
With extensions, we can also ask chrome for permissions to capture various browser information. The json we build only needs storage permissions, but we can also add new features like microphones, cameras, locations and etc.
Finally, the browser action takes care of the visual functionalities, such as the main file that will serve as the popup for your extension, and its icon, which will appear when the user installs it in your browser.
That's it?
Yes! All we need to create the extension is here, the only thing we need to do is tell Chrome where our manifest.json is. To do this we enter chrome://extensions/ and activate developer mode, in the upper right corner.
3 buttons will appear, LOAD UNPACKED, PACK EXTENSION and UPDATE, go to load unpacked and select your manifest.json file and that's it, your extension will be ready for use and you should already see its icon in the navigation bar of your browser.
The rest is up to you!
Feel free and use your creativity to create and style the features of your extension for your purposes. Thanks for reading and any questions, feel free to comment below.


Top comments (1)
Hey I have a doubt can yo tell me how to add external node libraries in this extension, I have been struggling to do so for quite sometime now