You may encounter the situation where you want to move one single MySQL database table to another (location on) disk, e.g. to free up disk space. It turns out that this process is far from straightforward. In this post I will describe several of our failed approaches (since failures are a great opportunity for learning), and the solution we eventually came up with.
Why move tables on disk?
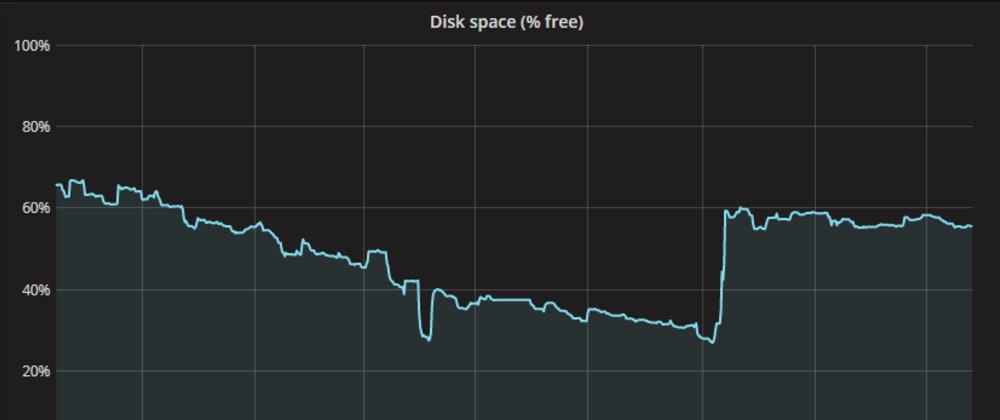
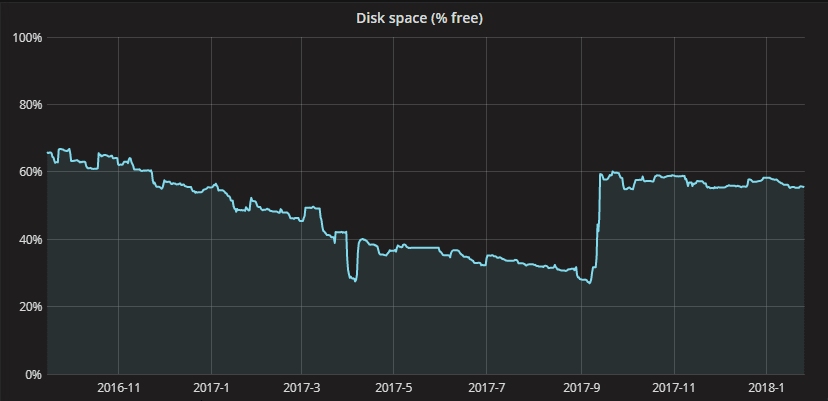
A while ago we received an alert that disk space on one of our servers at Moxio was gradually running low. We constantly monitor our servers for factors that could threaten normal operation, and receive a first alert when the free disk space drops below 30% of the total disk size. In that way we still have plenty of time to act upon it before the disk is actually full.
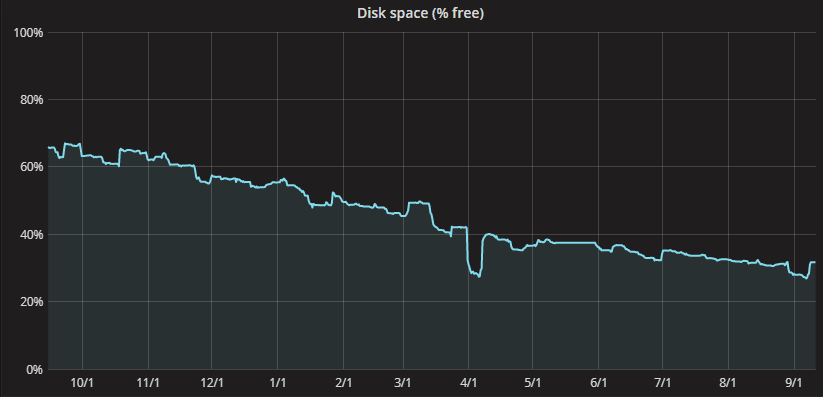
Usually in such situations we could free up sufficient disk space by deleting old backups and temporary files, or moving certain file storage directories off the main hard drive to an external storage array. This time almost all disk space was taken by the MySQL database server however. Some tables had been growing steadily over time, eating up more and more disk space. Since this was data we had to keep, our only sustainable solution was to move these tables to another disk.
The desired situation
Our ideal solution would be to move only the large individual tables to the external storage array. With that approach we could keep the other tables in the database on the (much faster) SSD disk, not sacrificing performance unnecessarily. So is this even possible with MySQL?
Historically, MySQL used to store all table data and indices in the system tablespace, represented by one or more ibdata files on disk. This means that data from multiple databases and tables was stored in the same file, making it impossible to move one of them to another location. Then MySQL 4.1.1 introduced file-per-table tablespaces for InnoDB with the innodb_file_per_table setting, which would store data and indices for newly created tables in a separate .ibd file per table. This setting became enabled by default in MySQL 5.6.6.
When using file-per-table tablespaces, it is possible to use the DATA DIRECTORY = 'path' clause with CREATE TABLE to place the data for the table outside the main MySQL data directory as of MySQL 5.6. This means that a setup as desired would be technically possible.
Failed approaches
In our case we were dealing with existing tables however. We tried several unsuccessful approaches to move these to another directory before eventually finding a satisfying solution.
Changing the data directory after creation
Since a DATA DIRECTORY can be specified to change a table’s storage location when creating the table, it seems logical that it would also be possible to change this location after creation by using this same option with ALTER TABLE. Indeed, ALTER TABLE syntactically supports DATA DIRECTORY as a table option. The documentation explicitly states however that this option is ignored (except when partitioning). It thus seems impossible to change DATA DIRECTORY for an existing table.
Symlinking the data files
Another approach we came up with was manually moving the table’s data files to the other disk, symlinking them back to their original location inside MySQL’s main data directory. According to the documentation however, although MySQL supports symlinking entire database directories or individual MyISAM tables, using symbolic links to InnoDB tables is not supported and may cause strange problems.
Creating a copy in the desired location
Since DATA DIRECTORY can only be specified when creating a table, we also tried creating a copy of the table in the desired location, copying over all data from the old table to the new copy and renaming the new table to take the place of the old one. This would look somewhat like:
SHOW CREATE TABLE `table_name`;
This returns the CREATE TABLE statement that would create the table structure of table_name. We now execute that exact statement, but substitute a new table name and append a DATA DIRECTORY clause:
CREATE TABLE `table_name_new` /* ... */ DATA DIRECTORY='/path/to/desired/location';
Now we have an empty copy of table_name, in schema that is. We then copy all data over from the existing table to the new one and issue an atomic rename to swap the two tables:
INSERT INTO `table_name_new` SELECT * FROM `table_name`; RENAME TABLE `table_name` TO `table_name_old`, `table_name_new` TO `table_name`;
Here we ran into problems however. When running the INSERT INTO ... SELECT query, MySQL failed with the error message
ERROR 1206 (HY000): The total number of locks exceeds the lock table size
It turns out that when using INSERT INTO ... SELECT, MySQL needs to set locks on the rows read from the source table to ensure proper replication. These locks take up space in the InnoDB buffer pool. The size of this pool is configurable using innodb_buffer_pool_size, but set to 128 MB by default. Since the table we’re trying to move is quite large (more than 50 million rows), MySQL is bound to run out of its space for holding locks.
Even if we could sufficiently increase innodb_buffer_pool_size to make this work, this approach is quite inefficient once you think about it. When inserting data into the new copy, MySQL has to serialize the data to disk and build indices for it, which takes a lot of time. We already have the serialized data and indices however: they’re right there for the original table! Instead of letting MySQL recreate the entire index and data file from scratch, we should look for a way to re-use the table data that is already there.
The solution
Eventually we found a solution for smoothly moving tables on disk, based on a guide for copying tablespaces to another MySQL instance in the MySQL manual. The solution comes down to moving the existing tablespace on disk, dropping and re-creating the table with the desired DATA DIRECTORY, and then re-attaching the saved tablespace to the new table.
Step-by-step, this looks as follows. First we ensure that all data is flushed from MySQL’s caches and buffers to the tablespace on disk:
FLUSH TABLES `table_name` FOR EXPORT;
FLUSH TABLES also locks the table for the duration of the connection or until we unlock it. The lock ensures the data in the table cannot change while we are moving the files. To maintain these locks we should keep open the MySQL connection in which we ran FLUSH TABLES .... In a new terminal window we move the tablespace files to a temporary location. In this case we use our home directory:
$ mv /var/lib/mysql/database_name/table_name.{ibd,cfg} ~
Now returning to our open MySQL session, we can release the locks (the tablespace has been safely put away in a consistent state), drop and re-create the table in its desired location:
UNLOCK TABLES; SHOW CREATE TABLE `table_name`; DROP TABLE `table_name`; CREATE TABLE `table_name` /* ... */ DATA DIRECTORY='/path/to/desired/location';
This will also create fresh tablespace files on disk (in the desired location) for the newly created table. We do not want these (because we want to put back our old tablespace files), so we discard this new tablespace:
ALTER TABLE `table_name` DISCARD TABLESPACE;
At this moment we can copy the saved original tablespace files to the location where MySQL now expects them, making sure to preserve ownership and permissions:
$ cp -a ~/table_name.{ibd,cfg} /path/to/desired/location
The final step is to let MySQL import the original tablespace files back from disk:
ALTER TABLE `table_name` IMPORT TABLESPACE;
Except for copying the tablespace files to the other disk, this whole process is very fast, as MySQL just takes the original table data and indices and does not have to rebuild these.
Recap
After several failed attempts (in which we did learn a lot about MySQL internals though), we eventually found a solution for efficiently moving tables to another location on disk. Using this approach we moved some of our largest and fastest-growing tables to an external storage array, freeing up the diskspace necessary to keep our server going.
Another thing to remember: if you know that a database table will become large, plan its location on disk in advance. When creating the table, specifying a custom location on disk (using DATA DIRECTORY) is simple and saves you the hassle of the process described in this post down the road.
Enjoyed reading this post?
My colleagues and I regularly write webdev-related blog posts like this to share the things we learn or discover. You can find all our posts on the Moxio blog. Get notified of new posts by following me or Moxio on Twitter or by subscribing to our RSS feed.


Top comments (1)
Great step-by-step article!
I had a similar problem recently which I'm planning to share, and I went through similar headaches as you. I came to the same conclusion that I need to "dump and reimport" the entire database to get back the free space, so I don't think there's a better way around it.
Just an bonus note, if you have a Master/Slave setup and your database is creating bin logs (which are huge as well), you can symlink the entire binlog directory without a problem.
Thanks for sharing!