Hello, I am Arno. Today we are going to find out how 3d printer works by writing a firmware. code link

Setup
Hardware
Firstly, we need a 3D printer that is already able to print. So if we encounter any issue while we are writing firmware, we know it's not a hardware problem. You can buy a machine directly, but I would recommend you assemble one by yourself. In this way, If there is a mechanical problem, you can handle it by yourself since you already familiar with the mechanical structure and also because you have schematic to check which these commercial companies probably not willing to provide. Here are hardware I choosen.
-
Mother board
which controlled by a AVR mega2560
-
Stepper driver
- X TMC2008
- Y TMC2008
- Z A4988
- E TMC2225
-
Mechanical structure
- Big fish i3

Software
In this step, we want make sure the MCU can run our code.
Download vscode
Install addon
platformioOpen platformio tag, create new project, choose Board as mega2560, choose Framework as Arduino.
Now we write some test code in
src/main.cpp
   // src/main.cpp
   #include <Arduino.h>

   void setup() {
       Serial.begin(115200);
   }

   void loop() {
       Serial.println("Hello from Mega2560.");
       delay(1000);
   }
- Connect 3D printing motherboard with compute, click the right arrow ➡ button at the bottom of
vscode. Thenplatformiowill compile and upload the test code above into 3D printing motherboard
![]()
- Open any Serial assistant you prefer, connect the motherboard, if you found
Hello from Mega2560.is printed, then you are all set.
Parse gcode
Gcode was generated by Slicer like Cura or Prusa. It tells the printer where the hotend should go and what temperature should it maintain.
- Most used gcode
  G1 F200 X2 Y4 ; move to (2,4,0) and set feedrate as 200mm/min, 99% gcodes looks like this
  G28 X0 Y0 ; move X/Y to min endstops
  M104 S200 ; set hotend temp as 200℃
  M20 ; List SD Card
  M23 ; Select SD file
check all gcodes in online documents of Marlin
In this section, we should implement the parse function of Gcode class which is able to convert a gcode string like G1 X2.4 Y5.6 into a gcode object.
-
gcode objectexample
  gcode.cmdtype = 'G';
  gcode.cmdnum = 1;
  gcode.X = 2.4;
  gcode.Y = 5.6;
  gcode.hasX = true;
  gcode.hasY = true;
Notice that if you try to use '\n' to split string like me, you need be careful that some gcode string might end with "\r\n"
SD card
In general, we need to configure SPI to use SD card. But we are using mega2560, we can use the SD Library for Arduino. The only thing we need to do is find which pin is the CS (chip select) pin in schematic and call SD.begin(csPin) function in setup function.
Temperature control
Call hotend.update() every 150ms, which will decide turn the heater on or off according to current temperature.
- 150ms interval was implemented using timer(
Heater::init) - Temperature control algorithm is PID(
Heater::calculatePid)
Motor control
In this section, we should figure out how to control stepper motor through a stepper motor driver like A4988.
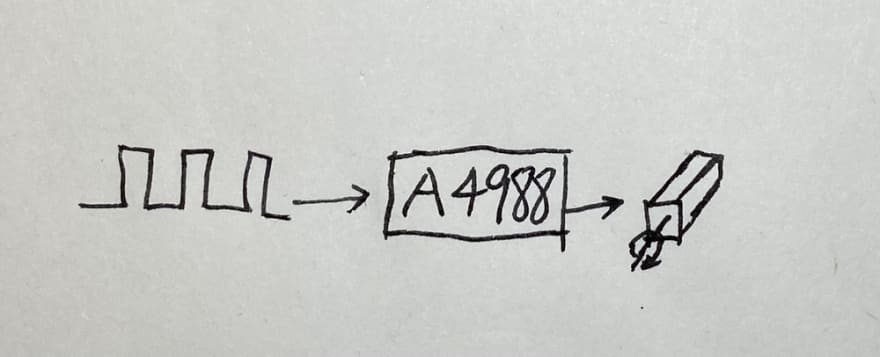
A4988

- VMOT
8V~35V DC, A 100uf capacitor needs to be placed between VMOT and GND to quickly respond to the motor's power demand. Beware, this is the only pin that connect high voltage, if you connect other pins with 24V DC, this module will burn in seconds.
- 1A 1B
Connect to coil 1 of the stepper motor
- 2A 2B
Connect to coil 2 of the stepper motor
- VDD
MCU power
- DIR
Connect to MCU, high and low each represent a different direction.
- STEP
Each time this pin receives a pulse, A4988 will dive the stepper motor advance one step. Normal stepper motor used in 3d printer takes 200 steps to complete a revolution, which means 200 pulses.
- MS1 MS2 MS3
But in most conditions, to drive stepper motor advance one revolution, 3200 pulses should be feed into A4988. That's because one step is divided into 16 micro steps.
| MS1 | MS2 | MS3 | subdivision |
| --- | --- | --- | ----------- |
| 0 | 0 | 0 | 1 |
| 1 | 0 | 0 | 2 |
| 0 | 1 | 0 | 4 |
| 1 | 1 | 0 | 8 |
| 1 | 1 | 1 | 16 |
- ENABLE
LOW: enable module
HIGH: disable module
- SLEEP
LOW: sleep
HIGH: active
-
RESET
LOW: reset module
Steps per unit
Now we know how to control stepper motor through A4988. But how long does the hotend travel(mm) if motor advance one step?
- Synchronized pulleys and belts
Take the 2GT 20-tooth synchronous wheel as an example. 2GT means that one tooth corresponds 2mm, then if the synchronous wheel has 20 teeth, each time it rotates 1 revolution, the belt will travels 40mm. And if we motor drive as 16 subdivision, then one revolution means 3200 pulses is needed.
stepPerUnit = 3200steps / 40mm
- Screw
Take a screw with a pitch of 2mm and a lead of 8mm as an example. The lead means the linear distance traveled by the screw for one revolution.
stepPerUnit = 3200steps / 8mm
Endstop

Endstop has 3 pins: normal open(NO), normal close(NC), circuit common(COM). If we the NC and COM then:
| State | on or off | MCU read |
|---|---|---|
| not triggered | on | LOW |
| triggered | break | HIGH |
Motion control
How to advance
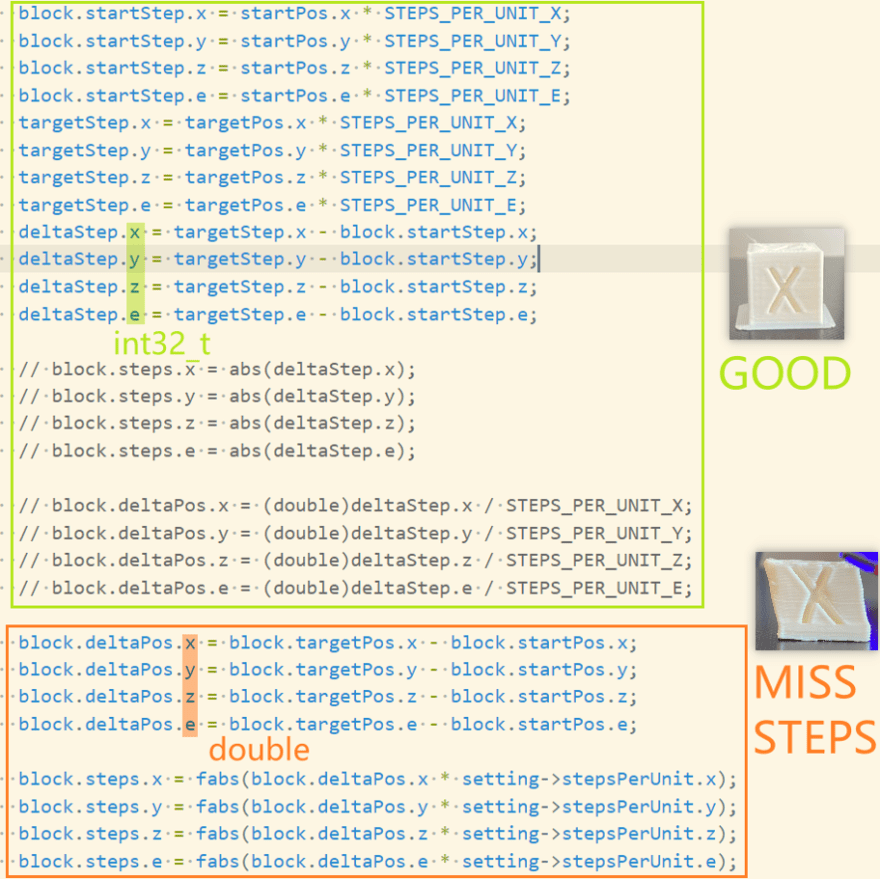
Assuming that our starting point is (0,0), target point is (6, 3). Then motorX shoud advance (6 x 80) steps, motorY should advance (3 x 80) steps. Of course, we can demand the motorX to advance first then motorY like Plan B. But there is a better way like Plan A.

This is Bresenham's algorithm. Specifically, since it takes 480 steps in the X direction and 240 steps in the Y direction, hotend should move 480 times, each time motorX advance one step, however motorY advance one step each tow times. Each time of motion is called a step event. The total number of times is called step event count, and its value is the greater of X and Y.
// module/Planner.cpp - planBufferLine
block.stepEventCount = getMax(block.steps);

// main.cpp - motion control isr
motorX.deltaError = -(curBlock->stepEventCount / 2);
motorY.deltaError = motorX.deltaError;

motorX.deltaError += curBlock->steps.x;
if (motorX.deltaError > 0) {
    motorX.moveOneStep();
    motorX.deltaError -= curBlock->stepEventCount;
}

motorY.deltaError += curBlock->steps.y;
if (motorY.deltaError > 0) {
    motorY.moveOneStep();
    motorY.posInSteps += curBlock->dir.y;
    motorY.deltaError -= curBlock->stepEventCount;
}
Do not use float to calculate the number of steps directly, because it might lead to step missing.
Multiple motion commands
We should push a block which contains how many steps every motor should advance in a queue, and take it out when needed.
-
block
  block.dir.x = 1
  block.steps.x = 37
  ...
  block.stepEventCount = 37
  block.accelerateUntil = 6
  block.decelerateAfter = 37
  block.entryRate = 1808
  block.nominalRate = 2001
  block.exitRate = 2001
Speed control
For example, if we want set speed as 1000steps/s, then every step event takes 1ms, which means every 1ms an interrupt should be generated.
Trapezoidal acceleration
We can set speed as constant, but changing the speed can improve efficiency.
Specifically, a block can be divided into an acceleration segment, a constant speed segment and a deceleration segment. Noted that if the length of block is very short, the acceleration graph should becomes a triangle.
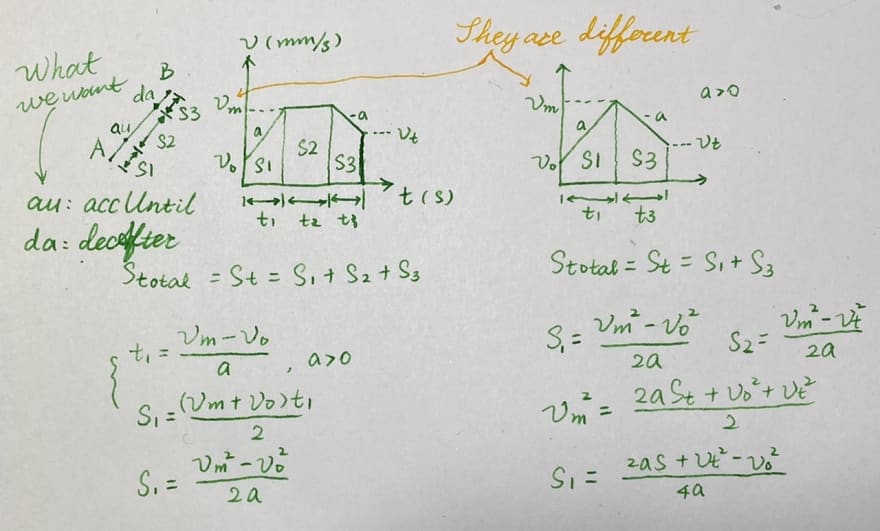
Connection speed
In order to prevent the speed and coherence between each block. We need to calculate the entry speed and exit speed of each block. The estimation method is given below. Noted that the arc in the figure is only used to estimate the connection speed. The hotend does not go through this arc in practice.

I hope this article is useful or at least interesting for you.

Top comments (0)