
Alpas is an awesome framework for making web applications. Alpas also works extremely well if you’re looking to build an API only app. In this tutorial, I’ll show you how you can make a simple RESTful API using Alpas.
Here is the list of tools and things that I used. 🛠
- IntelliJ IDEA for coding, building/running the app, and debugging
- The Alpas starter template
- Postman REST client to interact with the API; Insomnia would also work just as well
With the Alpas starter template, I removed pretty much all of the front-end web stuff to slim it down. You can see my finished API project on GitHub to take a peak at the finished product void of front-end modules.
Note : This slimmed down project version will ultimately lead to an Alpas API starter template in the near future. 🎉
Also, to preface this tutorial, this will be a task (to-do list) API and I already established my database connections, created an entity factory, coded up a database seeder, and seeded my database with some extraordinary Chuck Norris facts that will act as my tasks.
Alright, let’s get this party started.
Step 1: Setup your routes
First up, let’s add some routes for the API in the routes.kt file. For a RESTful API, you’ll typically want to have routes for index, show, store, delete, and update.
With Alpas and the beauty of the statically typed language of Kotlin, our routes are simple to create and easy to follow.
    fun Router.addRoutes() = apply {
    apiRoutes()
}

private fun Router.apiRoutes() {
    // register API routes here
   group("tasks") {
       get(ApiController::index)
       get(ApiController::show)
       post(ApiController::store)
       delete(ApiController::delete)
       patch(ApiController::update)
   }
}
Ok, now that we added the routes, let’s delete them. There is an even simpler way in Alpas using resources method.
    private fun Router.apiRoutes() {
    // register API routes here
    resources<ApiController>("tasks")
}
Check that out! We just reduced the lines of code by 4. 💪🏽
If you are curious as to what is in the resource method, this is where Kotlin being statically typed really shines. If you are using IntelliJ, hold down the command key and click resources. This will take you directly to the resources method to see how it works. 🧨
inline fun <reified T : Controller> resources(
    path: String = "/",
    only: List<String> = listOf(
          DEFAULT_GET_METHOD,
          DEFAULT_POST_METHOD,
          DEFAULT_PATCH_METHOD,
          DEFAULT_DELETE_METHOD,
         "edit", "new", "show"
    ),
    except: List<String> = emptyList()
):
As you can see, resources has what we need to handle the API routes. Run the ./alpas route:list command in your projects root to see the list routes you have in Alpas in a table format. You can see the output in the image at the very top of this post. This is super helpful to see not only see what routes are present in your project, but also to see how they are defined and what security is placed around the routes.
Step 2: Create the controller
Use the controller command to quickly create the controller by running ./alpas make:controller ApiController command under your project’s root.
This will generate the ApiController.kt file. Now that we have the file ready, let’s add in the logic for creating, updating, deleting, and showing tasks.
Step 3: Create index
When the index is called, it will return the list of tasks. We will simply query the tasks database, put the data results in a list, and return in JSON format.
fun index(call: HttpCall) {

    val tasks = Tasks
        .latest()
        .toList()

    call.reply(tasks.toJson()).asJson()
}
Now, let’s run the app and use Postman to see if we get the expected data!
Using Postman, set the call type to GET, add in the url (localhost:8080 in my case since I am running on my local) and make sure the URI matches what the route expects.
Running the GET request for http://localhost:8080/tasks/ shows the following snippet:

Step 4: Create show
Let’s say we want to just show a single result by id. According to the route, we can pass an along in the URI. Let’s add a show function to grab that id, pull the result from the database, and then return the data back through the API.
fun show(call: HttpCall) {

    val id = call.longParam("id").orAbort()

    val tasks = Tasks
        .latest()
        .filter { it.id eq id }
        .toList()

    call.reply(tasks.toJson()).asJson()
}
In Postman, we will once again use a GET request and pass along the following URL: http://localhost:8080/tasks/9
This returns the following result.
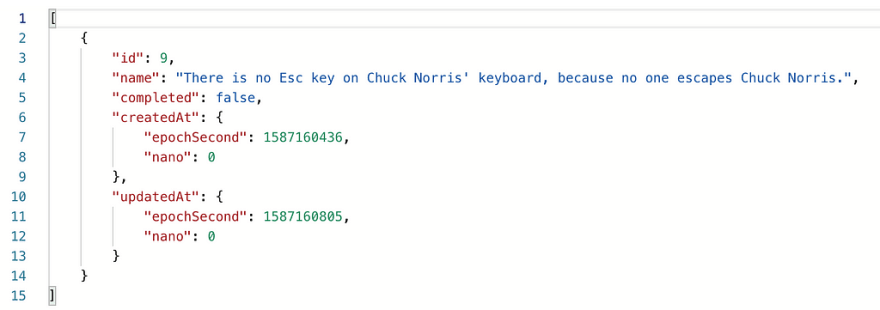
Wow, don’t even attempt to mess with Chuck Norris! 🥋
Step 5: Create store
With index and show, we were retrieving data from the database. Now, let’s add data to the database using store.
Instead of just adding any ol’ thing that passes through the API, let’s also add in some validation. We will apply rules to make sure that the name field is present and that there is, at minimum, two characters in the name value.
fun store(call: HttpCall) {

    call.applyRules("name") {
        required()
        min(2)
}.validate()

    val name = call.stringParam("name").orAbort()

    Tasks.create() {
        it.name to name
        it.createdAt to Instant.now()
        it.updatedAt to Instant.now()
     }
   call.acknowledge(201)
}
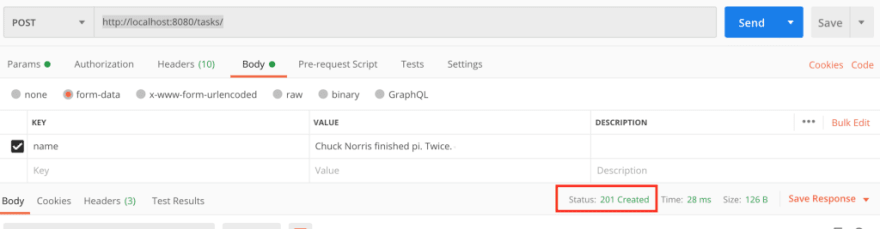
Let’s test this out by doing a POST request in Postman. Add in http://localhost:8080/tasks/ and in the Body , add a key:value pair. Make sure the key is set to name and add in a fun Chuck Norris fact for the value. When you are ready, click on Send.
If it worked, you should see a 201 Created status code.
Here is the example I added.
Step 6: Create update
If you ever need to update either the name of the task of the completed value, that’s where update comes in handy. Let’s create the update function to update the name, completed value, and the updated timestamp.
fun update(call: HttpCall) {

    val id = call.longParam("id").orAbort()

    Tasks.update {
         if (call.stringParam("name") != null) { it.name to
             call.stringParam("name") }
        if (call.param("completed") != null) { it.completed to
        call.param("completed").toString().toBoolean() }
        it.updatedAt to Instant.now()
        where {
            it.id eq id
     }
    call.acknowledge(202)
  }
}
And. Of course, let’s test it out in Postman.
This time, we will make a PATCH request to http://localhost:8080/tasks/, and pass in the id and update the completion.
I’ll first make a quick GET request to get id for the new task I added in Step 5, which I see has an id of 26. Now, we’ll toggle the completed status from false to true.

Step 7: Create delete
Last up is the delete function.
For delete, we will retrieve the id via query string parameter. If that id is present in the database, then that record will be wiped. 🧻
fun delete(call: HttpCall) {

    call.applyRules("id") {
         required()
    }.validate()

    val id = call.longParam("id").orAbort()

    Tasks.delete { it.id eq id }
    call.acknowledge(202)
}
On the Postman side, to validate we got it right, we will make a DELETE request to http://localhost:8080/tasks/?id=26 to remove the record we added in step 5.

Status code 202 Accepted means we did it right and the record has been removed.
That is a barebones RESTful API example but you can see how powerful it can be. I hope this helps you get started with creating your own powerful APIs using Alpas as a backend.
Now, it’s your turn! Build upon this API and share with us what you have created. 🤖

Top comments (0)