Preface
This article will explore ways to develop a simple version of shadowsocks.
Because I'm not very familiar with networks, there may be some errors in it. Please feel free to point out them.
This article is for beginners and may be superficial.
This article only focuses on communications over TCP, not including UDP.
This article requires the basic knowledge of:
- JavaScript
- Node.js
- HTTP
About Buffer
The computer handles binary data at low level, the same as the progress of network transmission.
Node.js offers the Buffer class to handle binary data. A buffer object is like an array with a byte as an item (usually displayed as hex). Here are some frequently-used operations below (the encoding of chars are not under consideration in the series, UTF-8 by default):
Buffer.from("hello")
Returns <Buffer 68 65 6c 6c 6f> , and every item is the ASCII code of the char.
Buffer.from([0x00, 0x01, 0x02])
Returns <Buffer 01 02 03> , and every item is a byte.
-
buffer.slice()Just like thesliceof arrays, it splits a part of buffer and returns that. -
buffer.toString()Transform the buffer to string, and every one/multiple bytes represent a char. -
buffer.toJSON()Transform the buffer to a JSON object, and every item is a decimal number if printed. This is useful when handling blank chars like \r \n because they may not be visible in some logs.
let buf = Buffer.from("hello"); // <Buffer 68 65 6c 6c 6f>
console.log(buf.slice(0, 3).toString()); // "hel"
console.log(buf.toJSON()); // { type: 'Buffer', data: [ 104, 101, 108, 108, 111 ] }
About TCP
As a frontend engineer, we should be very familiar with HTTP. Whether sending HTTP requests or using express , koa to develop an HTTP server, we're using HTTP.
But maybe we're not so familiar with TCP. Now I'll introduce how to develop a TCP server and a TCP client in Node.js simply.
Server
// server.js
const net = require('net');

const server = net.createServer((socket) => {
  socket.on('data', (data) => {
    console.log('data from client:', data);
    socket.write('Hello from server.');
  });
});

server.listen(4001);
Client
// client.js
const net = require('net');

const socket = net.connect(4001, '127.0.0.1', () => {
  socket.write('Hello from client');
});

socket.on('data', (data) => {
  console.log('data from server:', data);
});
As shown in the figure, the createServer method of net module is actually to create a TCP server. The TCP server and client use a pair of socket to communicate with each other. Socket is a duplex, which is a readable and writeable stream. If call sockatA.write(data), socketB would receive data.
Let's run node server.js , and then run node client.js. The result is below:
According the the introduce of Buffer in last article, we know that server received the message from client: Hello from client, and sent a message Hello from server to client, in a way of TPC transmission.
Understanding the relationship between TCP and HTTP
As is known to us, TCP/IP is based on the 4 layers model, and HTTP is at the application layer while TCP is at the transport layer.
HTTP is based on TCP
How to understand the phrase based on?
Let's build a TCP server:
// server.js
const net = require('net');

const server = net.createServer((socket) => {
  socket.on('data', (data) => {
    console.log(data.toString());
  });
});

server.listen(4001);
Then we we visit localhost:4001 on browser, the console would print logs as below:

The server received a string with an HTTP request message content. In the meanwhile, the browser will be loading status because server does not return any response.
Let's update server code to return an HTTP response:
// server.js
const net = require('net');

const server = net.createServer((socket) => {
  socket.on('data', (data) => {
    console.log(data.toString());
    const html = `
    <!DOCTYPE html>
    <html>
        <head>
          <title>hello</title>
        </head>
        <body>
          <div style="color:skyblue;">hello world</div>
        <body
      </html>`;

    const body = Buffer.from(html); // body is for calculating length

    const rawResponse =
      'HTTP/1.1 200 OK\r\n' +
      'Content-Type: text/html\r\n' +
      `Content-Length: ${html.length}\r\n` +
      '\r\n\r\n' +
      body;

    socket.write(rawResponse);
  });
});

server.listen(4001);
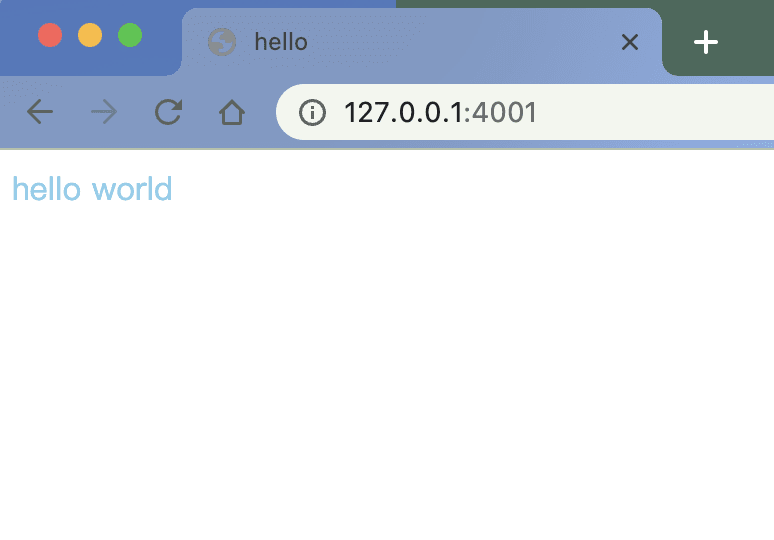
Now we visit it again:
It shows the html content in response. That's the essence of HTTP: a request has a corresponding response, while they are both text.
Overall, TCP is a protocol to control transmission. However, it does not care the detail of transmitted content. The detail is controlled by the high level (application) protocols, such as HTTP. Similarly, client and server usually use JSON to communicate with each other. The JSON format is just a "protocol" based on HTTP.
Besides, the port of HTTP is actually the port of TCP.
About proxy and socks5
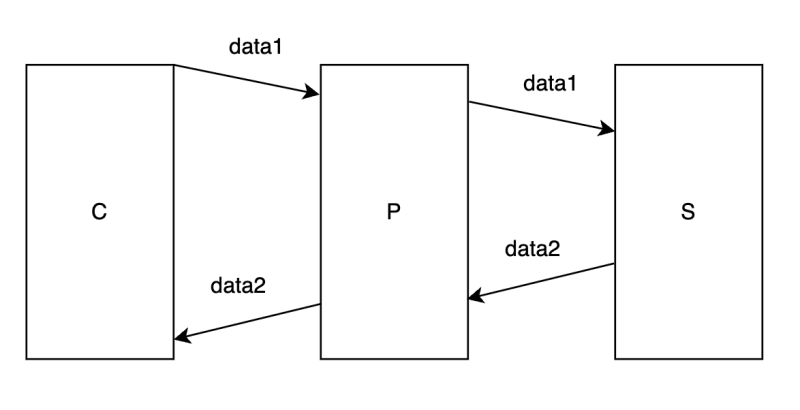
Proxy is a middleware server. Let's call client C, server S, proxy P. The relationship of them is like:
The job of proxy is to forward data. Assume there are some barriers between C and S (like the Great Fire Wall) forbidding the communication, but C and P, P and S could communicate freely, then we can use P to help the communication between C and S.
socks5 is a proxy protocol between the application layer and transport layer, so socks5 uses TCP to transmit HTTP message.
Let's take the basic socks5 communication without authentication as an example:
- client sends a handshake message:
                   +----+----------+----------+
                   |VER | NMETHODS | METHODS  |
                   +----+----------+----------+
                   | 1  |    1     | 1 to 255 |
                   +----+----------+----------+
The number in second line is neither value nor number range but length. The number 1 under VER indicates that the length of VER is 1 byte. The length of METHODS is from 1 to 255 bytes.
- 1st byte:
VER, is the version number. For socks5, the value is0x05. - 2nd byte:
NMETHODS, is the count of supported authentication methods by client. - From the 3rd byte, every byte represents an authentication method.
Because the data is binary and is read as byte one by one, it's crucial to distinguish the boundaries. So we use a specific byte to represent the length n of a field, and use the following n byte(s) to represent the value of the field, which is a very common way.
For example, considering the string 127.0.0.14000, it takes 13 bytes. The program cannot tell which part is ip and which is port when reading it. But given the string 09127.0.0.14000with a rule: the former 2 bytes represent the length of ip, it's easy to tell that 127.0.0.1 is ip while 4000 is port because it says the first 9 bytes is ip.
- proxy returns a response:
                         +----+--------+
                         |VER | METHOD |
                         +----+--------+
                         | 1  |   1    |
                         +----+--------+
- 1st byte: the same,
0x05。 - 2nd byte: METHOD, is the authentication method chosen by server.
0x00means that it does not need any authentication.
- client sends a request:
        +----+-----+-------+------+----------+----------+
        |VER | CMD |  RSV  | ATYP | DST.ADDR | DST.PORT |
        +----+-----+-------+------+----------+----------+
        | 1  |  1  | X'00' |  1   | Variable |    2     |
        +----+-----+-------+------+----------+----------+
After the connection via handshake, client is going to send requests to proxy. Since it's a proxy, client needs to tell proxy the target ip and port it wants the data to be sent to. Otherwise proxy does not know where to forward data.
- VER: same.
- CMD: the command of the socks session
-
0x01CONNECT. We'll only talk about it in this article. -
0x02BIND -
0x03UDP forward
-
- RSV: reserved with a value
0x00 - ATYP: the type of target server address. DST.ADDR is the ip while DST.PORT is the port.
-
0x01means IPv4, with it DST.ADDR takes 4 bytes. For example, ATYP + DST.ADDR + DST.PORT:01 c0 a8 01 01means the ip of target server is192.168.1.1 -
0x03means domain. Due to the unfixed length of domains, the length of DST.ADDR is unfixed as well. Remember how to transmit data with unfixed size? Yes, length first byte. So in this case, the first byte of DST.ADDR represents the lengthnof the domain , while the followingnbytes represent domain. For example, ATYP + DST.ADDR + DST.PORT:03 09 62 61 69 64 75 2e 63 6f 6d 01 bbmeans the domain isbaidu.com, and the port is443. -
0x04means IPv6. DST.ADDR takes 16 bytes.
-
- proxy returns a response
        +----+-----+-------+------+----------+----------+
        |VER | REP |  RSV  | ATYP | BND.ADDR | BND.PORT |
        +----+-----+-------+------+----------+----------+
        | 1  |  1  | X'00' |  1   | Variable |    2     |
        +----+-----+-------+------+----------+----------+
- REP: response status.
0x00means success. - ATYPE: address type of proxy .
- BND.ADDR is the ip of proxy,BND.PORT is the port.
BND.ADDR and BND.PORT is the ip address and port of proxy, not target server. Proxy uses this ip-port to communicate with target server. For connect command, the 2 values could be set to 0 in basic scenario because client does not care which ip-port is used by proxy to communicate with server.
- start forwarding data After the initialize process above, client would send the real data to proxy, while proxy forwards it to target server. In a similar way, target server would send the response to proxy, while proxy forwards to client. These forwarding processes are just via TCP protocol we talked above.
Demo Code
In the demo, we only focus on CONNECT command with IPv4 and domain.
const net = require('net');

const port = 4000;

const STATE = {
  INIT: 0,
  SENT_FIRST_HANDSHAKE_RESPONSE: 1,
  ERR: -1,
};

const server = net.createServer((socket) => {
  let state = STATE.INIT;

  const closeSocket = () => {
    socket.destroy();
    state = STATE.ERR;
  };

  socket.on('data', (data) => {
    switch (state) {
      case STATE.INIT: // initial state, ready to receive the 1st handshake message
        const version = data.readUInt8(0); // the first byte is VER (version)
        if (version !== 5) { // VER must be 0x05
          closeSocket();
          return;
        }

        socket.write(Buffer.from([0x05, 0x00])); // return 0x0500 which means no need for authentication
        state = STATE.SENT_FIRST_HANDSHAKE_RESPONSE;
        break;

      case STATE.SENT_FIRST_HANDSHAKE_RESPONSE: // already received the 1st handshake message, now ready to receive CONNECT message including target server address, port, etc.
        const cmd = data.readUInt8(1);

        if (cmd !== 1) {
          Buffer.from([
            0x05, 0x07, 0x00, 0x01, 0x00, 0x00, 0x00, 0x00, 0x00, 0x00,
          ]); // received unsupported CMD, tell client failure
          closeSocket();
          return;
        }

        // read ip-port of target server
        let addrType = data.readUInt8(3);
        let addrLength, remoteAddr, remotePort;

        if (addrType === 4) {
          // unsupported IPv6 type

          socket.write(
            Buffer.from([
              0x05, 0x08, 0x00, 0x01, 0x00, 0x00, 0x00, 0x00, 0x00, 0x00,
            ])
          );
          closeSocket();
          return;
        }

        if (addrType === 3) {
          // domain
          addrLength = data.readUInt8(4);
          remoteAddr = data.slice(5, 5 + addrLength).toString();
          remotePort = data.readUInt16BE(data.length - 2);
        } else if (addrType === 1) {
          // ipv4
          remoteAddr = data.slice(4, 8).join('.');
          remotePort = data.readUInt16BE(data.length - 2);
        }

        // 连接 target server
        const remote = net.createConnection(
          { host: remoteAddr, port: remotePort },
          () => {
            socket.write(
              Buffer.from([
                0x05, 0x00, 0x00, 0x01, 0x00, 0x00, 0x00, 0x00, 0x00, 0x00,
              ])
            ); // tell client success

            state = STATE.SENT_CONNECT_RESPONSE;

            console.log(`connecting ${remoteAddr}:${remotePort}`);
            // KEY POINT: pipe two sockets to forward
            socket.pipe(remote);
            remote.pipe(socket);
          }
        );

        remote.on('error', (err) => {
          remote.destroy();
          closeSocket();
        });

        break;
    }
  });

  socket.on('error', (err) => {
    console.log('socket error', err.message);
  });
});

server.listen(port, () => {
  console.log(`socks5 proxy server is listening on port ${port}`);
});
The key point:
socket.pipe(remote);
remote.pipe(socket);
is just like:
socket.on('data', data => remote.write(data));
remote.on('data', data => socket.write(data));
Unlike HTTP server handling string in most cases, TCP server handles Buffer. So for data, we need to call some Buffer methods.
Deploy it on a server which is accessible to both target server(like Google) and your client, and configure your client proxy settings to connect it, then you'll be free to have access to Google!
Full code available on https://github.com/Arichy/arcsocks


Top comments (0)