
Running a programming blog is a great way to hone your skills, build a personal brand and expand your portfolio. However, it certainly requires a lot of effort to both get started and to keep going. You not only need to have the programming knowledge and writing skills but also the ability to make quick and sure decisions.
Developers (being developers) will often spend a lot of time picking their tech stacks, rather than building the blog or creating content. Now, while this is certainly beneficial for learning about new tools, sometimes you just need to ship! 🚢
Thus, more recently, for any kind of static or content-heavy websites, like a landing page, blog, etc. I’ve defaulted to Astro.
Astro
Now, if you haven’t used Astro before - you’re missing out. It’s a web framework for building really fast SSG or SSR-powered websites.
It does so through island architecture, by only loading the JS code of your components when required — e.g. when the component becomes visible or the browser is idle — and shipping static pre- or server-rendered HTML in all other cases.
On top of that, it integrates really well with your existing stack, including various UI frameworks, like React, Vue, or my recent favorite — Solid.js — for building the interactive parts of your UI.
Vrite — CMS for Technical Content
With Astro handling the front end, you still need some kind of data source for your blog. While a few Markdown files can do the job, I don’t consider that the most scalable or comfortable setup.
Unfortunately, most CMSs won’t be ideal either, as writing about code is a very specific, rather niche use case. Goodies like code highlighting, formatting, or proper Markdown and Keyboard shortcuts support aren’t guaranteed. Not to mention, the additional requirements you might have when working in teams, like real-time collaboration or proper content management tools.
All these reasons taken together are essentially why I created Vrite, which is basically a CMS for technical content. With everything above and more included — like code editor, Prettier integration, Kanban dashboard, and more.
Vrite and Astro
Now, Vrite is open-source and currently in Public Beta. This means that, while there might be bugs, you can already do quite a lot with it. For example, you can easily integrate it with the DEV platform via its API. However, by combining it with Astro, you can take it a step further!
With its great performance and support for Solid.js (the framework Vrite is built with), Astro is already powering the Vrite landing page and blog — and does so really well!

This great pairing inspired me to create Vrite’s first dedicated integration — one for Astro.
So, with Astro, Vrite, and easy integration between the two, it’s possible to get a blog up and running in minutes! Let me show you how…
Building a Blog With Astro and Vrite
Source code here: https://github.com/areknawo/start-programming-blog-in-minutes-with-astro-and-vrite
Since Vrite is open-source and based on Node.js, you’ll soon be able to self-host it pretty easily if you want to. However, until I document this process and stabilize Vrite, the best way to try it out is through a hosted instance at app.vrite.io. So, start by signing in for an account:

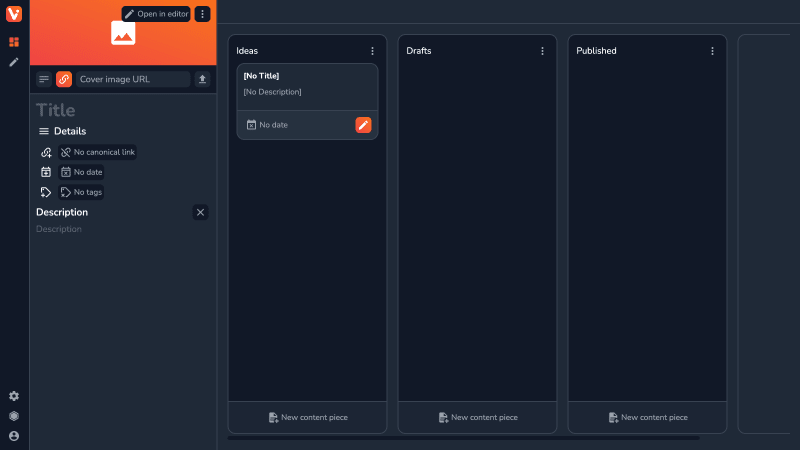
When you’re in, you’ll see a Kanban dashboard:

You can read more about how the content is organized in Vrite in my previous blog post. However, for now, all you need to know is that individual columns are called content groups — meant for organizing your content — while the cards inside — content pieces — are containing the actual content with related metadata.
Create a few content groups to represent your content production process (e.g. Ideas, Drafts, Published) by clicking New group, and then create your first content piece by clicking New content piece in the content group of choice.
With a content piece now created and selected, you’ll see a side panel, containing all its metadata. Inspired by code editors like VS Code, with which most developers are quite familiar, the resizable side panel is where you’ll edit metadata, configure all available settings, manage your team, and more.
Once the content piece is selected (opened in the side panel and highlighted), you can move to the editor by clicking the Editor button in the side toolbar.

Vrite editor is focused on providing the best technical writing experience possible. Thanks to many features, like:
- Modern, clean UI/UX with WYSIWYG editing experience;
- Markdown and keyboard shortcuts;
- Built-in code editor with code highlighting, autocompletio,n and Prettier formatting (for supported languages);
- Support for most of the GFM (GitHub-Flavored Markdown) formatting options and content blocks;
it’s easy to get started with and can cover vast majority of use cases in technical blogging.
To customize the editor to the needs of your blog, you can go to Settings → Editing experience to enable/disable various formatting options and content blocks and provide your own Prettier config for code formatting.

Now, to integrate with Vrite you’ll need an API token. To get it, head to Settings → API → New API token.

Here, you can customize the token name, description, and permissions. It’s recommended to only use necessary permissions, which for a personal blog would likely mean read access to content pieces and content groups (to retrieve the content), tags, and profile to build tag-based lists and provide some profile info about you (which you can configure in Settings → Profile).
Save your API token and keep it safe. Now it’s time to create an Astro-powered blog!
Start by creating a new Astro project:
npm create astro@latest
When prompted, choose "Use blog template” as this will get you started the fastest.
Now, cd into the new projects and install Vrite JS SDK:
npm install @vrite/sdk
The SDK provides all the tools you need to interact with Vrite’s API, including the API client, and Content Transformers. I’ve already covered those in a previous blog post. However, you don’t actually have to think about them when working with Astro — thanks to the dedicated integration!
First, create a .env file to house your Vrite API token and an ID of the content group to publish content from:
VRITE_ACCESS_TOKEN=
VRITE_CONTENT_GROUP_ID
To get the ID of the content group, in the Kanban dashboard, open the context menu and Copy ID:

Then, in the astro.config.mjs import and configure the integration, by first loading the ENV variables and then providing the Vrite plugin in the integrations array:
import { defineConfig } from 'astro/config';
import mdx from '@astrojs/mdx';
import { vritePlugin } from '@vrite/sdk/astro';
import sitemap from '@astrojs/sitemap';
import { loadEnv } from 'vite';

const { VRITE_ACCESS_TOKEN, VRITE_CONTENT_GROUP_ID } = loadEnv(
  import.meta.env.MODE,
  process.cwd(),
  ''
);

export default defineConfig({
  site: 'https://example.com',
  integrations: [
    mdx(),
    sitemap(),
    vritePlugin({
      accessToken: VRITE_ACCESS_TOKEN,
      contentGroupId: VRITE_CONTENT_GROUP_ID,
    }),
  ],
});
Additionally, for the best experience, add the Vrite SDK types to your tsconfig.json file:
{
  "extends": "astro/tsconfigs/strict",
  "compilerOptions": {
    "strictNullChecks": true,
    "types": ["@vrite/sdk/types", "astro/client"]
  }
}
Now the integration is configured and ready to go! It’s time to use it in the code.
Inside src/pages/blog/index.astro file let’s display a full list of existing blog posts:
---
// ...
import { getContentPieces } from "virtual:vrite";

const posts = await getContentPieces({ limit: "all" });
---

<!DOCTYPE html>
<html lang="en">
    <!-- ... -->
  <body>
    <Header />
    <main>
      <section>
        <ul>
          {
            posts.map((post) => (
              <li>
                {post.date && <FormattedDate date={new Date(post.date)} />}
                <a href={`/blog/${post.slug}/`}>{post.title}</a>
              </li>
            ))
          }
        </ul>
      </section>
    </main>
    <Footer />
  </body>
</html>
All it takes is a getContentPieces() function call to retrieve all the content pieces from the configured content group, in the order seen in the Kanban dashboard. Here we retrieve all the available content pieces (by providing { limit: “all” }, though, for bigger blogs, you’ll likely want to use pagination, which is also supported by this utility.
The function itself comes from the virtual:vrite module that provides a few other utilities like this, plus a fully-configured API client to make your work with Vrite and Astro a breeze. Additionally, (if you configured your tsconfig.json), it’s fully typed, providing great DX!
With that, you should now see the list of the content pieces on the website:

What about the actual content? Well, for this you should move to src/pages/blog/[…slug].astro:
---
import BlogPost from "../../layouts/BlogPost.astro";
import { getStaticPaths, ContentPiece, Content } from "virtual:vrite";

export { getStaticPaths };
type Props = ContentPiece;

const contentPiece = Astro.props;
---

<BlogPost
  title={contentPiece.title}
  description={contentPiece.description || ""}
  pubDate={contentPiece.date ? new Date(contentPiece.date) : new Date()}
  heroImage={contentPiece.coverUrl}
>
  <Content contentPieceId={contentPiece.id} />
</BlogPost>
In Astro, you can use dynamic routes, together with rest parameters, i.e. […slug] to generate pages from an external source, like a CMS. The parameter can be used to match and then fetch the correct data in the getStaticPaths() function (when in the SSG mode).
This is such a common use case that the Vrite integration implements this function for you! Simply make sure your route has a slug parameter, re-export the function from virtual:vrite module and — you’re done!
The rest of the file is used to render the blog post. All the data of the content piece is available via Astro.props (which you can strongly-typed by adding type Props = ContentPiece;). You can then supply this data to a BlogPost layout provided by the template. Finally, to render the content, use the Content component provided by the integration, and supply it with the content piece ID.
With that, your blog post should now be visible under the generated URL:

The Content component automatically renders your blog post to HTML and uses Astro’s Code component for displaying and highlighting the code snippets, though you’ll have to npm install shiki for it to work:

Now you have a blog basically ready to go. If you want to customize the integration further, you can always tap into the underlying Vrite API client to e.g. retrieve your Vrite profile. In src/pages/about.astro:
---
import Layout from "../layouts/BlogPost.astro";
import { client } from "virtual:vrite";

const profile = await client.profile.get();
---

<Layout
  title={profile.fullName || "About me"}
  description="Lorem ipsum dolor sit amet"
  pubDate={new Date("May 23 2023")}
  updatedDate={new Date("May 23 2023")}
  heroImage="/placeholder-about.jpg"
>
  <p>{profile.bio}</p>
</Layout>
That said, it’s worth noting that the profile data in Vrite is a bit limited right now and you’ll likely want to add some more information right into the page.
When you’re done, simply run npm run build and have Astro generate a super-fast static blog for you!
Bottom line
While I might be a bit biased, I think this is one of the fastest and easiest CMS integrations out there. Unless you’ve experienced some bugs — mind you Vrite is still in beta and you should report those on GitHub — with some styling, you’ll have a blog in no time! Additionally, if you ever need to scale, the Vrite and Astro combo easily supports pagination and SSR, with little to no additional setup!
Now, there’s still a lot more you can do with Vrite even now, that wasn’t covered in this blog post. For example — you can set up a Webhook to automatically rebuild and redeploy your static blog when you add a new content piece to the group (you can get some inspiration for that from this blog post). You can also invite your team to collaborate on content in real-time or cross-post using Webhooks and Content Transformers. Documentation and more content on all of that is coming soon.
Overall, if you’re running a programming blog or are a technical writer in need of better tools, I think Vrite is (or will soon become) what you were looking for. Either way, if you’re interested, definitely check out Vrite at app.vrite.io and follow me on this journey for better technical tooling!
- 🌟 Star Vrite on GitHub — https://github.com/vriteio/vrite
- 🐞 Report bugs — https://github.com/vriteio/vrite/issues
- 🐦 Follow on Twitter for the latest updates — https://twitter.com/vriteio
- 💬 Join Vrite Discord — https://discord.gg/yYqDWyKnqE
- ℹ️ Learn more about Vrite — https://vrite.io

Top comments (2)
Hey, first off - thanks for reporting the issue with Content Transformer on GH. I really want to encourage that as I need more input on what to fix/improve.
Now, I personally haven't experienced basically any issues when publishing my posts to DEV. Medium on the other hand, is notoriously quirky and hard to integrate with, while their API is non-existent now (github.com/Medium/medium-api-docs). That said, I know it's a big platform and I'll think of how to provide the best experience for publishing on it (even if it ends up being a dedicated copy-paste UI).
The underlying JSON content format and API is, in my opinion, pretty good. The "rendering" part you're refering to is handled by Content Transformers from the SDK, converting the JSON to a Markdown string. While this can be done fully manually by the user, I do want to provide a good API/tooling for it. As they currently are, Content Transformers seem to work (for the most part), though I certanly see room for making them more stable and reassuring. How to do it with a convenient API and without making the user handle basically all the conversion - I don't have any better ideas just yet.
As for pasting Markdown - I've also noticed it when writing the docs for Vrite (need to move between files in the repo and the editor). It's certainly needed and I'll likely add it within the next few days.
Congrats on an impressive background and good luck with your own startup!
Also, thanks for kind words! Will keep you in the loop. Would be happy if you could share Vrite with your dev colleagues who might be interested!