
Looking for a way to build a web application with features like authentication, database setup, and authorization without writing a ton of code and configurations? Ever wanted to create a production-ready app in a matter of days?
Believe it or not, it's possible! This tutorial will show you how to use Feathers.js to create a REST API in minutes. We'll learn about Feathers.js, implement an example API, and share some thoughts and considerations. Let's begin.
What is Feathers.js
Feathers is a lightweight web framework for developing real-time apps and REST APIs in JavaScript or TypeScript.
Feathers can interact with any backend technology, supports over a dozen databases, and works with any frontend technology, such as React, VueJS, Angular, and React Native.
Feathers.js is well-known for its ease of use and rapidity of delivery, and extensive documentation. With Feathers, all you need to add a feature is to run a simple command.
Prerequisites
This tutorial is a hands-on demonstration. To get started, I assume you have the following:
What we'll be building
You will create a movie rental application to illustrate the capabilities of Feathers.js and Arctype database visualization tools. The administrator will generate movies in this program, and authenticated users will be able to rent them. You'll learn to use Sequelize to correlate tables in Feathers.js, restrict access to specific routes, and link your database to Arctype.
Getting Started
To get started, open your command-line interface and create a folder for this tutorial with the command below:
npm install @feathersjs/feathers --save
Wait for the installation to complete and confirm the installation with the command below:
feathers -V
If everything went well with the installation, you'd see the version number printed out on the console.
Creating an Application
With Feathers installed on your computer, create a folder for this application with the command below:
Mkdir RestWithFeathers && RestWithFeathers
Then, generate a new API application with the command below:
feathers generate app
The above command will prompt you to select the configuration for your application. For the demonstration in this tutorial, your selection should look like the screenshot as shown below:
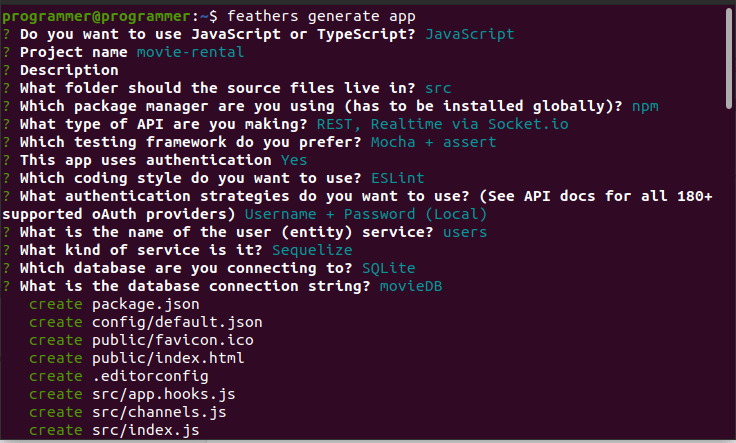
In the above screenshot, we made the following selections:
- Selected Javascript as the preferred programming language
- Specified the name for the application (movie-rental)
- Selected src the location for the project boilerplates
- Selected npm as the package manage
- Enabled user authentication
- Selected Eslint to analyze our code
- Choose a username and password authentication strategy.
- Selected user as the name for our entity
- Selected Sequelize as the ORM for the application
- Selected SQLite as our database
- Specified movieDB as our database name
Once the selections are completed, the command will generate an express-like project structure. Now let's look at the folder structure generated by running the above command.
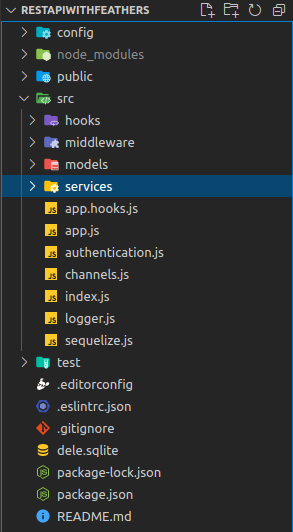
For this tutorial, we'll look at once we look at the following:
- config: Contains the configurations files for the application
- node_modules: A folder to store the list of installed packages required to run the application.
- public: Contains the static files that can be served to the client.
- src: Contains the server code for Feathers.js applications
- src/hooks: Contains the application custom hooks.
- src/middleware: Contains Express middlewares
- src/service: Contains our application services
- src/index.js: The entry file that runs the application
- src/app.js: Configures our Feathers application
- src/app.hook.js: Contains hooks that apply to every service
- src/channels.js: Sets Featherjs event channels
- test: Contains the test for the application
Now run the server in development mode with the command below:
npm run dev
Running the server in development activates hot reload and console error logging. At this point, the server should be running on port 3030, and a moviedb.sqlite file should be created in your project's root directory.
Creating Services
A service is an object or instance of a class that implements certain methods. Services provide a consistent, protocol-independent interface for interacting with any data. In Feathers, you just need to run a command, and everything is set up for you to create a service. Create a movie service with the command below:
feathers generate service
The above command will prompt you to select the configurations for your service. Your selection should look like the screenshot as shown below:

Here, you selected the ORM for your movie table, the service name, the route URL, and enabled authentication on the movie routes. Once those selections are completed, the command will generate a folder structure below in the src/service folder.
In your movie.hook file, Feathers added the code snippet below, which ensures that before the request passes through this route to the movie service, it has to confirm the user's user access token sent when the user logged in.
before: {
   all: [],
   find: [ authenticate('jwt') ],
   get: [ authenticate('jwt') ],
   create: [ hashPassword('password') ],
   update: [ hashPassword('password'),  authenticate('jwt') ],
   patch: [ hashPassword('password'),  authenticate('jwt') ],
   remove: [ authenticate('jwt') ]
 },
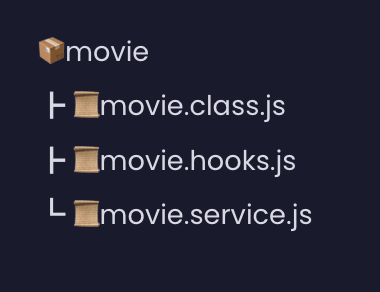
Next, create a rental service with the command below:
feathers generate service
The above performs the same operation with that movie service, but this time generates a different folder name and files as shown below:

It will also call the jwt authenticate('jwt') function in all the routes. Also, the command will generate the respective models for the services you just created with some boilerplates as shown below:

Creating database tables
With the services and models created, modify the model's properties to have the required properties for the movie and rentals table. For the movie model, add the following properties to the properties.
title: {
    type: DataTypes.STRING,
    allowNull: false,
},
producer: {
    type: DataTypes.STRING,
    allowNull: false,
},
imageURL: {
    type: DataTypes.STRING,
    allowNull: false,
},
createdAt: { type: DataTypes.DATE, defaultValue: Date.now },
     updatedAt: { type: DataTypes.DATE, defaultValue: Date.now },
Then, in the model of the rental, add the following properties.
quantity: {
       type: DataTypes.INTEGER,
       allowNull: false,
     },
     createdAt: { type: DataTypes.DATE, defaultValue: Date.now },
     updatedAt: { type: DataTypes.DATE, defaultValue: Date.now },
We still need to create an association between the user, movie, and rental model, which brings us to the next section.
Data relationships
Database relationships are associations formed between tables when data is retrieved using join statements. Relationships are often planned using an ERD diagram. You can find instructions for creating an ER Diagram here
Our application has a user, a movie, and a rental table. The movie is owned by a rental, and a user owns a rental. The most straightforward approach to maintaining track of this data in each database is to establish a relationship between them, saving the table IDs as a foreign key in the tables with which they are related. So let's go ahead and create a relationship between of three tables. In the models/user.models.js, locate the comments:
// Define associations here
// See https://sequelize.org/master/manual/assocs.html
And add the code snippet below.
const { rentals } = models;
   users.hasMany(rentals);
You created a one-to-many-relationship with the rentals table in the code snippet. This means that one user can have many rentals.
We then will also add the code below to the models/movie.model.js file.
const { rentals, movie } = models;
   movie.belongsToMany(rentals, { through: 'MovieRendtals' });
In the above code snippet, we created a many-to-many relationship between the rentals table, meaning a movie can have multiple rentals. In many-to-many relationships, a junction table is created to track the two tables' IDs, in this case, MovieRentals.
Lastly, add the code snippet below to the models/rentals.model.js file.
const { users, movie } = models;
   rentals.belongsTo(users);
   rentals.belongsToMany(movie, { through: 'MovieRentals' });
At this point, the tables now have a relationship with each other. Now you can load the data into the tables when you create or fetch the data from any service. That brings us to hooks in Feathers.
Adding Custom Hooks
Hooks are pluggable middleware functions that can be registered before, after, or on errors of a service method. You can register a single hook function or create a chain of them to create complex workflows. You'll create a hook that will load the data associated with each table. In your service/rentals folder, create a get-related.js file and the snippet below:
module.exports = function (options = {}) {
    return async (context) => {
        const sequelize = context.app.get('sequelizeClient');
        const { users, movie } = sequelize.models;
        context.params.sequelize = {
        include: [{ model: users }, { model: movie }],
        raw: false,
    };
    return context;
    };
};
In the above code, the snippet tells Feathers to load users and movie models whenever a movie is rented. Now update your service/rentals/rental.hooks.js file with the code snippet below. Modify the code inside the before object.
all: [authenticate('jwt')],
find: [getRelated()],
get: [getRelated()],
create: [getRelated()],
update: [],
patch: [],
remove: []
Test the application
Now let's test the application with Insomnia. We'll start with the users routes.
Create a user
Create a user on the /users route.

Authenticate a user
Authenticate a user on the /authentication route.

Create a movie
Create a movie on the /movie route.

Rent a movie
Rent a movie on the /rentals route. You'll specify the userId, movieId, and quantity fields in this route.

These look good! Now go ahead and test other requests method on each route, like GET, UPDATE, and DELETE.
Connect to Arctype
Connect your database to Arctype to view the tables and data created in your application. You can connect to Arctype by following these steps:
- Run Arctype
- Click on the SQLite tab.
- Click on the Choose SQLite File button
- Navigate to the project folder and select the moviedb.sqlite file
- Test the connection and save the changes
Once your database is connected to Arctype, you'd see the users, movies, rentals, and MovieRentals tables as shown in the screenshot below:

At this point, your database has successfully been connected to Arctype. You can click on each table to show the data saved in them.
Conclusion
Throughout this tutorial, you've explored Feathers.js by building a demo application. You've learned how to set up a Feathers.js application, create a service, implement authentication/authorization, create custom hooks, and connect to Arctype. Now that you've gotten this knowledge, how do you intend to use Feathers in your next project? Perhaps you can even add an extra feature to this project by forking or cloning the Github repository.

Top comments (1)
I am trying to implement your code but the code suggested in Adding Custom Hooks section both have errors. Any suggestions/fixes?