
This guide explains the Git best practices that you should adopt when building internal apps — for better collaboration, app quality, and reliability.
So far in our Git announcement series, we've discussed why Git is so important for developers and how proud we are of our “first to the moon” moment on getting the first real, fully-functional Git implementation for a web-based apps platform. To conclude, this article shows you how you can use Git to improve your workflows, enable easier collaboration, and improve the quality and reliability of your Appsmith apps.
General Git best practices for collaboration, iteration, and reliability
Git is a flexible tool that can be adapted to pretty much any workflow, but there are better and worse ways to use it. We designed Appsmith's Git functionality around the best practices of experienced developers, making Appsmith a great place for beginners to build good habits.
If you’re new to Git, we recommend that as a first step you check out the official Git quickstart videos and the official Git glossary to get acquainted with all of the terminology before you begin. Otherwise the upcoming talk about commits, branches, pushing and pulling, and even forking might get a bit confusing.
Now that you're familiar with Git terminology, let’s talk about some of the best practices for using Git whether you’re using Appsmith or not:
Never commit directly to the main branch
The main branch of your codebase should be reserved for code you consider ready to ship. Code should go through the full process of ideation, planning, implementation, testing, and more testing before being merged to the main branch.
Use feature branches to implement new functionality
If you’re working on a new feature or making improvements to an existing one, you should create a branch where you can work on that change in isolation. Then, when you're done, you can test that it works in your development environment, and then test it against other changes that may have been made in other branches since you began, and finally merge it into the main branch once you've confirmed nothing has broken. This is called using feature branches.
Commit incremental changes
Split the changes and additions you need to make to your code down into standalone pieces as much as possible and commit them individually. Then, if there's a problem with one of the changes, you can roll it back and fix it on its own, rather than having to roll back ALL of the changes you've made. It also makes merging back into the main branch easier — small changes are easier to troubleshoot if merge conflicts do occur.
Think of using separate feature branches and committing incremental changes a bit like baking a cake — you can crack the eggs directly into the main mixture and risk a bad egg ruining the whole recipe, or you can crack the eggs into a separate cup to examine them before mixing them in.
Push your code to a remote repository often
Git is a distributed version control system, so it can sync your code between multiple remote machines or online repositories hosted on services like GitHub and BitBucket. This is great for collaboration and it's also a very convenient way to make sure that your valuable code is backed up offsite.
Disasters can and will cause unexpected data loss. Fire, theft, faulty storage devices... There are innumerable ways for your data or the devices storing it to be damaged or destroyed, and your team will not be happy with you if you’ve failed to push your code.
Be verbose
Explain the changes you've made and why you've made them. Even seemingly trivial changes should be documented with comments and in the commit message, to establish good habits and ensure that all changes are visible and understood for code review. Your solution to a difficult problem may not be obvious to others.
If you're a solo developer, verbose comments and commit messages will still pay off in the long term — your memory is not as good as you think it is, and “future you” may not remember exactly how or why “present you” implemented a particularly nifty code hack.
Perform code reviews
You have separate branches with incrementally committed changes that are well described with comments and commit messages. Congratulations! You just made reviewing that much more straightforward.
Just knowing that someone else is going to read your code leads to a marked improvement in code quality and commenting — we think it's just the subconscious result of developers wanting to help their colleagues out during review. Routine code reviews mean that senior devs can also be more confident in the work junior devs are producing, while junior devs can also learn from senior devs and gain confidence.
Ensuring that code is reviewed prior to merging into the main or production branches also helps to make sure that no show-stopping bugs or security vulnerabilities make it through to your users.
Choose a branching strategy that works for your project and organization structure
Git largely leaves it up to you to use it how you want, but through planning and experience (also known as trial and error), several recognized key strategies have emerged to make the most of Git’s features.
You should avoid straying too far from convention when choosing your strategy and make adaptations only if necessary. You want your branching strategy to make sense to others and be adoptable by other teams that may join your project.
Be conflict-averse
Merge conflicts are usually caused by different developers working on the same code in the same file on separate branches and then trying to merge them. Git is not an intelligent system: it just does what you tell it to do, so it has no way of knowing which is the “correct” change to keep.
It's your job to identify the cause of the conflict and determine which change to carry forward. Merge conflicts can be greatly reduced by keeping your code organized, giving team members ownership over separate features or parts of the codebase, and encouraging them to consult with the person responsible for another section if they need to make changes there.
Best practices for Git in Appsmith
Appsmith's goal is to make app development as quick and easy as possible, and that extends to our Git implementation. We'd like to highlight a few features that assist you and some additional strategies that you should adopt to get the most out of Git on our platform.
Storing secrets
“Secrets” are the credentials you use to access database, API, communication, and other services when developing and deploying your software. They must be kept secret for a reason — database and API credentials can be used to access and modify data intended to be kept private and, in the case of APIs for paid services, cost you money if somebody else gains access and decides to run up your bill.
In Appsmith, we automatically redact all credentials used to access configured datasources. They'll never enter version control if you use the in-built functionality for storing those credentials.
If you have other kinds of secrets that you would like to avoid committing to version control, you should ensure that they are retrieved from a secure location when your app is run so that they are not present in your code.
Using branches and integrating Git workflow techniques
Your branching strategy can be extended to use development, staging, and production branches instead of a single main branch. These Git workflow best practices allow you to test changes prior to deploying them, improving the reliability of your deployed applications.
This is also useful if you are self-hosting Appsmith and want to stick with an older platform version in production while you test that your apps are compatible with an updated release. You can create a new branch, fire up a Docker container running the latest version of Appsmith, and test and tweak it without affecting your production deployment.
Be extra verbose
It's helpful to be extra verbose when writing your Git commit messages: note what you've changed, why you've changed it, and any potential repercussions for other developers (or your future self).
Providing as much detail as possible in these messages is important in Appsmith because we let you build apps in a drag-and-drop graphical interface. These interfaces are then converted into text files that may not make it obvious exactly what has changed, especially since users can’t directly write comments in the source files.
Don't forget how Git works
Every Git action in Appsmith is performed with the click of a button instead of by entering commands on the command line. One click will often perform multiple actions in a Git workflow that would otherwise take several commands.
A manual Git workflow for creating a new branch requires running the following commands to perform various actions:
-
git pullto fetch the latest code from the remote repository -
git checkout -b new-branch-nameto create a new branch and check out -
git statusto confirm the current status of the branch -
git diffto see any pending changes -
git addto add files -
git committo commit the current changes to the local repository -
git pushto sync the changes in the local repository to the remote repository
When using Git in Appsmith, this workflow is performed by:
- Clicking the button to pull the latest version of your app from the remote repository
- Clicking the button to create a branch
- Making changes to your app
- Clicking the button to commit. Changes won't sync to the remote repository until you commit, and
git pushhappens automatically after a commit.
It's worth making sure you’re familiar with how Git works before you start using these streamlined functions, just so you know what's going on in the background. If you do manage to get your application into a bad state with merge conflicts, knowing how Git functions will let you work your way back out of it.
How to use Git in Appsmith
Appsmith connects to Git repositories through standard SSH key-based authentication (supported by GitHub, GitLab, BitBucket, and other managed and self-hosted options) so that you are free to choose your own Git provider.

You can start with a blank repository for new apps, or you can pull from an existing repository to work on an existing Appsmith application.
We’ve made Git as convenient as possible in Appsmith. You can see what branch you are on in the bottom left corner of the screen (no more typing git status all the time to remember where you are!). If you want to switch to or create a branch, you can manage your remote and local branches without worrying about adding the right flag to your git branch or git checkout commands.

Committing code works just as you’d expect — you can see which pages and files in your application changed.

We’re working on improving our git diff functionality so that you can see the changes to the individual lines in the files we’re generating from the Appsmith database, which will further enhance the code review process for our users.
You can also easily merge the changes from one branch into another.

Alt-text: .
All the operations that a developer needs in their workflow are now implemented, and we’re continuing to work on additional functionality to take our Git feature to the next level and automate even more of your app development workflow.
A simple Git workflow for small development teams and projects
Git is pivotal for the operation of large development teams, but it's also a life-saver for small development teams and solo developers. By ensuring that it's easy to roll back changes and back up your work so that it is never lost, it allows for risk-free innovation and iteration.
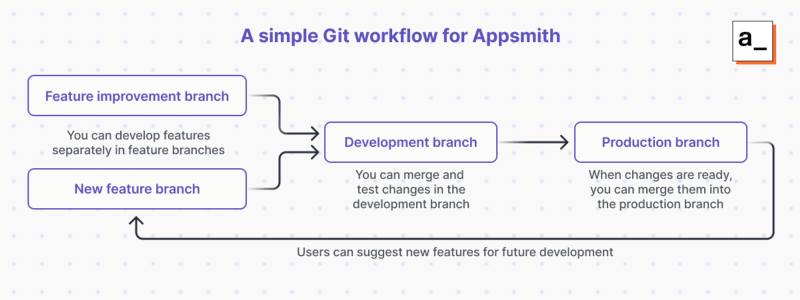
A simple Git workflow that you can adopt for your Appsmith projects when working in a small team. This is based on GitFlow.
Extending your Git workflow
If you're working in a larger team, you can integrate bespoke branching strategies into your Git workflow to improve collaboration based on your requirements. If your app relies on other back-end services that you develop, you can also coordinate updates to deploy at the same time across your infrastructure, so nothing breaks.
You can also look into other workflow architectures, such as trunk-based development. This can streamline development in larger teams by fully relying on the features of modern version control and rapidly deploying changes rather than waiting for everyone committing to a development branch. There are risks to the stability of your application compared to the GitFlow workflow, but teams with rigorous code review and robust CI/CD practices often see delivery time and other benefits from it.
Start building with Git and Appsmith in the cloud or on your own infrastructure
Git is fully supported in our free cloud-hosted version of Appsmith that lets you start creating your own apps with no installation and no infrastructure — just connect your GitHub repository, bring your data, and start building in your browser. Git is also fully supported in our self-hosted and enterprise versions for users and organizations with additional requirements.

Top comments (0)