
Choosing the right tool for a web application can be tricky. But if you do, it will make things a lot easier for you.
Depending on your application, combining Node.js and MongoDB works well most of the time — especially if you use a front-end framework like React (MERN), Angular (MEAN), or Vue (MEVN).
In this tutorial, you will learn how to create a CRUD application using Node.js and MongoDB and write some basic tests for your Node.js API. The application will connect to a MongoDB database and allow users to create, read, update, and delete blog posts.
Let's get started!
What Is MongoDB and Why Should You Choose It?
MongoDB is an open-source, cross-platform, document-oriented database program. It is classified as a NoSQL database management system and employs JSON-like documents with optional schemas.
These are some of the reasons why companies and development teams of all sizes use MongoDB:
- MongoDB's powerful document data model enables developers to store and retrieve data in their applications quickly.
- It has an excellent user interface that allows developers to install MongoDB and begin writing code right away.
- MongoDB Atlas is available in any major public cloud (including AWS, Azure, and Google Cloud), in large data centers via the Enterprise Advanced edition, or for free via the open-source Community edition. MongoDB’s horizontal, scale-out architecture can support huge volumes of both data and traffic.
- MongoDB has built a large and well-developed platform ecosystem. It has a global community of developers and consultants, making it simple to get assistance. It also provides enterprise-level support.
We'll use MongoDB with our Node.js app because Node.js has a MongoDB Node.js driver that implements the necessary network protocol and JavaScript API to read and write to a local or remote MongoDB database easily.
Prerequisites
To get started with this tutorial, ensure you've got the following installed:
Node.js Project Set-up
Now let's start! Create a new folder and initialize a new Node.js project by running the command below.
mkdir crud-with-mongodb && cd crud-with-mongodb
npm init -y
The above command will create a folder called crud-with-MongoDB and initialize a new Node.js project by creating a package.json file.
Create a new file and name it app.js in the project folder. This is the root file for your Node.js project.
Now, create a Node.js application in the app.js file with the code snippet below.
const express = require("express");
const app = express();

//middleware
app.use(express.json());

app.listen(3001, () => {
  console.log("Server is running on port 3001");
});

module.exports = app;
You have created a basic Node.js application that will run on port 3001 and added middleware that will parse the data in the request payload.
Install Dependencies for Your Node.js Project
With the project set up, go ahead and install Express and Mongoose.
npm i express mongoose
You'll also need to install Mocha, Chai, and chai-http as dev-dependencies by running the command below.
npm i -D mocha chai chai-http
Once the installation is done, open the package.json file and modify the scripts with the following configuration.
...
"scripts": {
   "start": "node app.js",
   "test": "mocha --timeout 10000"
},
...
You've configured the start and test script for your application. The application will run application tests using Mocha.
Set Up A MongoDB Database for Your Node.js App
With the required modules installed, open the app.js file and add this code snippet to set up MongoDB for your application.
...
const mongoose = require("mongoose");
//configure mongoose
mongoose.connect(
  process.env.MONGODB_URI || "mongodb://localhost/CRUD",
  {
    useNewUrlParser: true,
    useUnifiedTopology: true,
  },
  (err) => {
    if (err) {
      console.log(err);
    } else {
      console.log("Connected to MongoDB");
    }
  }
);
...
You've imported the Mongoose package and used the connect method to establish a connection to your MongoDB database.
Build A Model
With your MongoDB database connected to your application, create a models/Blog.js file in the project root directory and add the following.
const mongoose = require("mongoose");
const Schema = mongoose.Schema;

const blogSchema = new Schema({
  title: String,
  body: String,
  image: String,
  createdAt: {
    type: Date,
    default: Date.now,
  },
});

module.exports = mongoose.model("Blog", blogSchema);
You've created a blogSchema and defined the property. Then, using the defined schema, you've made a "Blog" model.
Create Services
Build a services/BlogService.js file in your project root directory. Using this approach to create reusable business logic is a good practice that prevents you from reinventing the wheel.
Open the services/BlogService.js file and add the code snippet below.
const BlogModel = require("../models/Blog");

exports.getAllBlogs = async () => {
  return await BlogModel.find();
};

exports.createBlog = async (blog) => {
  return await BlogModel.create(blog);
};
exports.getBlogById = async (id) => {
  return await BlogModel.findById(id);
};

exports.updateBlog = async (id, blog) => {
  return await BlogModel.findByIdAndUpdate(id, blog);
};

exports.deleteBlog = async (id) => {
  return await BlogModel.findByIdAndDelete(id);
};
This imports the BlogModel from the previous section to build the CRUD operations for your application.
Set Up Controllers
Now you need controllers to consume the services you've created. Make a controllers/BlogController.js file in the project's root directory and add this code.
const blogService = require("../services/BlogService");

exports.getAllBlogs = async (req, res) => {
  try {
    const blogs = await blogService.getAllBlogs();
    res.json({ data: blogs, status: "success" });
  } catch (err) {
    res.status(500).json({ error: err.message });
  }
};

exports.createBlog = async (req, res) => {
  try {
    const blog = await blogService.createBlog(req.body);
    res.json({ data: blog, status: "success" });
  } catch (err) {
    res.status(500).json({ error: err.message });
  }
};

exports.getBlogById = async (req, res) => {
  try {
    const blog = await blogService.getBlogById(req.params.id);
    res.json({ data: blog, status: "success" });
  } catch (err) {
    res.status(500).json({ error: err.message });
  }
};

exports.updateBlog = async (req, res) => {
  try {
    const blog = await blogService.updateBlog(req.params.id, req.body);
    res.json({ data: blog, status: "success" });
  } catch (err) {
    res.status(500).json({ error: err.message });
  }
};

exports.deleteBlog = async (req, res) => {
  try {
    const blog = await blogService.deleteBlog(req.params.id);
    res.json({ data: blog, status: "success" });
  } catch (err) {
    res.status(500).json({ error: err.message });
  }
};
You have created the controllers and consumed the services to:
- create a blog
- get all blogs
- get a blog
- update a blog
- delete a blog by its id
We use JavaScript's try catch to handle errors and ensure the server doesn't fail.
We return the data with a status of "success" for each controller. If an error occurs, we return the error with a status of 500.
Create Routes for Controllers
Let's now create the routes for the controllers. Make a routes/BlogRoutes.js file in the project's root directory and add the code snippet below.
const express = require("express");
const {
  getAllBlogs,
  createBlog,
  getBlogById,
  updateBlog,
  deleteBlog,
} = require("../controllers/BlogController");

const router = express.Router();

router.route("/").get(getAllBlogs).post(createBlog);
router.route("/:id").get(getBlogById).put(updateBlog).delete(deleteBlog);

module.exports = router;
You've imported your controllers and defined the routes for each controller using the Express router.
Now open the app.js file, import the blogRouter, and add new middleware so your application can use your defined routes.
...
const blogRouter = require("./routes/BlogRoutes");

...
app.use("/api/blogs", blogRouter);
...
When you send a request to the route /api/blogs, Express will check the routes in the routes folder and request routes that match the URL.
Writing Automated Tests
Automated tests are crucial to every web application. They save you time that would otherwise be spent running repetitive tests to see if your code works as expected. You'll also avoid the additional cost incurred in running repetitive tests.
You'll need to write some automated tests to ensure that your API works as expected and you'll do that using the chai module.
To get started, create a test/test.js file in the project root directory and add the following.
const Blog = require("../models/Blog");
const chai = require("chai");
const chaiHttp = require("chai-http");
const app = require("../app");
chai.should();

chai.use(chaiHttp);

describe("Blogs", () => {
  beforeEach((done) => {
    Blog.deleteMany({}, (err) => {
      done();
    });
  });
  describe("/GET blog", () => {
    it("it should GET all the blogs", (done) => {
      chai
        .request(app)
        .get("/api/blogs")
        .end((err, res) => {
          res.should.have.status(200);
          res.body.data.should.be.a("array");
          res.body.data.length.should.be.eql(0);
          done();
        });
    });
  });
  describe("/POST blog", () => {
    it("it should new POST a blog", (done) => {
      let blog = {
        title: "This is the first blog",
        body: "This is a blog post",
        image:
          "https://images.unsplash.com/photo-1518791841217-8f162f1e1131?ixlib=rb-1.2.1&ixid=eyJhcHBfaWQiOjEyMDd9&auto=format&fit=crop&w=800&q=60",
      };
      chai
        .request(app)
        .post("/api/blogs")
        .send(blog)
        .end((err, res) => {
          res.should.have.status(200);
          res.body.data.should.be.a("object");
          res.body.status.should.be.eql("success");
          done();
        });
    });
  });
  describe("/GET/:id blog", () => {
    it("it should GET a blog by the id", (done) => {
      let blog = new Blog({
        title: "This is the first blog",
        body: "This is a blog post",
        image:
          "https://images.unsplash.com/photo-1518791841217-8f162f1e1131?ixlib=rb-1.2.1&ixid=eyJhcHBfaWQiOjEyMDd9&auto=format&fit=crop&w=800&q=60",
      });
      blog.save((err, blog) => {
        chai
          .request(app)
          .get("/api/blogs/" + blog.id)
          .send(blog)
          .end((err, res) => {
            res.should.have.status(200);
            res.body.data.should.be.a("object");
            res.body.status.should.be.eql("success");
            done();
          });
      });
    });
  });
  describe("/PUT/:id blog", () => {
    it("it should UPDATE a blog given the id", (done) => {
      let blog = new Blog({
        title: "This is the first blog",
        body: "This is a blog post",
        image:
          "https://images.unsplash.com/photo-1518791841217-8f162f1e1131?ixlib=rb-1.2.1&ixid=eyJhcHBfaWQiOjEyMDd9&auto=format&fit=crop&w=800&q=60",
      });
      blog.save((err, blog) => {
        console.log(blog.id);
        chai
          .request(app)
          .put("/api/blogs/" + blog.id)
          .send({
            title: "The first blog was updated",
            body: "This is a blog post",
            image:
              "https://images.unsplash.com/photo-1518791841217-8f162f1e1131?ixlib=rb-1.2.1&ixid=eyJhcHBfaWQiOjEyMDd9&auto=format&fit=crop&w=800&q=60",
          })
          .end((err, res) => {
            res.should.have.status(200);
            res.body.data.should.be.a("object");
            res.body.status.should.be.eql("success");
            done();
          });
      });
    });
  });
  describe("/DELETE/:id blog", () => {
    it("it should DELETE a blog given the id", (done) => {
      let blog = new Blog({
        title: "This is the first blog",
        body: "This is a blog post",
        image:
          "https://images.unsplash.com/photo-1518791841217-8f162f1e1131?ixlib=rb-1.2.1&ixid=eyJhcHBfaWQiOjEyMDd9&auto=format&fit=crop&w=800&q=60",
      });
      blog.save((err, blog) => {
        chai
          .request(app)
          .delete("/api/blogs/" + blog.id)
          .end((err, res) => {
            res.should.have.status(200);
            res.body.data.should.be.a("object");
            res.body.status.should.be.eql("success");
            done();
          });
      });
    });
  });
});
Before running each test, we delete all the records in the database, so that each test can start with a blank slate. For all routes, we expect the response to contain a blog object. We also expect all the routes to return a status of "success" if everything goes well.
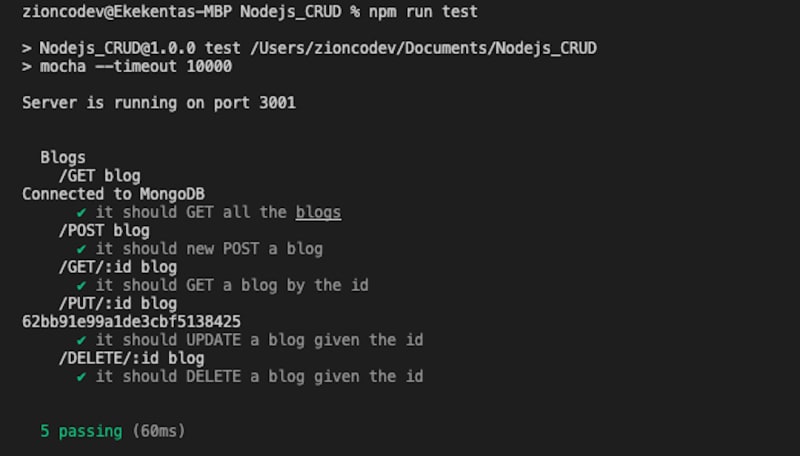
Now run the command below to see the result of the tests.
npm run test
In the above code, we used the chai module that we installed earlier to write automated tests for the application. We started by importing the chai module, the Blog model, and the chai-http module to run the server. The chai module provides a method — describe — to describe what the test does. Then, using the it method, we describe the output of each test.
To know if the application returns the expected output, we send dummy data to the server, similar to how a user would when using the API.
So, if everything goes well with the tests, you should see output like this.
Testing Your Node.js App with Postman
Now, let's test the application with Postman. Postman is a RESTful API testing tool that can help you test your API or check an API's operation. It provides a slick user interface to send HTTP queries.
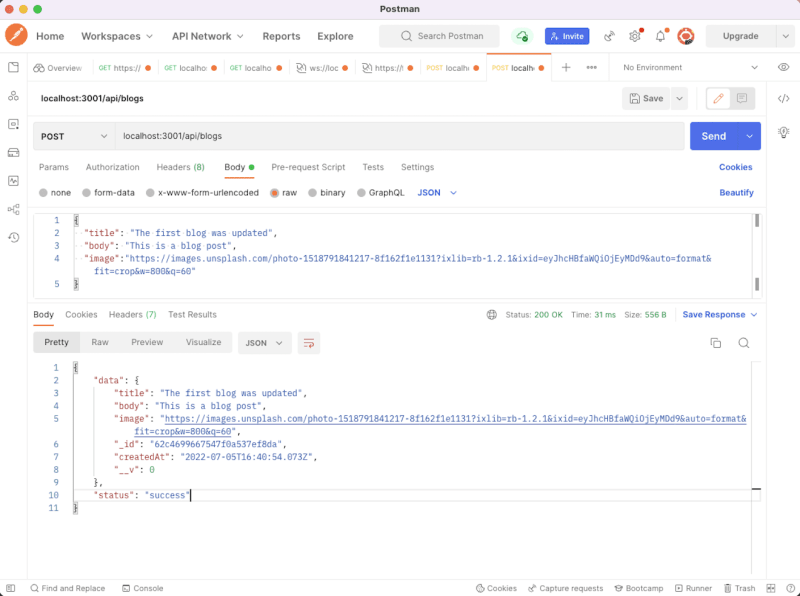
We'll start with the createBlog route and pass in the object below as JSON to the request body.
{
  "title": "The first blog was updated",
  "body": "This is a blog post",
  "image":"https://images.unsplash.com/photo-1518791841217-8f162f1e1131?ixlib=rb-1.2.1&ixid=eyJhcHBfaWQiOjEyMDd9&auto=format&fit=crop&w=800&q=60"
}
You can see this in the screenshot below.
Now test the getAllBlogs route.
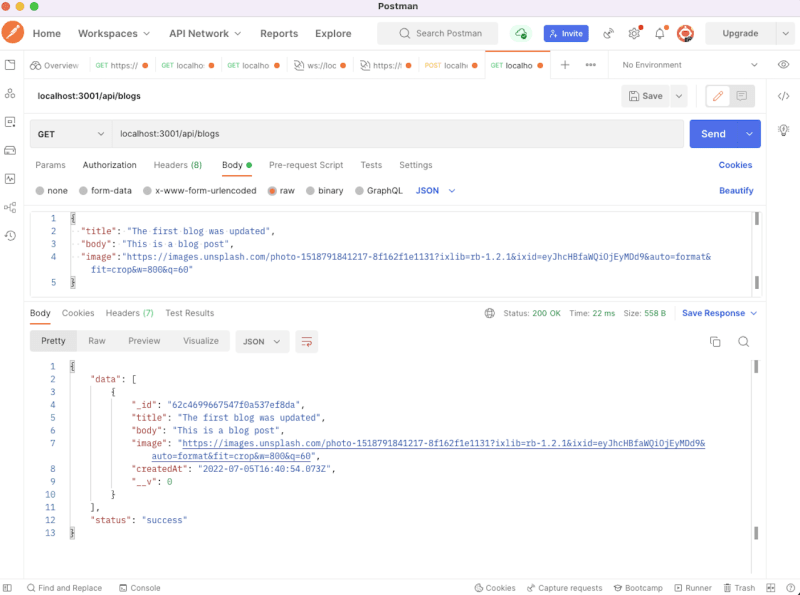
Go ahead and test get, update, and delete blog routes and see how things work.
Wrap Up and Next Steps
In this post, you learned how to make a CRUD app using Node.js and MongoDB.
We started by introducing MongoDB and considering why a developer would use it before creating a simple blog API.
How will you use Node.js and MongoDB in your next project? Feel free to clone the project from this tutorial and play around with the features.
Happy coding!
P.S. If you liked this post, subscribe to our JavaScript Sorcery list for a monthly deep dive into more magical JavaScript tips and tricks.
P.P.S. If you need an APM for your Node.js app, go and check out the AppSignal APM for Node.js.


Top comments (0)