
Modern project development often requires developers to understand not one or two core technologies, but a whole range of them. It can involve different programming languages, structures, and databases or cloud operating systems. However, one of the main challenges is scaling and configuring the interactions and dependencies of these components between themselves.
To solve such tasks, companies and developers often resort to container technology, which integrates and packages all kinds of technologies, programs, and code into one ecosystem in the form of containers. One of the most popular solutions in this area is Docker Containers, which has such advantages:
- isolate environment,
- scaling options,
- dependency management,
- host autonomy,
- simple software layout.
At the same time, we should note that the basic operating system for Docker is Linux. However, for developers who prefer Windows, some solutions use virtual machine technologies - Docker for Windows and Docker ToolBox. But their use is not always practical, as virtual machines often require additional system resources and more advanced configuration options for interaction with the main operating system.
There is another approach for such cases that uses Windows Subsystem for Linux (WSL) and allows running Linux programs, including Docker, on the Windows platform.
WSL aspect and configurations
Windows Subsystem for Linux provides functionality for Linux files, scripts, and programs in Windows 10 and Windows Server 2019. WSL does not use virtual machines but runs a compatibility layer at the system level. It provides a high integration level with the main system and allows to use most programs from repositories for Linux distributions without significant system resources.
Let’s highlight the main WSL features and aspects of its application:
- Uses only the latest Windows 10 revisions and provides the ability to run multiple Linux distributions and associated programs.
- WSL is not a complete Linux kernel, but just a compatibility functionality for running Linux programs. Therefore, for low-level support, it requires other tools such as virtual machines.
- WSL can be used effectively for simple and not heavily loaded high-level programs or scripts, for example, for the bash-environment.
In this case, for complete integration of Docker with the Windows platform, we will use the latest version of the program - WSL2. It will allow avoiding the stage of creating a private virtual machine for Docker and therefore simplify its use due to system resources and data synchronization between different systems.
Complete installation procedure of the WSL2 (after this simply WSL) is fully described in the official documentation and usually does not cause any problems. Therefore, below we will only focus on the main aspects of installation and configuration.
The main steps in WSL configuration for Windows include the following:
- Checking the operating system build version.
- Creating or logging on to Microsoft Account and joining the Windows Insider Program.
- Enabling software options and operating system settings:
- WSL and virtual machine platform support service.
- Hyper-V virtualization services (required for Docker for Windows).
- Selection of the Linux distribution and its further configuration.
- Upgrades of Linux components to required or current versions.
Next, we will show and describe these steps briefly.
There are two ways to check the version of the operating system Windows 10. The first is to use the Windows interface and execute the winver command on the run command line. The second uses the command-line interface (or PowerShell terminal) and the execution of the systeminfo command. As a result, you will get the operating system version and it should be Windows Pro 10, higher than the 18917 build or Windows Pro 10 Insider version as in our case.

Note that Windows 10 must be PRO version as for other ones, the Hyper-V virtualization service will not be configured, and the Docker for Windows will not work.
Once the operating system version matches the requirements, you will need to join the Windows Insider Program. You can do this by opening the next options:
1.Select Settings>Update & Security.
2.Select the Windows Insider Program tab.
3.Login with a Microsoft Account.
4.Press the Run button and select the Fast option.
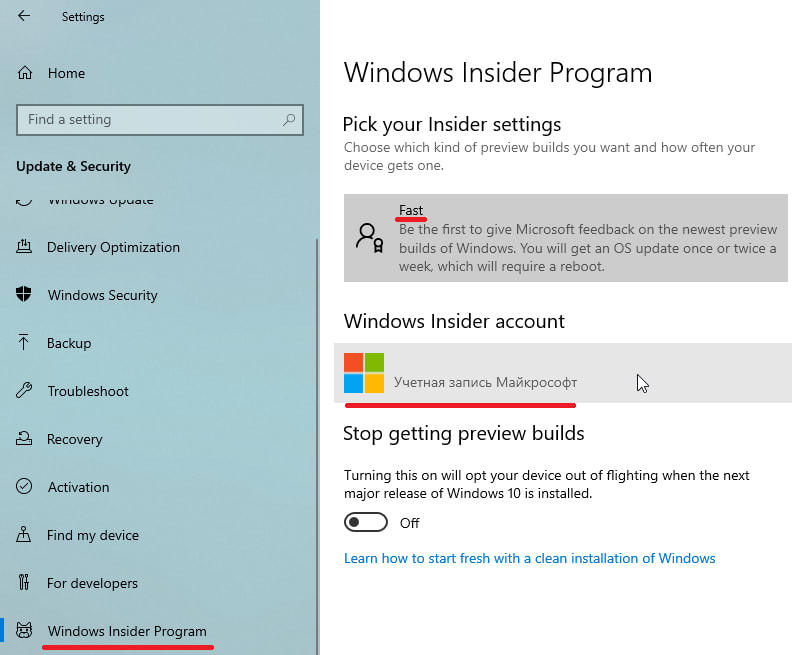
Note that if you do not get the above option, you need to become an administrator or check the operating system version again.
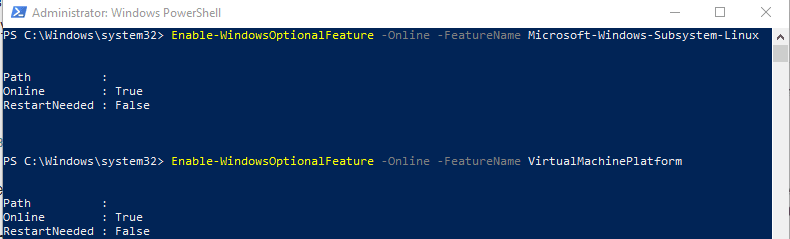
Next, we will enable necessary services and options in the Turn features on or off section as shown below :

The same can be done with the following commands in a PowerShell terminal.
Enable-WindowsOptionalFeature -Online -FeatureName Microsoft-Windows-Subsystem-Linux
Enable-WindowsOptionalFeature -Online -FeatureName VirtualMachinePlatform
Enable-WindowsOptionalFeature -Online -FeatureName Microsoft-Hyper-V –All
Following that, we will use the Microsoft Store and choose one of the free versions of Linux. In our case, it will be a popular Ubuntu 18.04 LTS image.

Before running the downloaded image, let's make sure that we are using the latest, which is the second version of the WSL. To check this, let's enter the commands in the PowerShell terminal:
wsl -l –v
wsl --set-version ubuntu 18.04 2
The second command is only required if you have installed the first version of WSL. Differences between versions and how to manage WSL images are well described in documentation and tutorials.

Following that, we will launch WSL from the Start menu, and after initial configuration, we'll get the Ubuntu terminal as shown below:

Finally we are ready to install Docker.
Docker Desktop with WSL and Docker-CE
Currently, there are two options for installing Docker on Windows 10:
- Using Docker Desktop for Windows with WSL2 backend.
- Using WSL2 tools to install the Linux version of Docker-CE.

The first option is appropriate for developers who build their projects on Windows platform and need native Linux kernel support for Docker. That makes it possible to run containers without emulation and use the Linux workspaces. Also, we should mention that Docker with WSL2 makes the system resources (specifically, memory) less demanding since it uses the dynamic memory allocation function.
The second option provides functionality of the Linux environment, which gives an advantage for projects using its tools and repositories. Note that Docker-CE does not require a basic desktop version and the Hyper-V service. Therefore, this option allows you to run other virtual machines together with WSL for other different tasks.
In general, the usage of Docker-CE and WSL does not differ from the typical Docker usage on Linux systems. Therefore, we will only focus on configuration and customization of Docker Desktop being a popular tool for managing containers on the Windows platform.
Docker Desktop with WSL2 backend
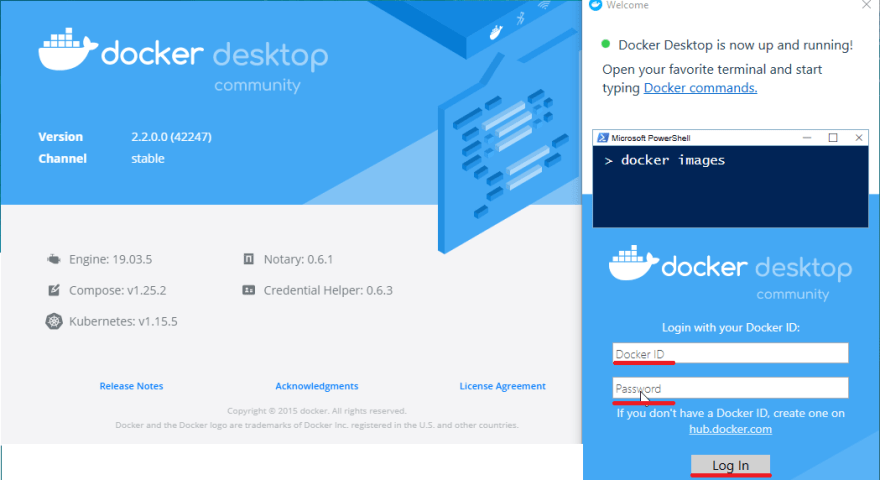
Let's install the latest version of Docker Desktop from the official website. To download the install package and get started, you will need to log in or create a new account on Docker Hub.

Follow the instructions of the installer during the installation process. The process itself takes some time, following that, the computer will require a restart to enable the Hyper-V service.

If the installer reports a firewall or antivirus blocking during the installation, you will need to add port 445 to the firewall exceptions or rules.
After installation and rebooting, the Docker Desktop will automatically launch. During the first start, you will need to enter Docker Hub Credentials to initialize all involved services.
Once the installation is complete, the Docker Whale icon will appear in the taskbar, and by clicking on it, we can configure it further.
Next, we will initialize the WSL2 backend functionality in the installed application. To do this, select Settings from the menu and activate WSL2 backend engine on the General tab.

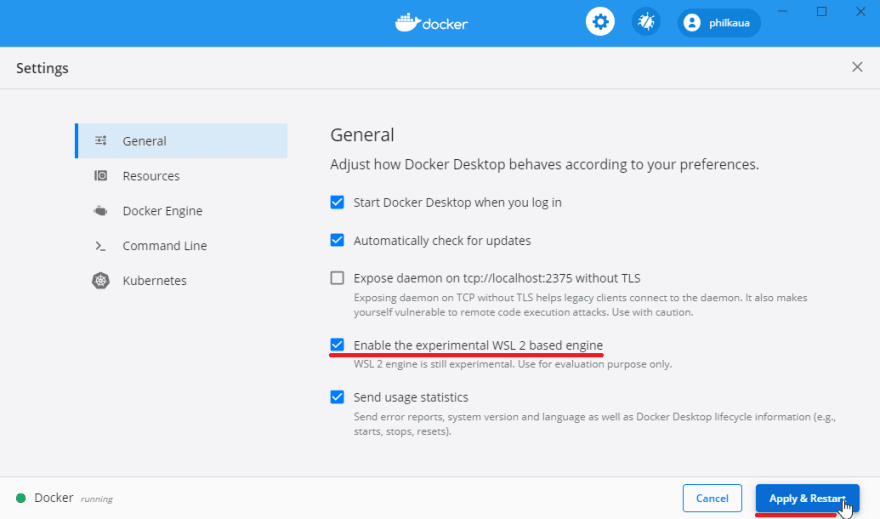
After applying these actions, you will need to reboot the Docker application and then confirm the activation of WSL integration for Docker Desktop.

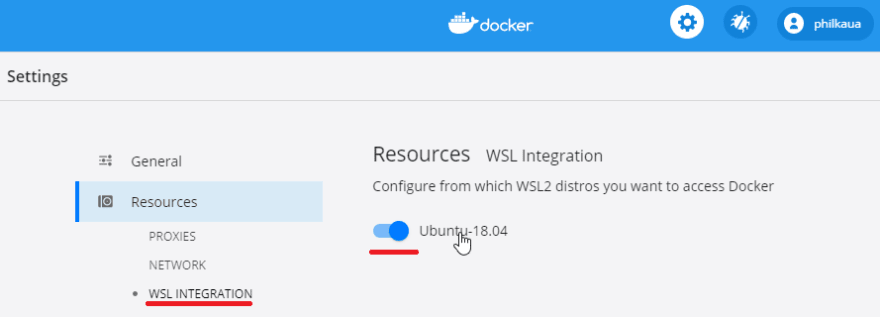
Next, you should activate the previously installed WSL Ubuntu 18.04 LTS image in Docker settings under the Resources tab.
After implementing the changes, let us check to see if everything has been installed correctly. On the PowerShell terminal using the standard docker version command:

As a result, we can see that Docker Desktop has been installed correctly and is ready for use. But before connecting, let's highlight some features of using it on a Windows system:'
- If you want to connect Windows or Linux containers, you should change the corresponding option in Docker settings as shown below:

Project files should be stored in proper folder and environment to avoid case-sensitive errors in the Windows project. One of the solutions that will help to use Windows project files in a Linux environment is the
mklinkcommand which creates a symbolic link to the project folder.
mklink /D C:\project_directory \\wsl$\ubuntu-18.03\home\user\project_directoryLocal domains should be registered in their respective host's file. Windows 10 host files are located in: C:\Windows\System32\drivers\etc\hosts
Other features and options for using Docker on Windows are generally the same as in the Linux version.
Next, let's run the simplest examples to demonstrate the features of Docker Desktop with WSL.
Running Docker on Windows
To demonstrate Docker functionality, we will use Docker Hub, which contains most ready-to-use containers.
As an example of Docker's workability, we will take the simplest container that displays the phrase "Hello-World". To do this, we need to run two commands on the command line or the PowerShell terminal.
docker pull hello-world
docker run hello-world

As we can see, the messages are displayed, and Docker Desktop works correctly. Next, let’s try to run the Windows Server container from its official image. To do this, let's run the following commands:
docker run mcr.microsoft.com/windows/servercore:ltsc2019
docker run --rm –it mcr.microsoft.com/windows/servercore:ltsc2019 cmd
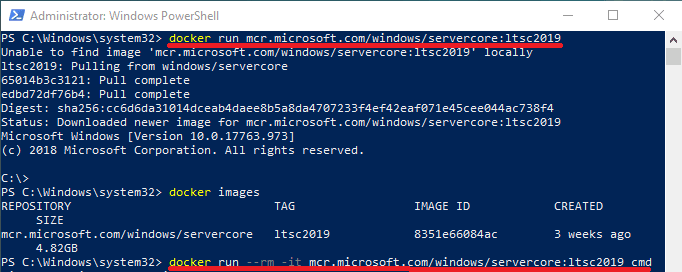
The first command downloads and runs the associated container, while the second command runs it with parameters that will output the container in the command line environment as shown below:

As a result, we have the Windows operating system running in the container. For test, we've also executed the standard command dir and tasklist and everything works correctly.
Now, we will create our container on the Docker Hub with the output of the test phrase at its startup. To do this, first of all, let's check the downloaded containers.
docker images
From the container ID, we will create a new one in our repository on Docker Hub with the following command:
FROM 8351e66084ac `n CMD echo Test Work! Hello World!" | docker build -t philkaua/windows-test-image –
After executing this command, a new container will be created. We will check its performance by running it from the PowerShell terminal using the command:
docker run <user>/windows-test-image

As we can see, the container is working.
Summary
In this article, we showed how to use containers using Docker on a Windows platform. We walked through the installation and configuration features of the Windows Subsystem for Linux as well as Docker for Windows systems. Perhaps this information will help and simplify the use of container technology with Docker and Windows.


Top comments (3)
You don't need to join the insider program anymore to get the required version as 2004 has been released. Unlike WSL, WSL2 doesn't require Pro, it also works on Home. You can just run run Docker + WSL2 on Windows 10 Home as a I have done here too.
Holy cow this looks useful.
You say that WSL isn’t a VM and doesn’t use the actual Linux kernel, but that’s exactly how WSL2 works. It is however true for WSL1.