One of the basic pillars of Apiumhub is our premise to the clients to always deliver working software with the highest possible quality levels. In order to do it, we work with Continuous Integration that allows us to have versions of their applications available for them, tested, used and that can be passed to production as quickly as possible. And today we will look more in details on how to do iOS continuous integration with Fastlane and Jenkins.
To carry out this task, we developed through a series of Jenkins plugins a DSL that allows us to have the latest software versions after having passed the integration tests, functional tests and QA tests and that are ready and validated to distribute them when the client requires it. This allows us to have short development cycles with significant value delivery and very fast feedback from end users on any of the new features added to a client application.
Thanks to the experience of several years working with several clients and the great accumulated knowledge, we have decided that it was time to incorporate new platforms to our continuous integration system. In this case, we will discuss how we have added the iOS platform to our system using the Fastlane tool and the Jenkins continuous integration system.
iOS continuous integration with Fastlane
Fastlane is a tool for managing Android and iOS continuous integration cycles (packaging and deployment). It was created by Felix Krouse and is based on ruby.
The need to create a tool of this style, had its origin in the long, repetitive and convoluted processes of packaging applications for mobile devices first in iOS and then the support to Android was added.
The fundamental basis of Fastlane is that it allows us to create a kind of ‘scripts’ that are called ‘Lanes’ where a series of preprogrammed ‘commands’ called ‘Actions‘ are executed. There are a series of actions by default in the tool that allow us to manage different aspects of the life cycle of mobile applications. The actions, as we discussed before, can be grouped into lanes that allow us to create custom scripts according to the needs that we want to cover the life cycle of the application.
Example of a lane:
lane :beta do
      increment_build_number
      gym # Build your app
      testflight # Upload to TestFlight
end
This lane is called beta and what it does is: increase the number of the build, do the packaging (generates the iPA) of the application and send it to Testflight.
We are not going to talk more about it and explaining how Fastlane works since all the documentation is very well collected in its web and there are many examples in the network.
To be able to install Fastlane we must take into account some things:
1. Have the appropriate version of ruby, for this we will execute the command
- ruby -v in a terminal
It is important to control the ruby version because by default OSX works with version 2.0 and this causes many problems to Fastlane so we recommend installing the version management system of ruby rvm. In case you have problems with the ruby version you can go to tutorials like this or do a quick search on Google (‘update osx ruby version’).
2. Install the xcode tools
- xcode-select –install
Fastlane can be installed through:
- Home Brew (brew cask install fastlane)
- Fabric
- Ruby, like a gem (sudo gem install -n / usr / local / bin fastlane –verbose)
Once Fastlane is installed on the machine, we have to go to the project folder where we want to add Fastlane and execute the command:
FastLane init
What will create all the dependencies and configure the project to support Fastlane. Once the process is finished, your project should contain a folder called fastlane and inside there should be 2 important files:
- Appfile : which contains the identifiers of the project and the equipment and the apple id is used to manage the credentials and the connection with iTunes.
- Fastfile : this is where the lane are defined. By default it usually brings the most common ones that are the lane of beta and release. This file is where all the processes of the life cycle and deploy of the application are configured and where all the management is done.
In Apiumhub we have 2 lane configured, one that we call build. What it does is pass the tests using the action scan and then use the action gym to package the application. The other one we call release. What it does is send the application to the Apple Store to publish.
Lane build:
lane :build do
      scan(scheme: "Plannear")
      gym(scheme: 'Plannear', export_method: 'app-store')
end


Lane release
      lane :release do
      deliver(force: true)
end
If the client wants to test their application internally before sending it to Apple, we use another lane called preprod that sends the application to testflight and distributes it automatically to all users added as testers.
iOS continuous integration with Jenkins: configuration
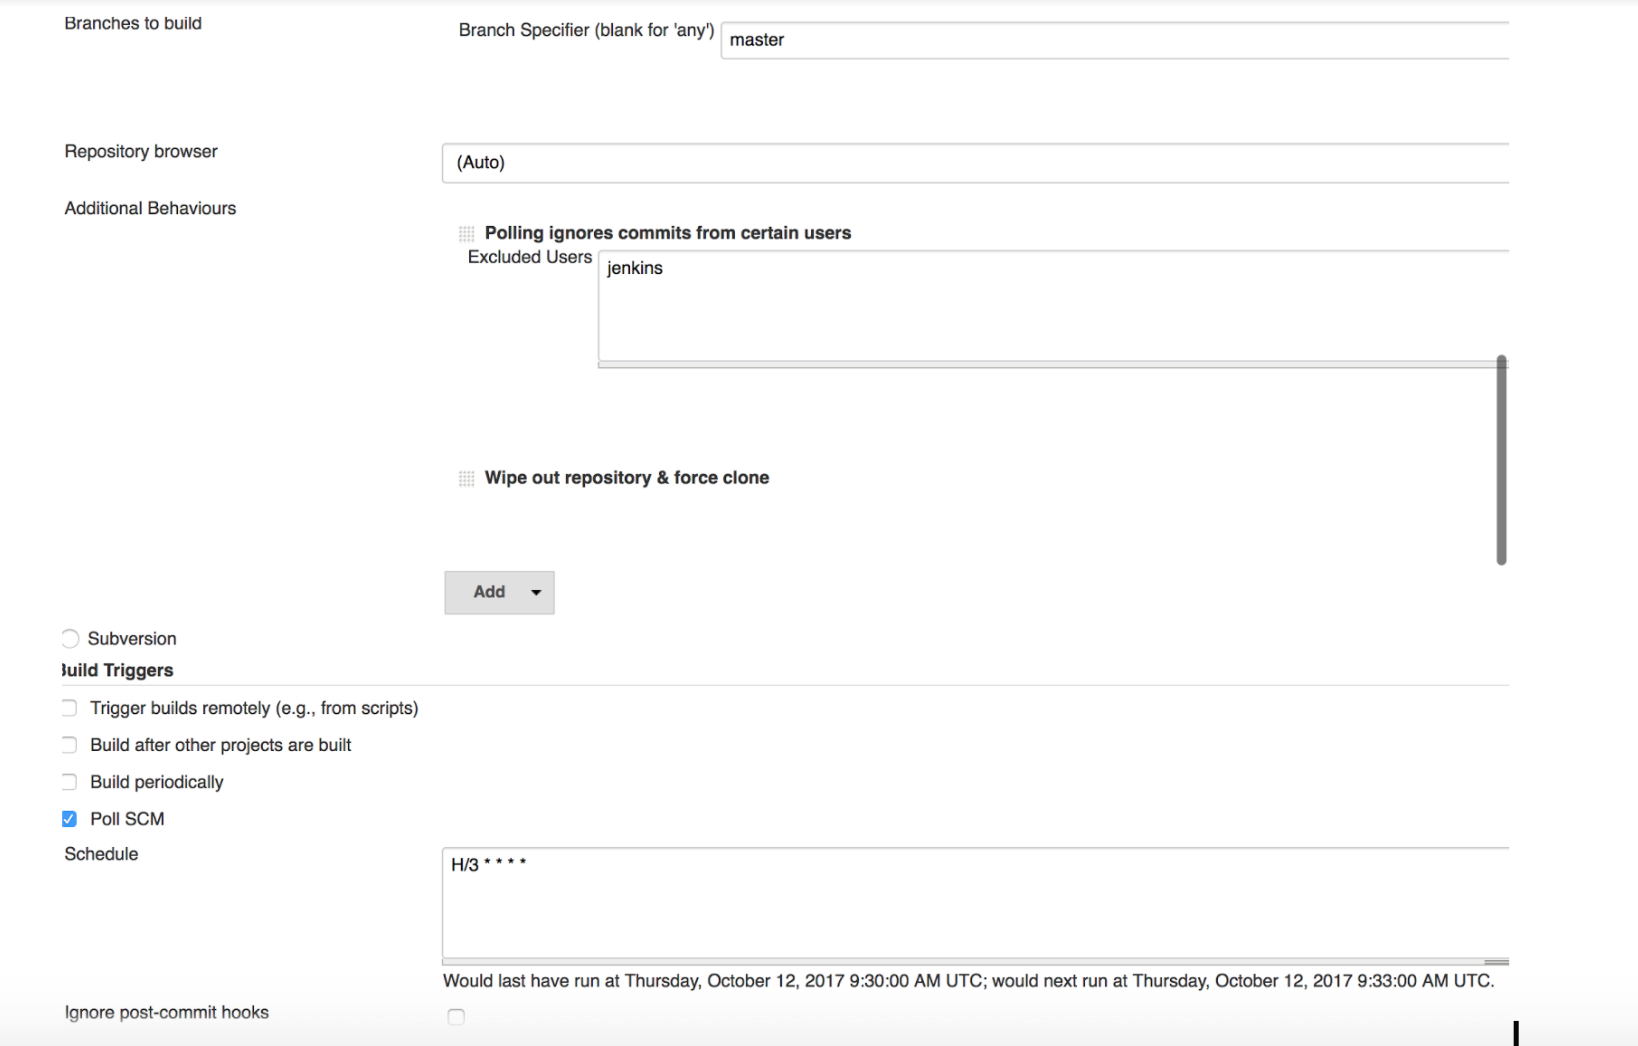
Once we have the Fastlane tool setup and tested what works in the project, what we do is configure the Jenkins to execute the tasks of the tool automatically (In this example what we have done is configure a local machine of a user as a test machine, but this could be done in the same way with any computer that had OSX installed and correctly configured the Fastlane).
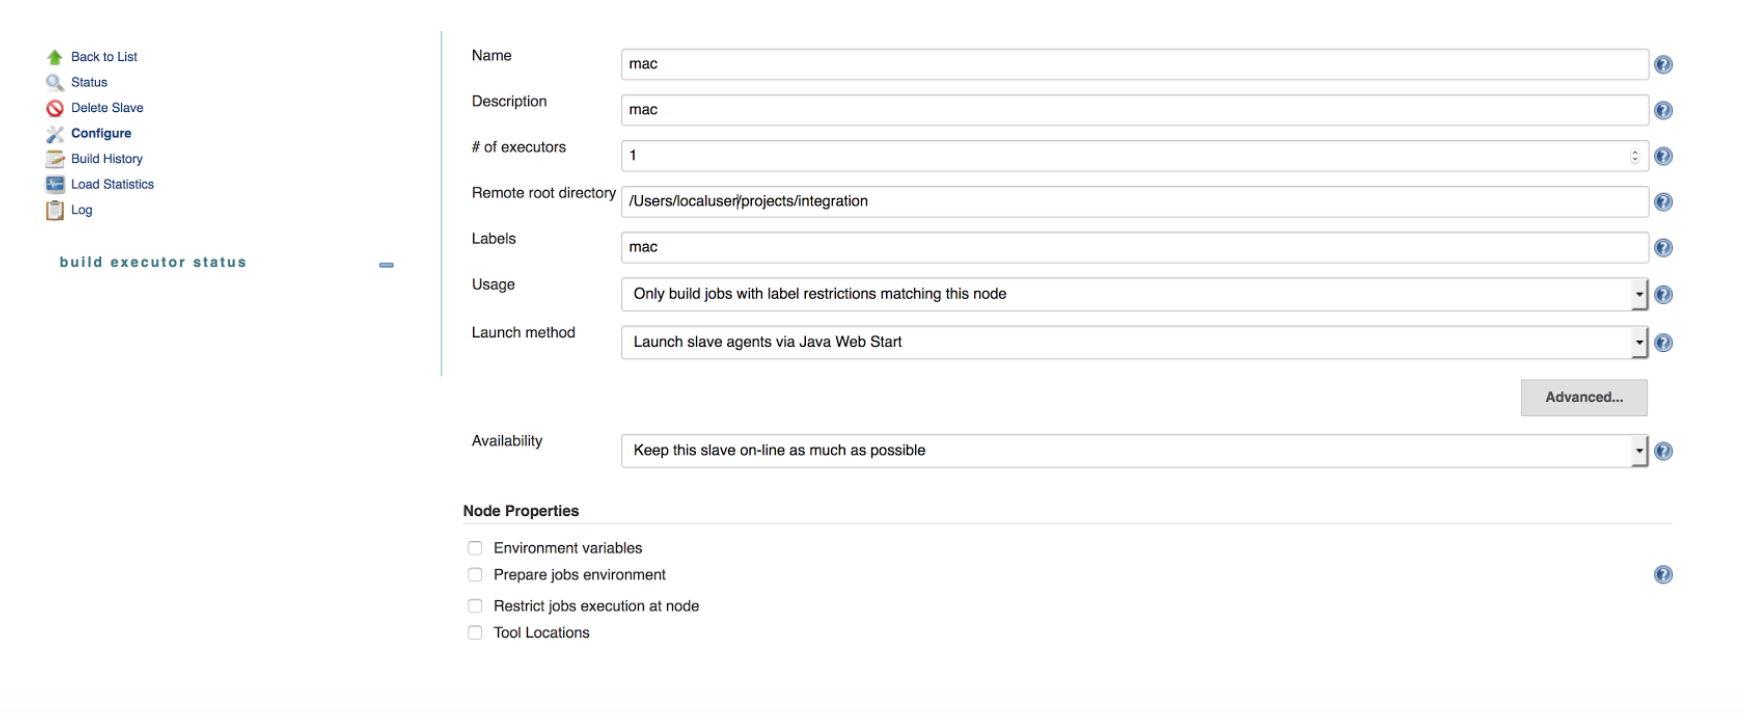
The remote node will be executed through web start. So in the machine where the remote node is executed, we have to install java and the web start tool. In the section remote root directory is the folder where the iOS project containing the Fastlane is installed.
The next step is to define our pipeline (it is necessary to have installed the plugin build pipelines) that has the following configuration:
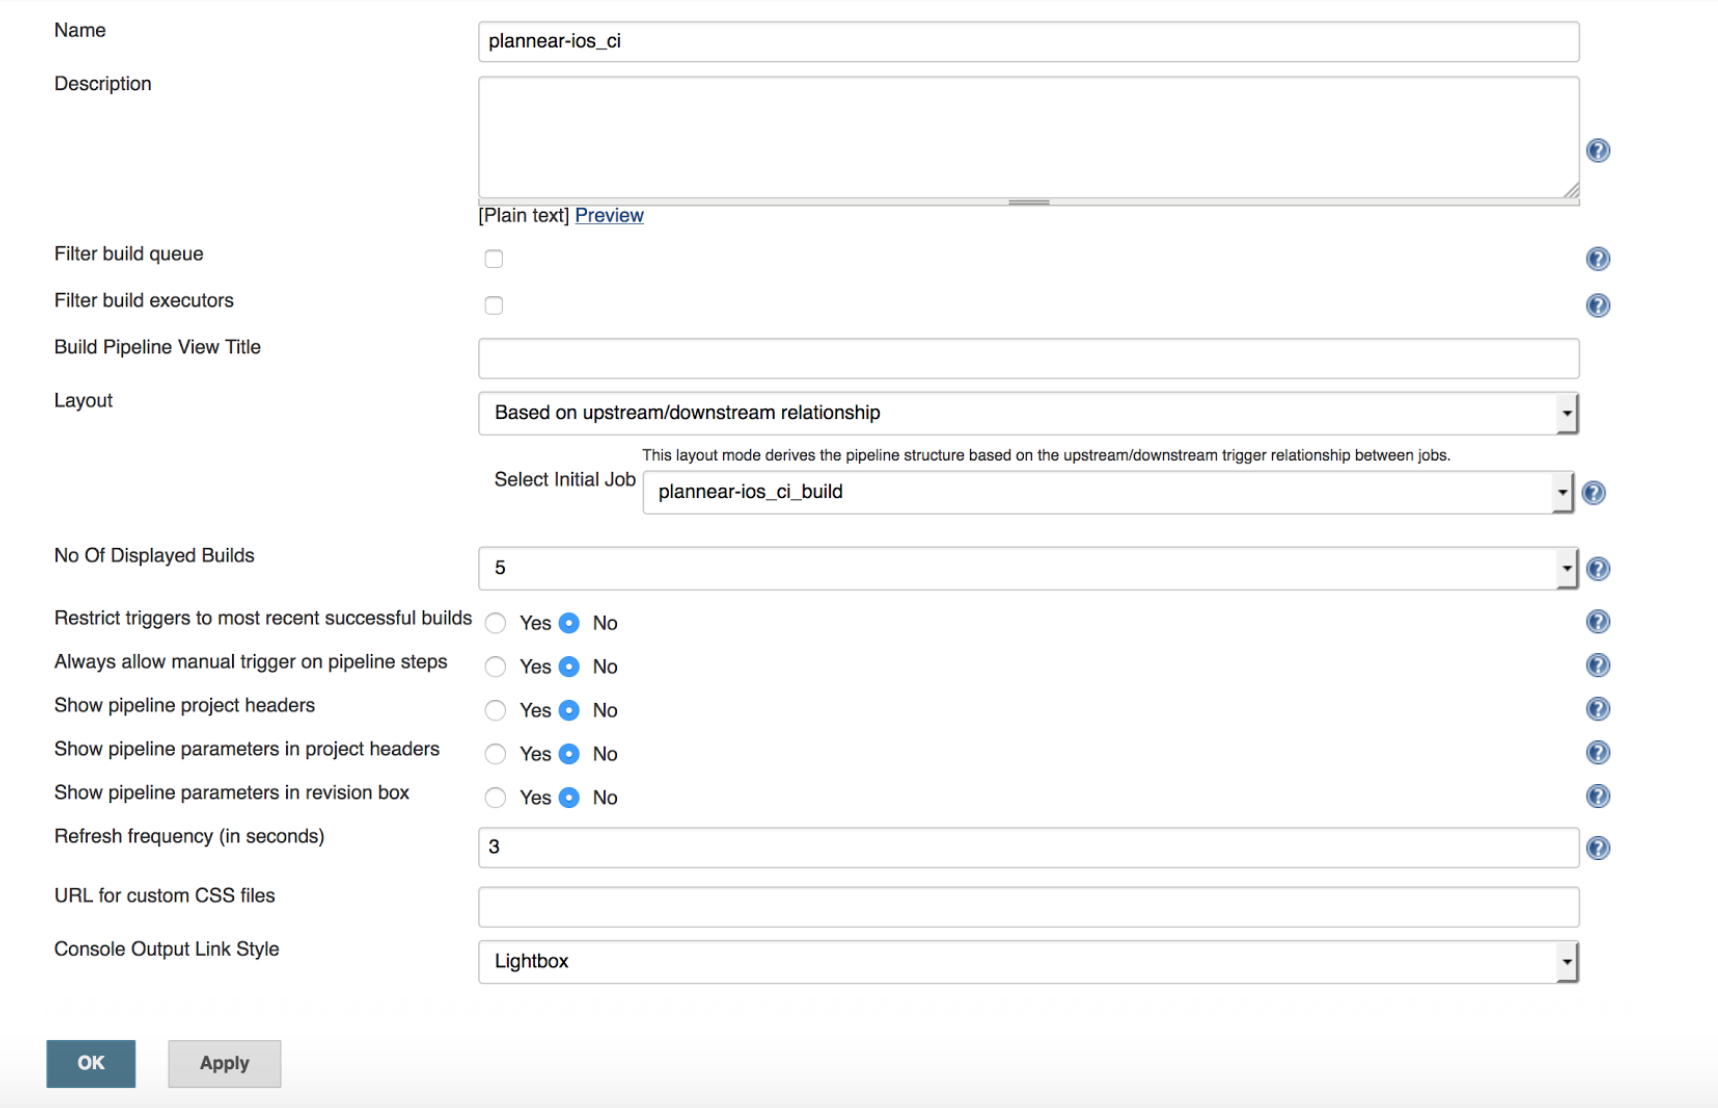
The part that we have to complete in this case is the one that says initial Job, which is where we will tell Jenkins what jobs we want it to execute in it’s pipeline.
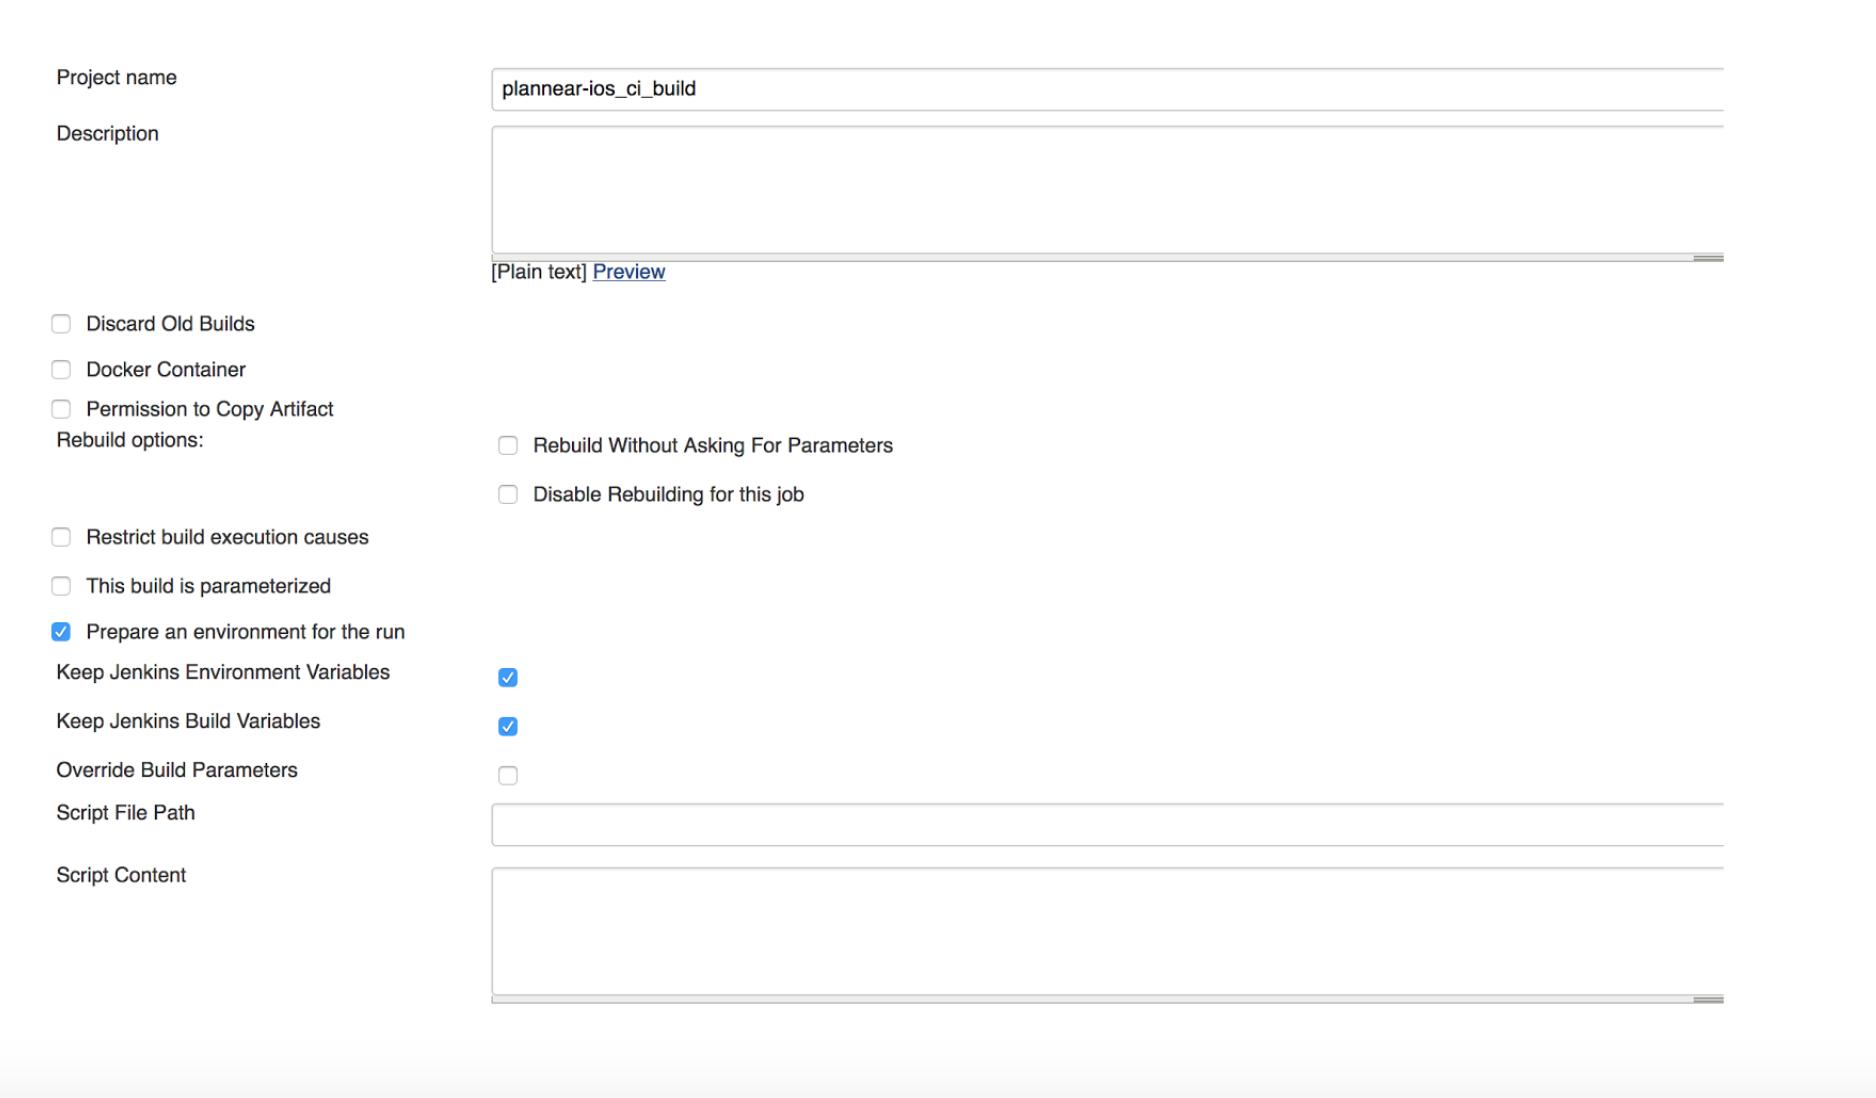
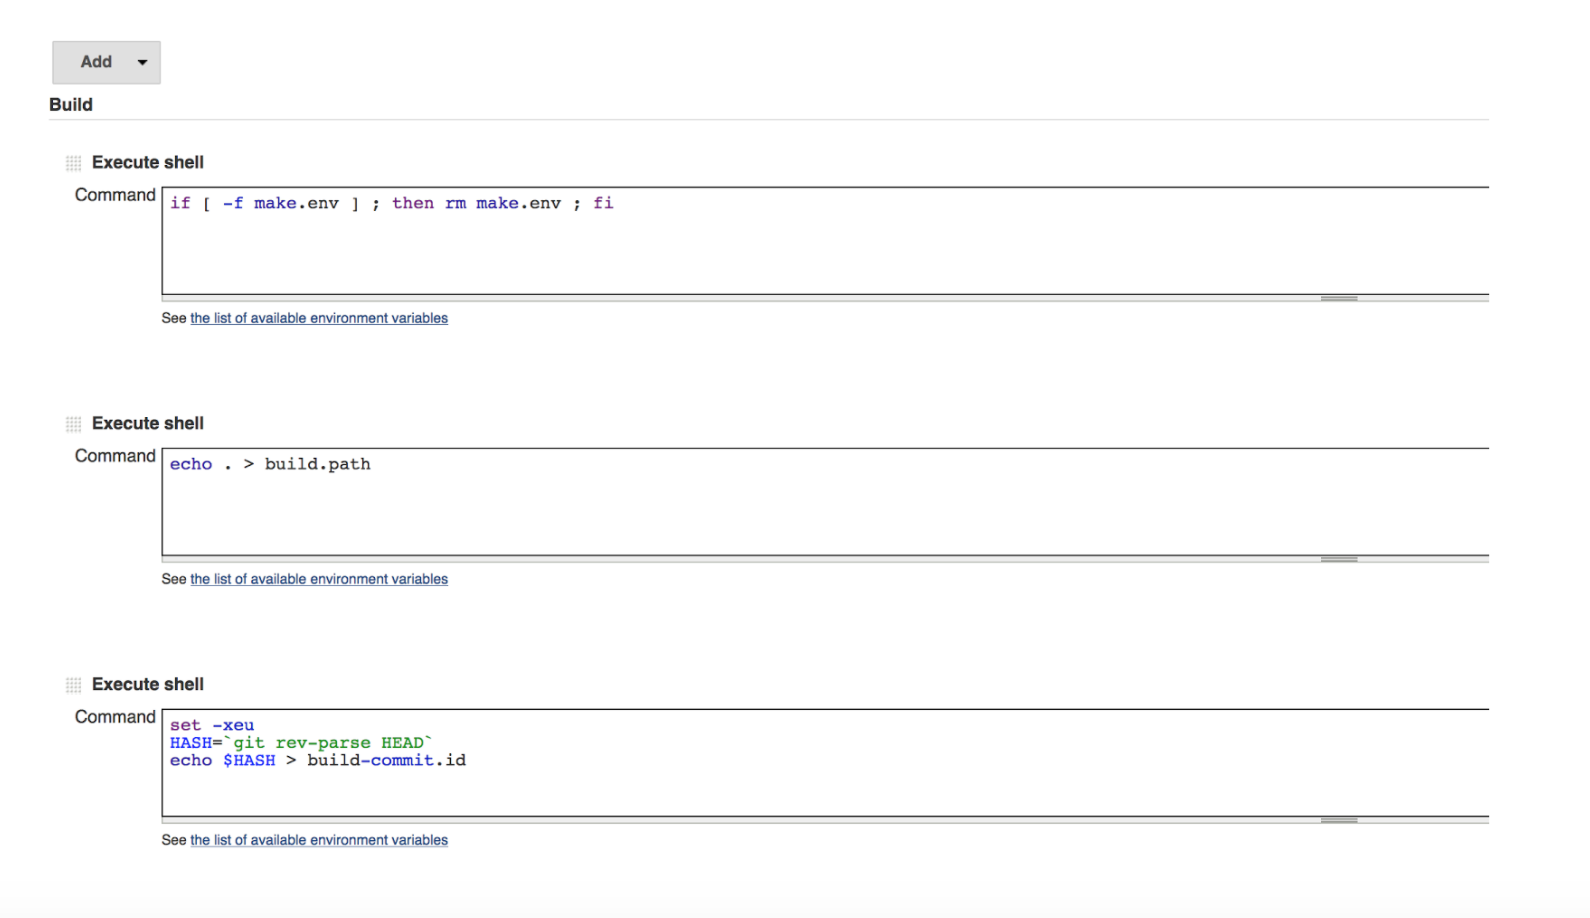
Finally, we come to the most important part of the Jenkins configuration, where we define the job that will be executed on the remote machine, every time the task of the pipeline is launched.
The configuration of the job is fairly standard for Jenkins, where it will be defined that first the github project should be downloaded and then execute the appropriate lane of Fastlane. The configuration would be similar to this:
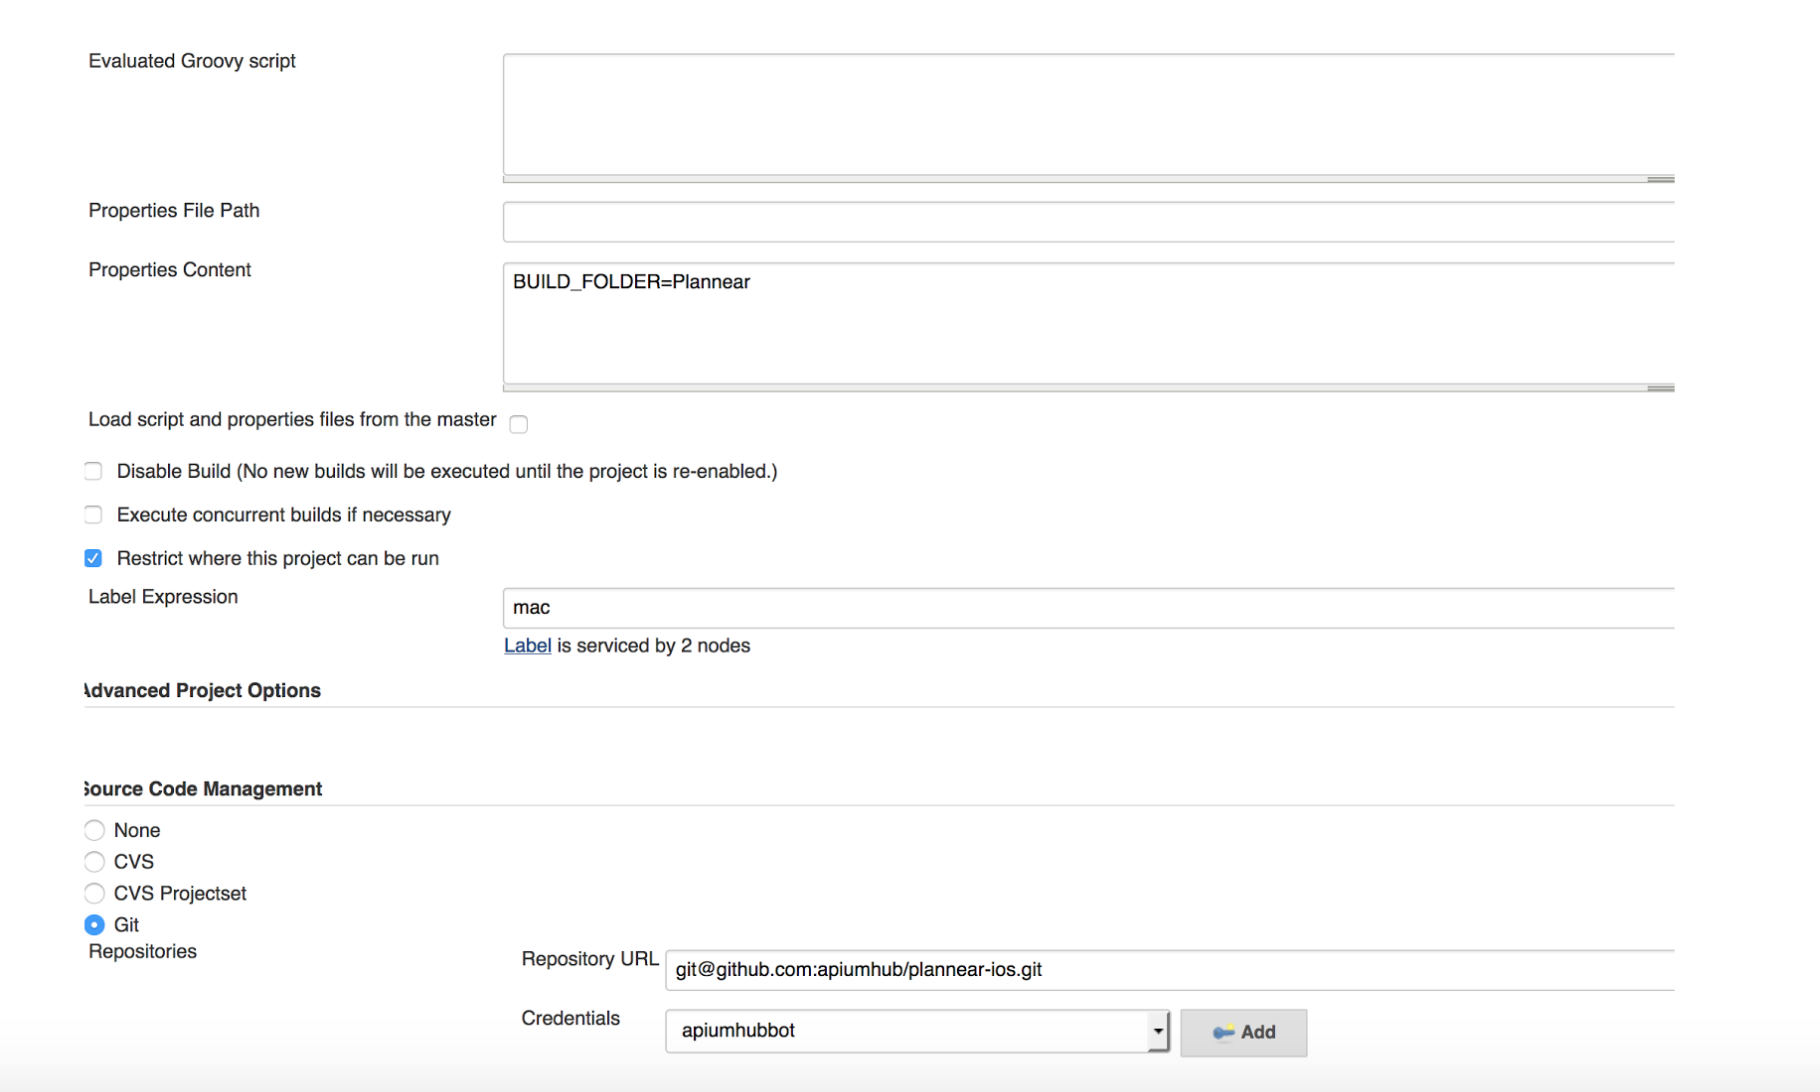
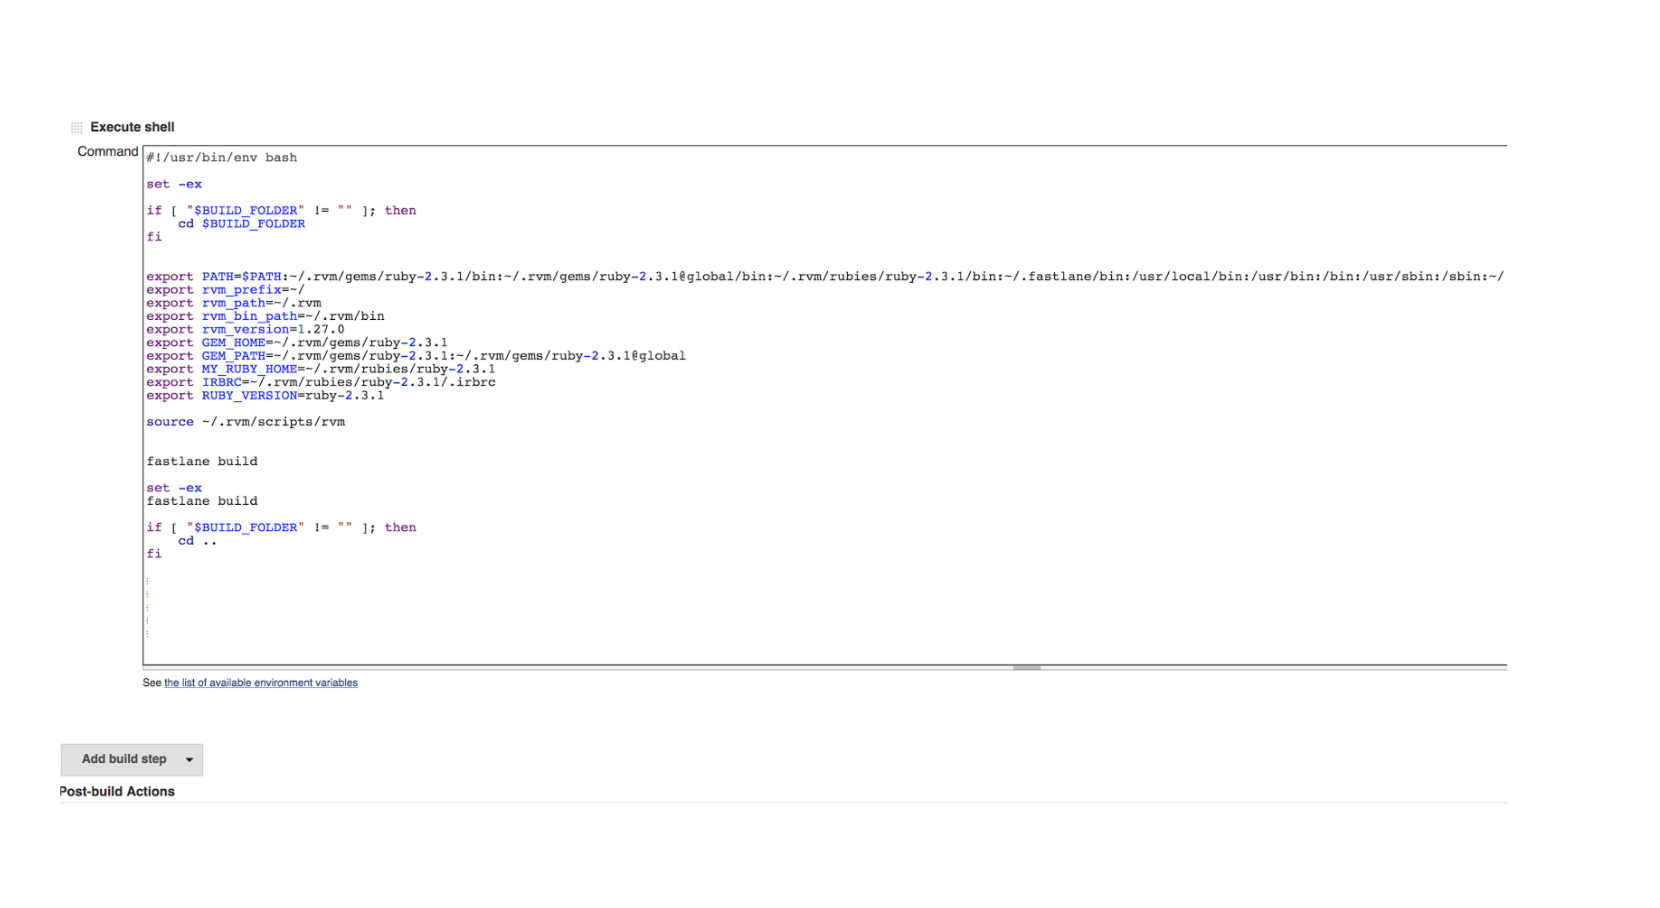
The most important part in this case is the final shell script. The particularity of this script is that it is necessary to correctly configure ruby environment variables so that Fastlane’s remote execution works correctly.
Once we have defined the set of pipeline → task → job we have already automated the whole process and simply by configuring the execution through a schedule in Jenkins we can execute any process of the life cycle of the application automatically.
In our case we usually define a pipeline for build and one for release and we can follow very quickly the process in Jenkins that would look like this:

This also helps if the client requests it, we can configure a machine in his or her facilities that executes the whole process, because in our case all the jenkins configurations are saved in a groovy file that can be versioned, which allows a quick deployment in any continuous integration environment with the same characteristics.
If you are interested in ios continuous integration or mobile development, I highly recommend you to subscribe to our monthly newsletter by clicking here.
If you found this article about iOS continuous integration interesting, you might like…
iOS Objective-C app: sucessful case study
Mobile app development trends of the year
Banco Falabella wearable case study
Viper architecture advantages for iOS apps
The post iOS continuous integration with Fastlane & Jenkins appeared first on Apiumhub.

Top comments (1)
The app pretty awesome. You can get the free version of app from AppEven app. Get it from this website.