ChatGPT Plugins serve as bridges linking ChatGPT to external APIs to use these APIs’ data intelligently. These plugins let ChatGPT undertake a range of tasks, such as retrieving up-to-date information from other APIs including sports results, stock market data, or breaking news, and assisting users in performing actions like flight booking or food ordering. Meanwhile, API Gateway is a powerful tool that allows developers to build, deploy, and manage APIs at scale. It acts as a gateway between ChatGPT and backend services, providing features such as authentication, rate limiting, and request/response transformations.
You can read from the previous post where we explored how API Gateway can be helpful for ChatGPT plugin developers to expose, secure, manage, and monitor their API endpoints. This post guides you step-by-step through the uncomplicated and direct method of developing a ChatGPT Plugin for API Gateway. As a fun extra, you will also learn how to add your plugin to ChatGPT and try it out. So, make yourself comfortable, and let's embark on this journey!
How to create a ChatGPT Plugin for API Gateway
As the getting started guide on the OpenAI website states, to build any new custom ChatGPT plugin we need to follow these general 3 steps:
- Develop an API or use an existing one, that implements the OpenAPI specification.
- Document the API using either the OpenAPI YAML or JSON format.
- Generate a JSON plugin manifest file that contains essential information about the plugin.
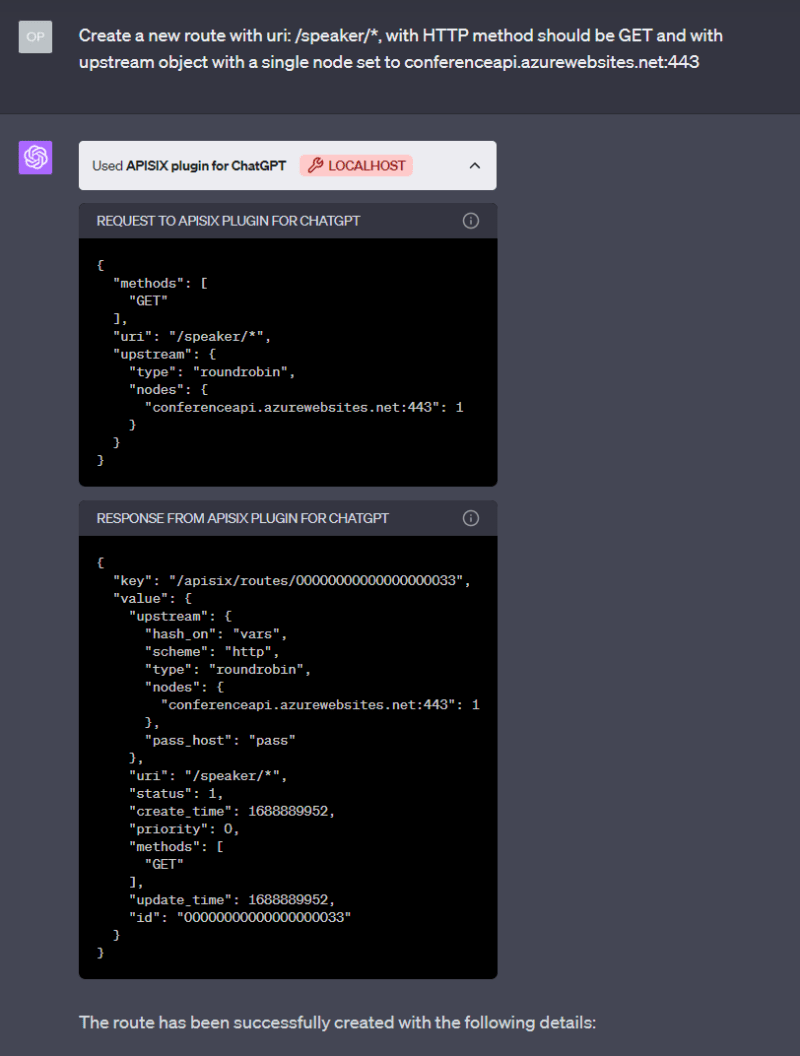
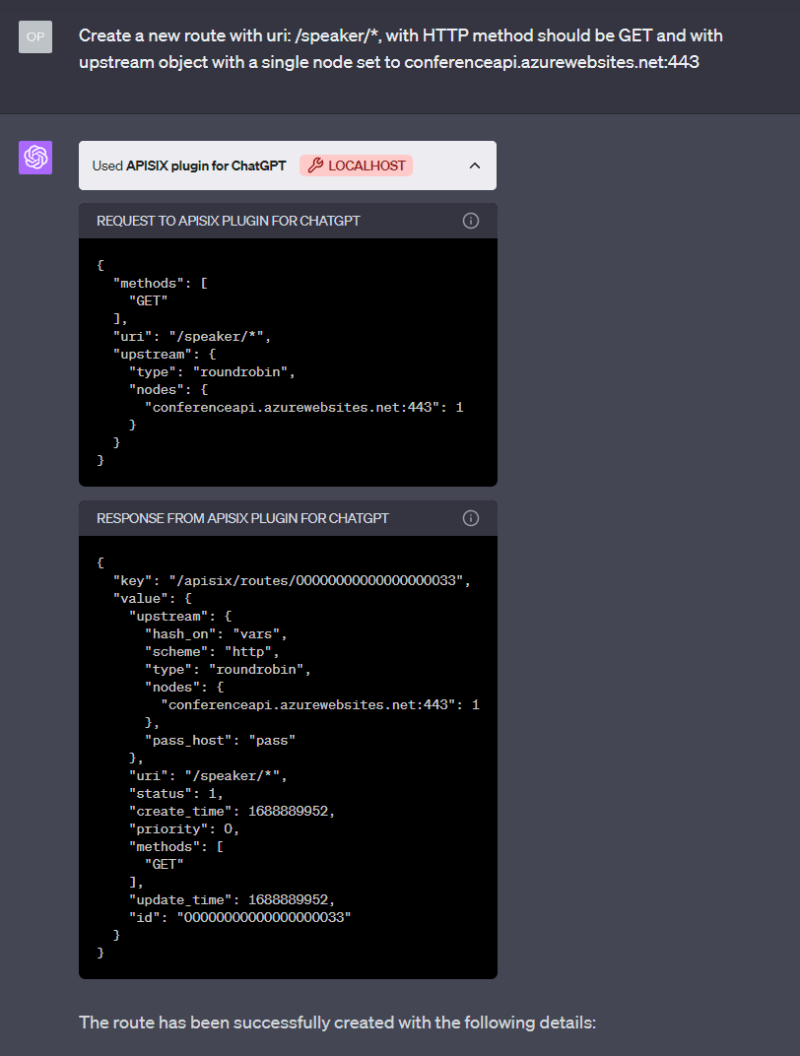
By following the above similar steps, we are going to build a custom plugin for ChatGPT that acts as API Gateway for backend API services. As an example, in the ChatGPT user interface, if a user wants to introduce an API Gateway in front of an existing Conference API to obtain details about a speaker's sessions and topics, the plugin is capable of receiving commands in the chat and then forwards the user's request to the Apache APISIX Admin API, which create a Route with the user-specified input configuration. This can be another approach to using the Chatbot to configure the API Gateway features. See sample output below:
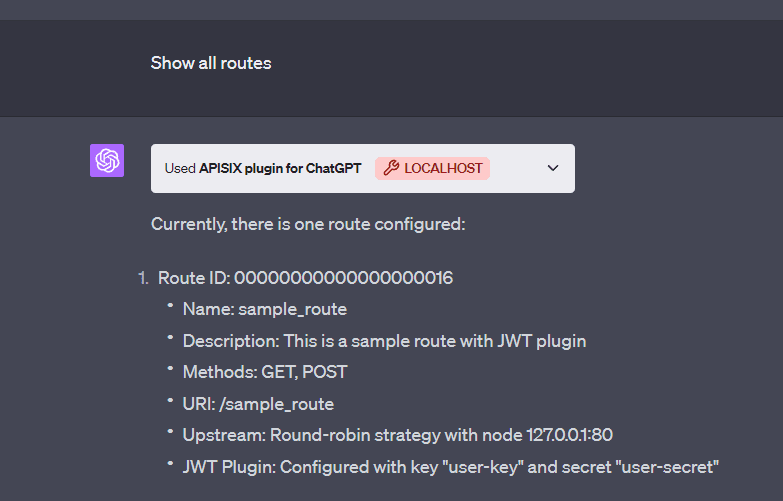
After the command runs successfully, APISIX creates the route and registers an Upstream for our Conference backend API. So, you can access the API Gateway domain and URL path to get a response through the Gateway. For example, this GET request to http://localhost:9080/speaker/1/sessions endpoint returns all speaker’s sessions from Conference API. You can also do basic operations like get all routes, a route by Id, update an existing route or create a route with plugins and upstream directly by asking ChatGPT.
To gain insight into the data flow between various components, you can refer to the provided architectural diagram:
Prerequisites
- Before you start, it is good to have a basic understanding of APISIX. Familiarity with API gateway, and its key concepts such as routes, upstream, Admin API, plugins, and HTTP protocol will also be beneficial.
- Docker is used to install the containerized etcd and APISIX.
- Download Visual Studio Code compatible with your operating system, or use any other code editor like IntelliJ IDEA, PyCharm, etc.
- To develop custom ChatGPT Plugins you need to have a ChatGPT Plus account and join the plugins waitlist.
The entire code repository for the complete API Gateway Plugin is located here. Let’s go through the steps one by one including code snippets, files and understand how to set up the API Gateway, document the API in the OpenAPI definition, and create a plugin manifest file.
The technology stack employed for the development of this plugin includes the following:
- An existing public Conference API where we use two API endpoints to retrieve a speaker’s sessions and topics information in the demo. You can discover other APIs on your browser.
- Apache APISIX API Gateway to expose Admin API and manage the API traffic.
- Python script to run the plugin, host the plugin manifest, OpenAPI specification, and plugin logo files on the local host URL http://localhost:5000/.
- The project uses Docker for convenience to build, deploy and run APISIX, etcd, and our Python script with a single
docker compose upcommand.
We will follow a series of steps to create the plugin. In Part 1, we will focus on setting up APISIX. Part 2 will entail the development of the ChatGPT plugin itself, and Part 3 involves connecting the plugin to ChatGPT and testing it. While we present the steps in sequential order, you are welcome to skip any of them based on your familiarity with the subject matter.
Part 1: Set up Apache APISIX
Step 1: Define APISIX Config
First, we create an APISIX config file. APISIX configurations can be defined using various methods, including static configuration files typically written in YAML. In the apisix.yml file, we provided an example configuration:
deployment:
  etcd:
    host:
      - "http://etcd:2397"
  admin:
    admin_key_required: false
    allow_admin:
      - 0.0.0.0/0
You can also consult with ChatGPT to understand what the above apisix.yml file means. Basically, this configuration defines the deployment mode for APISIX. Here, we use a simple traditional option where APISIX uses etcd storage to store configuration details as it gets them from Admin API. We also disable the Admin key admin_key_required for the sake of the demo.
Step 2: Register APISIX and etcd in Docker Compose
In the last step, we create a docker-compose.yml file and register APISIX and etcd there as services to build, deploy and run it. And APISIX Admin API will be available on port: 9180 and Gateway you can access it on port: 9080
version: "3"

services:
  apisix:
    image: apache/apisix:3.3.0-debian
    volumes:
      - ./apisix_conf/config.yaml:/usr/local/apisix/conf/config.yaml:ro
    restart: always
    ports:
      - "9080:9080"
      - "9180:9180"
    depends_on:
      - etcd
  etcd:
    image: bitnami/etcd:3.5.9
    environment:
      ETCD_ENABLE_V2: "true"
      ALLOW_NONE_AUTHENTICATION: "yes"
      ETCD_ADVERTISE_CLIENT_URLS: "http://0.0.0.0:2397"
      ETCD_LISTEN_CLIENT_URLS: "http://0.0.0.0:2397"
Part 2: ChatGPT plugin development
Step 1: Create a Plugin manifest
Every plugin requires an ai-plugin.json manifest file which provides important information about your plugin, like its name, description, logo assets, and so on. Read more about each manifest file field here and OpenAI includes some best practices for creating model descriptions (description_for_model). When you install the plugin on ChatGPT UI, the interface will look for the manifest file on your domain (http://localhost:5000/.well-known/ai-plugin.json). This helps ChatGPT understand how to interact with your plugin.
Create a new file named ai-plugin.json and paste the following code:
{
    "schema_version": "v1",
    "name_for_human": "APISIX plugin for ChatGPT",
    "name_for_model": "apigatewayplugin",
    "description_for_human": "API Gateway plugin to manage your backend APIs.",
    "description_for_model": "Create, retrive, manage APISIX routes, upstreams, and plugins",
    "auth": {
        "type": "none"
    },
    "api": {
        "type": "openapi",
        "url": "http://localhost:5000/openapi.yaml"
    },
    "logo_url": "http://localhost:5000/logo.png",
    "contact_email": "support@example.com",
    "legal_info_url": "http://www.example.com/legal"
}
You may notice that the file also specifies the URL to http://localhost:5000/openapi.yaml file.
When a user interacts with ChatGPT, it will refer to the
openapi.yamlfile to understand the descriptions of the endpoints. Based on this information, ChatGPT will determine the most suitable endpoint to utilize in response to the user's prompt.
Step 2: Create an OpenAPI specification
The OpenAPI specification is a standard for describing REST APIs. It is used to specify each API endpoint that the plugin will use to communicate with the model. Read more here. Here is an example of openapi.yaml file:
openapi: 3.1.0
info:
  title: APISIX Admin API
  description: >-
    APISIX Admin API is a RESTful API that allows you to create and manage
    APISIX resources.
  version: 3.3.0
servers:
  - url: http://localhost:5000
    description: Dev Environment
tags:
  - name: Route
    description: |-
      A route defines a path to one or more upstream services.

      See [Routes](/apisix/key-concepts/routes) for more information.

paths:
  /apisix/admin/routes:
    get:
      operationId: getAllRoutes
      summary: Get All Routes
      deprecated: false
      description: Get all configured routes.
      tags:
        - Route
...
# See the full version on GitHub repo
The above OpenAPI specification is just an extraction from the real Admin API schema and you can easily add more API schemas if needed. In our plugin demo, we used only Route related paths.
Step 3: Add endpoints for plugin static files (Optional for localhost)
Next, we create a Flask app in Python to expose our statics file as endpoints for the plugin's logo, manifest, and OpenAPI specification. ChatGPT makes a call to the API endpoints to fetch all information needed for the custom plugin:
import requests
import os

import yaml
from flask import Flask, jsonify, request, send_from_directory
from flask_cors import CORS

app = Flask(__name__)

PORT = 5000

# Note: Setting CORS to allow chat.openapi.com is required for ChatGPT to access your plugin
CORS(app, origins=[f"http://localhost:{PORT}", "https://chat.openai.com"])

api_url = 'http://apisix:9180'

@app.route('/.well-known/ai-plugin.json')
def serve_manifest():
    return send_from_directory(os.path.dirname(__file__), 'ai-plugin.json')

@app.route('/openapi.yaml')
def serve_openapi_yaml():
    with open(os.path.join(os.path.dirname(__file__), 'openapi.yaml'), 'r') as f:
        yaml_data = f.read()
    yaml_data = yaml.load(yaml_data, Loader=yaml.FullLoader)
    return jsonify(yaml_data)

@app.route('/logo.png')
def serve_openapi_json():
    return send_from_directory(os.path.dirname(__file__), 'logo.png')

# To proxy request from ChatGPT to the API Gateway
@app.route('/<path:path>', methods=['GET', 'POST'])
def wrapper(path):

    headers = {
    'Content-Type': 'application/json',
    }

    url = f'{api_url}/{path}'
    print(f'Forwarding call: {request.method} {path} -> {url}')

    if request.method == 'GET':
        response = requests.get(url, headers=headers, params=request.args)
    elif request.method in ['POST', 'DELETE', 'PATCH', 'PUT']:
        print(request.headers)
        response = requests.post(url, headers=headers, params=request.args, json=request.json)
    else:
        raise NotImplementedError(f'Method {request.method} not implemented in wrapper for {path=}')
    return response.content

if __name__ == '__main__':
    app.run(debug=True,host='0.0.0.0')
When the script runs, you can access files on the API domain:
-
ai-plugin.jsonwill be available on the URI path http://localhost:5000/.well-known/ai-plugin.json -
openapi.yamlwill be accessible at the URI path http://localhost:5000/openapi.yaml -
logo.pngwill be available on the URI path http://localhost:5000/logo.png
Note that we enabled CORS in the above code only to test the plugin locally deployed with the ChatGPT interface. If the plugin is running on a remote server, you do not need a proxy part. Refer to OpenAI docs to run the plugin remotely.
Step 4: Dockerize the Python app
To run the Python app automatically with Docker, we create a Dockerfile and register it in docker-compose.yml file. Learn how to dockerize a Python app here.
FROM python:3.9
WORKDIR /app
COPY requirements.txt requirements.txt
RUN pip3 install -r requirements.txt
COPY . .
CMD ["python","main.py"]
Finally, our docker-compose.yml file looks like this:
version: "3"

services:
  apisix:
    image: apache/apisix:3.3.0-debian
    volumes:
      - ./apisix_conf/config.yaml:/usr/local/apisix/conf/config.yaml:ro
    restart: always
    ports:
      - "9080:9080"
      - "9180:9180"
    depends_on:
      - etcd

  etcd:
    image: bitnami/etcd:3.5.9
    environment:
      ETCD_ENABLE_V2: "true"
      ALLOW_NONE_AUTHENTICATION: "yes"
      ETCD_ADVERTISE_CLIENT_URLS: "http://0.0.0.0:2397"
      ETCD_LISTEN_CLIENT_URLS: "http://0.0.0.0:2397"

  chatgpt-config:
    build: chatgpt-plugin-config
    ports:
      - '5000:5000'
Part 3: Integrate ChatGPT with the custom plugin
Step 1: Deploy the custom plugin
Once you have completed the development of your custom plugin, it's time to deploy and run it locally. To start the project run simply the following command from the project root directory:
docker compose up
When you start the project, Docker downloads any images it needs to run. You can see that APISIX, etcd and Python app (chatgpt-config) services are running.
Step 2: Connect the custom plugin to the ChatGPT interface
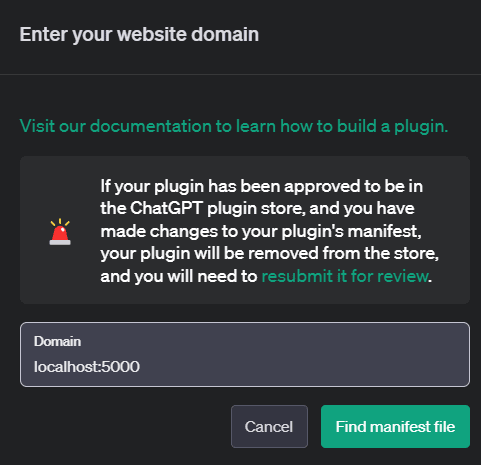
So, you’ve deployed the ChatGPT plugin, plugin config files accessible through API and now you’re ready to test it out. If you have a Plus account, we must first enable the plugin in GPT-4 since it is disabled by default. We need to go to the settings and click the beta option and click “Enable plugins”. Then click the plugins pop bar on the top of ChatGPT, navigate to “Plugin Store” and select “Develop your own plugin”. Provide the local host URL for the plugin (localhost:5000).
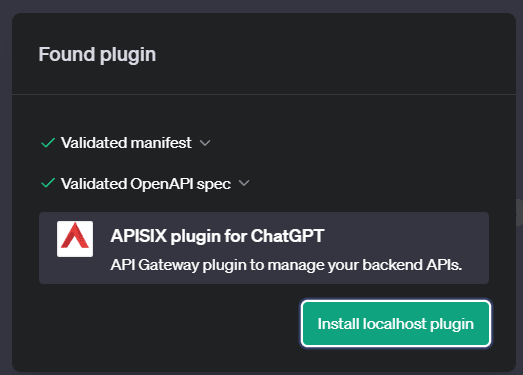
After you click on “Find a manifest file”, if everything is set it up correctly, you will see ChatGPT validates successfully both manifest and OpenAPI spec files.
Step 3: Test the custom plugin
Now the plugin is connected to the ChatGPT interface, we can write a simple command:
Since we do not have any route in the APISIX, we can create a new one. Here depending on the language used in our prompt ChatGPT will choose to call the appropriate APISIX endpoints. Please, try to write a command with more specific details so that ChatGPT can create a Route correctly.
Now the route has been created, you can access the Gateway endpoint to fetch Conference session details: http://localhost:9080/speaker/1/sessions. You can replace this Conference API with your backend API too.
API Gateway custom plugin other use cases
Now you can ask a question: What else you can do with this plugin other than simply routing the requests? There are many things you can improve on this plugin or add extra features that APISIX offers via the Admin API. Because we put the API Gateway in the front of the Conference API and API Gateway serves all requests coming from the plugin first, you can achieve at least the followings:
-
Security: Assume that now you want to secure the Conference API, without API Gateway in place you can still secure the data exchange between ChatGPT UI and plugin by using Plugin Authentication methods from OpenAI. However, the communication between the plugin and your backend service still remains unsecured until you implement some cross-cutting concerns in Python code, instead of spending time on this:
- We can implement security measures like authentication, authorization, and rate limiting with the API Gateway to protect the Conference API from unauthorized access and potential attacks. ChatGPT can talk to API Gateway freely but the communication between API Gateway and backend service can be absolutely secure.
- Caching: It is possible to cache similar Conference API responses so that we can show data for ChatGPT quickly.
- Versioning: We can create the second version of Conference API to route ChatGPT plugin requests to the newest service without changing any config and downtime.
- Load Balancing: We can distribute incoming requests across multiple instances of the Conference API, ensuring high availability and efficient resource utilization.
- Request Transformation: We can modify the requests made to the Conference API, enabling data transformation, validation, or transform requests from REST to GraphQL or to gRPC service calls.
- Monitoring and Analytics: The API Gateway provides robust monitoring and analytics plugins, allowing you to gather valuable insights about API usage, performance, and potential issues.
If you want to use Apache APISIX API Gateway as a front door for communication between ChatGPT custom plugins
and backend APIs, you can check this repo API Gateway between ChatGPT custom plugin and backend APIs
Next steps
Throughout the post, you learned how to create the custom plugin for API Gateway with the basic functionalities. Now you can take the sample project as a foundation and improve functionalities by adding more APISIX Admin API specifications to openapi.yaml file to use and test other plugins and add API consumers and more. Feel free to contribute to the GitHub project by raising pull requests.





Top comments (0)