
With the latest addition to the Apillon NFT Service, you can now deploy NFTs to the Astar Network in a few-click manner.
The latest integration of the Astar Network's smart contracts into the Apillon dashboard comes just days after Moonbeam inaugurated the platform's NFT season.
Apillon partners with Astar to deliver multi-chain smart contract connectivity
In this guide, you're taken step-by-step through the process of deploying an NFT collection on the Astar network using the drag-and-drop NFT Service. Low-code, fast, and in just minutes.
☝️ Note: At this stage, the process is the same as with deployment on the Moonbeam Network - the only difference being the choice of network (Chain) at the Mint NFTs step.
Things to know before you begin
How will your NFT collection work?
👉 Duration: As you deploy NFTs on a blockchain, they become immutable and non-deletable. If specified, NFTs could be revoked but not deleted. In case you are just testing and playing around, you might want to use dummy files and not the precious one-of-a-kinds.
👉 Hosting: Thanks to Apillon supporting Web3 Hosting with Crust and IPFS, all uploaded contents linked to your NFT collection are stored decentrally, too.
👉 Cost: Currently, Apillon services are offered at a freemium plan. Whatever you deploy at this stage remains a part of it and will not be included in upoming paid plans.
👉 Access: As you deploy an NFT collection, you make it permanently traceable on the blockchain. You can choose different ways to distribute NFTs to your audience or the public. The Apillon dashboard wizard guides you step-by-step through the process of creation and deployment of an NFT collection, however, you may go down the coding path:
- Write JavaScript code and logic to unlock the NFTs only at specific custom-set achievements (game rewards, loyalty bonuses, etc.)
- Deploy your website with Apillon Web3 Hosting
- Unlock access to your NFTs only for users who achieve a certain level in your app logic
👉 Editability: The deployment of an NFT collection via the Apillon NFT Service wizard does not include IPNS metadata mutability and/or gradual releases. You can still incorporate these by manually uploading metadata and NFTs using the Apillon infrastructure.
👉 Network: The current release of the NFT Service supports Moonbeam Network (Mainnet), Moonbase (Testnet), and Astar Network. In this guide, the NFT deployment on Astar Network is described.
What will you need?
To create an NFT collection on Astar with Apillon, make sure you have the following ready:
- Access to the Apillon dashboard
- NFT files
- NFT metadata
Learn more about how to create NFT files, from AI tools for artistic expression to metadata that defines and describes your NFTs. 👇
Guide: NFT Service prerequisites - Generate NFT art (with AI) and get files ready
Now that you have everything prepared, you can deploy a brand new NFT collection in minutes - with its contents stored decentrally and hosted either on a decentralized network or your existing website.
Let's dive in.
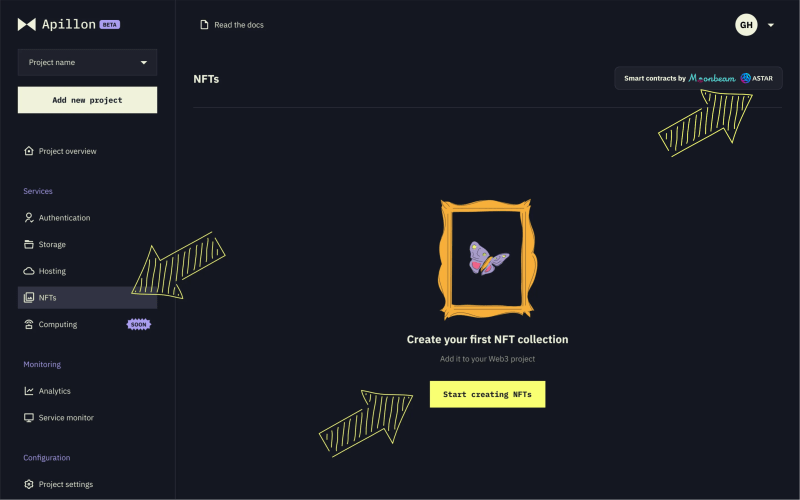
On the Apillon dashboard, navigate to Services in the menu on the left, and click NFTs.
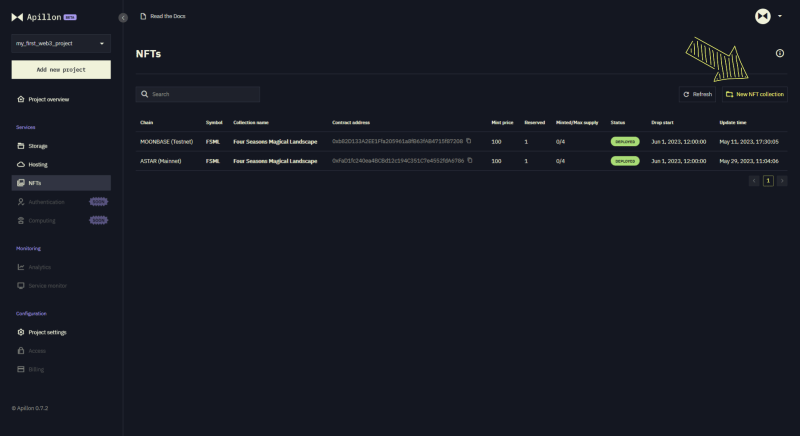
🔎 Note: In the top right corner, you can see the NFT smart contracts are provided by both Moonbeam and Astar networks. This guide focuses on deploying NFTs on Astar, but a similar process works for both.
If this is your first time working with NFTs on Apillon, click the "Start creating NFTs" button.
If you have already done some NFT work with Apillon, instead, you see the currently deployed collections on your dashboard. In the top right corner, click "New NFT collection".
In either case, to launch and deploy an NFT collection, you need to complete three steps.
- Store NFT metadata
- Compose NFTs
- Mint NFTs
Step 1: Store NFT metadata
After all the work you have put into designing your NFTs, the last thing you want is for them to vanishing from the face of Web3 in case of mishaps. To prevent that, you should store the NFT files - the unique assets and the data that makes them unique - on the web, and the best way to do it is by ensuring permanent access with decentralized storage.
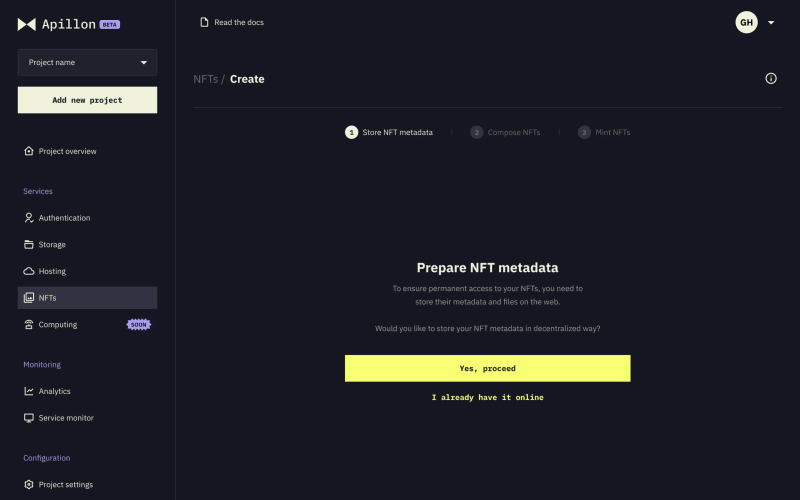
When the dashboard asks, "Would you like to store your NFT metadata in a decentralized way", there are two options (click on either to continue the process):
- Yes, proceed > go to Step 2 to upload files and data
- I have metadata online > go to Step 3 to source files and set parameters (advanced)
Step 2: Compose NFTs
2.1 Upload NFT metadata
In this step, upload your NFT metadata file in a CSV format - click "Select CSV file". The Apillon platform will automatically create a Web3 Storage bucket in the background and link it to your NFT collection.
👨💻 Advanced: If you're a developer with a wider scope of control and experience, you can achieve the same result manually. On the platform under Storage, create a Web3 Storage bucket, upload metadata and, when it's time to deploy your NFT collection, call the metadata URI.
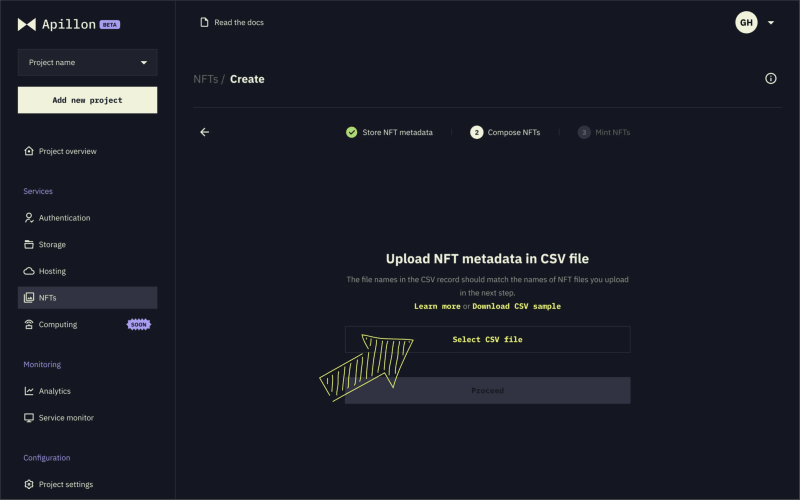
Once uploaded, the file name appears on the dashboard. Double-check it, and if you unintentionally chose the wrong one, click the delete icon next to it and upload again.

Click “Proceed”.
In the pop-up window, select Metadata attributes - the elements that describe your NFTs, and set their format (e.g., a "String" represents text-form values).
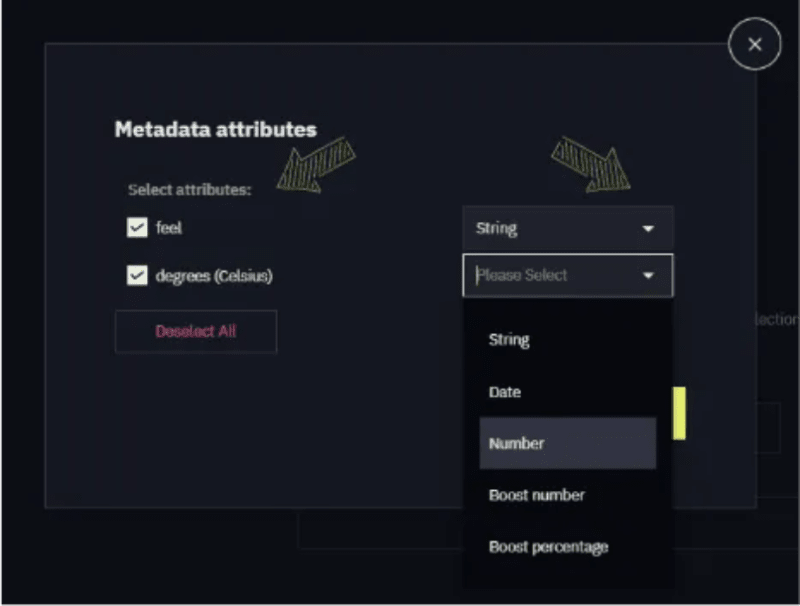
☝️ Note: The unchecked elements are still imported but don't function as NFT attributes.
Click “Confirm attributes”.
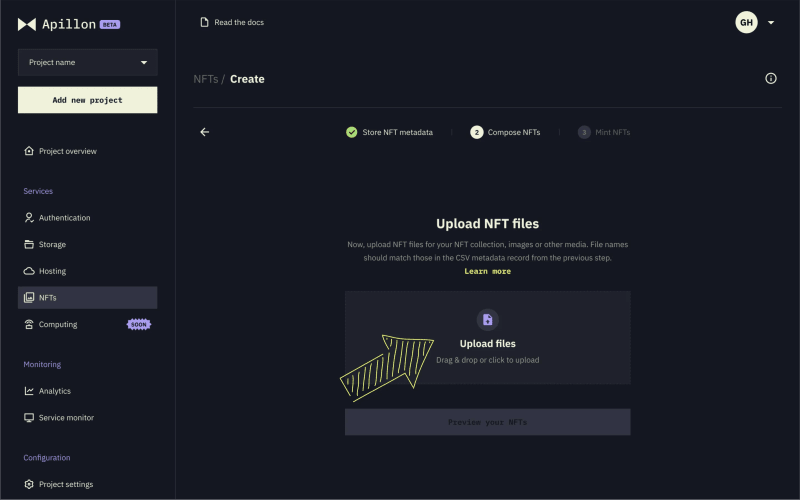
2.2 Upload NFT files
Next, it's time to upload the essence of your NFT collection - the one-of-a-kind creations.
Click “Upload files” and select them from your local storage.
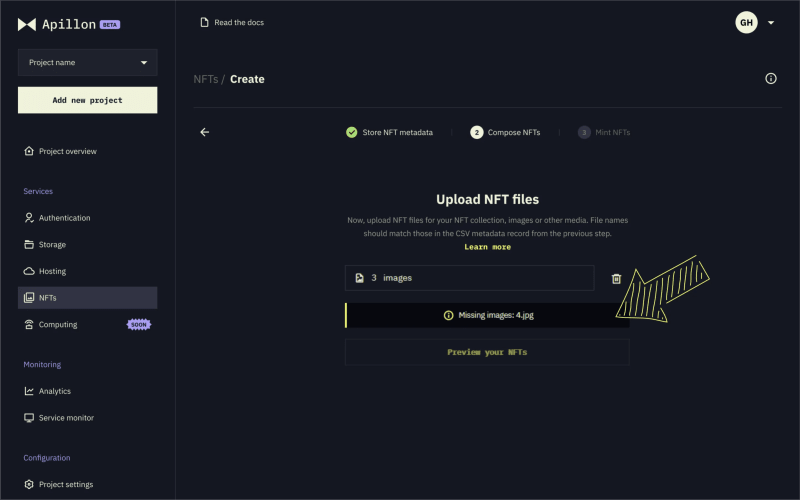
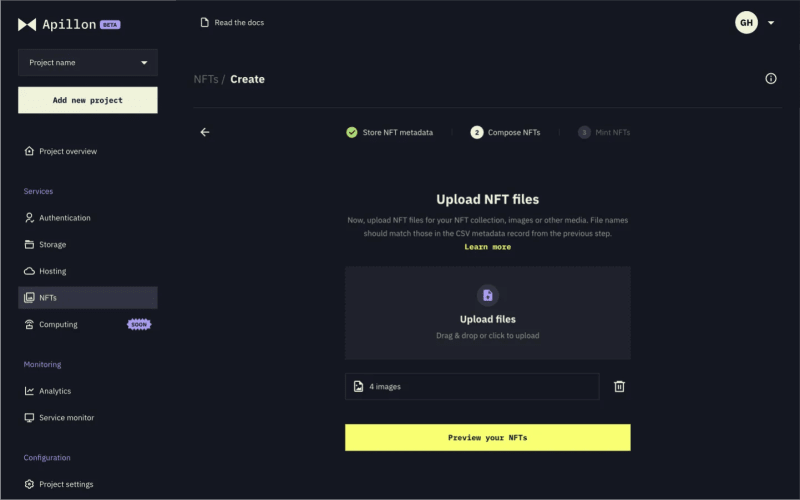
Once uploaded, you can see the total number of uploaded files. Double-check if it matches the number of NFT files listed in the CSV metadata record. If it doesn't, the dashboard notifies you of missing files. Delete the uploaded ones and repeat the process.
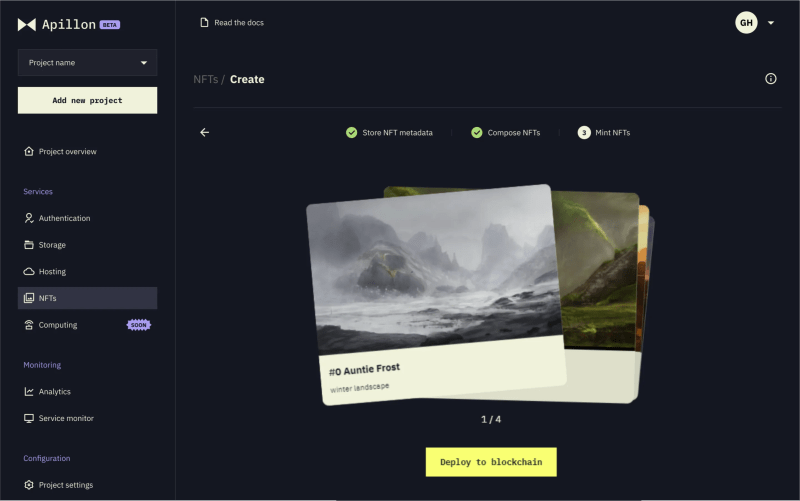
Now you can check how your NFTs would look like - click the "Preview your NFTs" button.
2.3 Preview NFTs
At this step, your NFT collection starts getting shape. Check how everything looks, navigate through pages if there are multiple, and verify the right files are displayed.
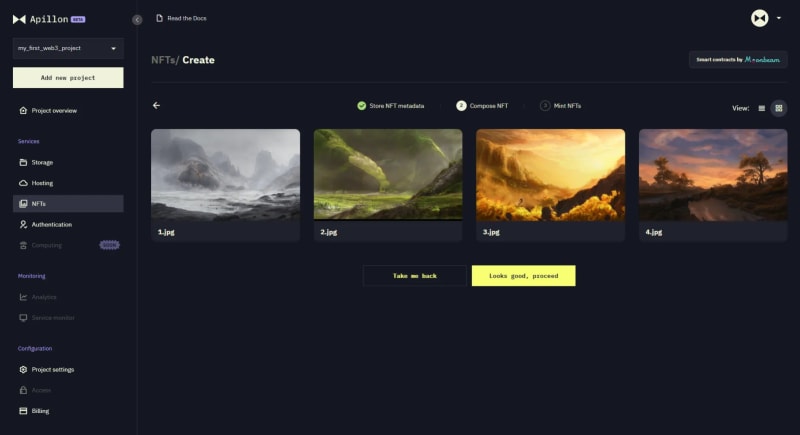
You can also switch to a list view in the top right corner and see whether the CSV file was parsed correctly with no mismatches between NFT files and their metadata.
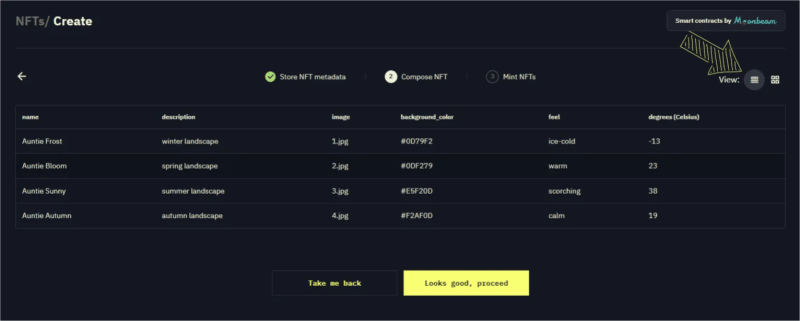
⚠️ Note: A mismatch could occur due to errors in the metadata CSV register. Ensure the order of files in the spreadsheet and the file names match the files you uploaded.
If everything looks good, continue with the process or return if you wish to change something.
☝️ Note: You can edit anything at this or earlier steps. But once you deploy your NFTs to the blockchain, they will remain there permanently. To keep metadata editable, you can only do it by manually uploading it to Apillon Web3 Storage with IPNS.
Now, you've made it to the last step - deploying your NFT collection on the blockchain and minting your unique assets on the Astar Network.
Step 3: Mint NFTs
Here, you determine the fine details of your collection, including name, symbol, and behavior.
☝️ Note: The process is similar whether you upload the files and metadata following the NFT Service wizard or source it online. In the latter case, you should also provide the metadata base URI and extension for Apillon to source data.
3.1 Name your collection
To easily find your NFT collection and allow your audience to immediately recognize your work, choose a name for it.
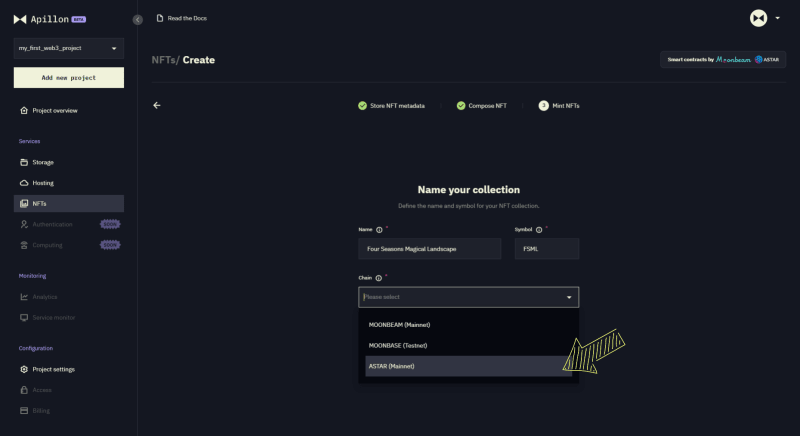
👉 Enter a Name that speaks to you and describes what the collection is about.
👉 Enter a Symbol that acts as a collection's token name on the blockchain. Typically, it consists of 3 or 4 letters that sum up or refer to the name.
👉 On the dropdown, select the Network (Chain) to deploy your collection. Choose Astar (Mainnet).
Double-check the inputs and click “Proceed”.
3.2 Behavior
This is where you give your NFT collection a personality and determine how it behaves in terms of supplying its contents to NFT owners.
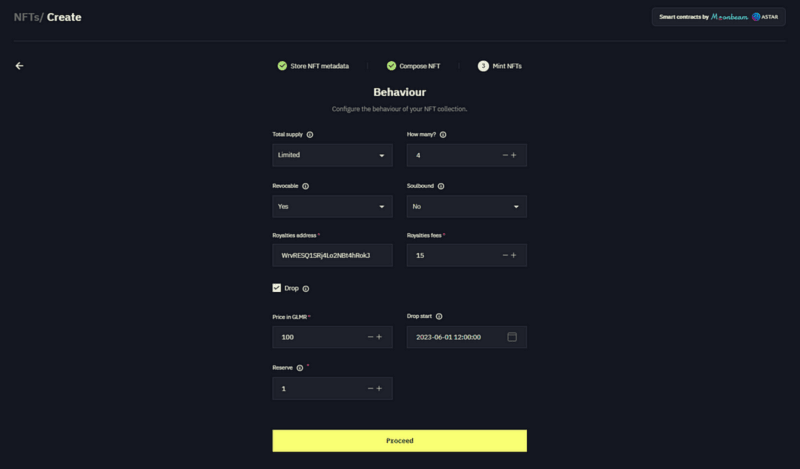
👉 Total supply refers to your collection's maximum supply of NFTs. If it contains a limited number of NFTs, enter the number under How many?.
👉 The Revokable function allows the collection owner (you) to revoke NFT(s) at any point in time. This is a good option for limited-time NFTs, such as achievement badges or exclusive brand campaigns. Unrevokable NFTs live permanently on the blockchain.
👉 By choosing Soulbound, your NFTs become untradeable, as they cannot leave the wallet they were deposited into and always remain tied to the originator's (your) wallet address.
👉 To collect royalties from your NFTs, enter your or the recipient's wallet address, and set the royalties fees in %.
👉 If you want your collection to be released at a certain date in the future, choose Drop. Your NFT collection will become publicly available for users to mint and purchase NFTs at the specified date and at the specified price. To avoid having to pay for your own NFTs, set the number of NFTs you want to Reserve for yourself and mint before the drop. If you don't choose drop, only you will be able to mint NFTs for either yourself or others.
Double-check the set parameters. To preview and start deploying your NFT collection, click "Proceed".
3.3 Preview and deploy
It's time to deploy your first Apillon-made NFT collection to the Astar Network. We advise you to review everything one last time.
Swipe through NFTs, and if everything looks fine, you're welcome to inscribe your works of art permanently on the blockchain. Click “Deploy to blockchain”.
Since this is a point of no return, you should double-confirm your decision.
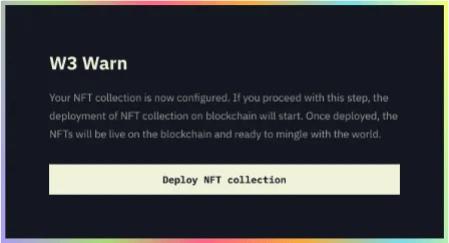
Click “Deploy NFT collection” again, and wait for Apillon to do its magic.
Soon after, your first NFT collection on Astar with Apillon is successfully deployed.
On the next screen, you can view the transaction on the Astar blockchain explorer or see its contents in your newly created bucket.

3.4 Display on the internet
Now that your NFT collection is deployed on Astar, you can check the transaction on the blockchain explorer linked at the bottom.
To display NFTs in all their beauty (beyond the transaction hash) and - more importantly - to make them tradeable and shareable, you should display them on a website.
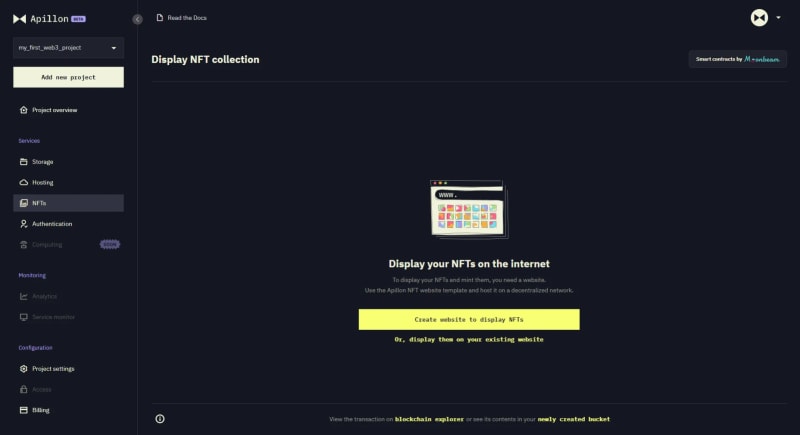
As soon as the NFT collection is deployed on the blockchain, an Apillon website template displays your collection by reading its metadata.
To make it yours, you have two options: create a decentrally hosted website by forking the template on GitHub, or simply integrate the code into your existing website.
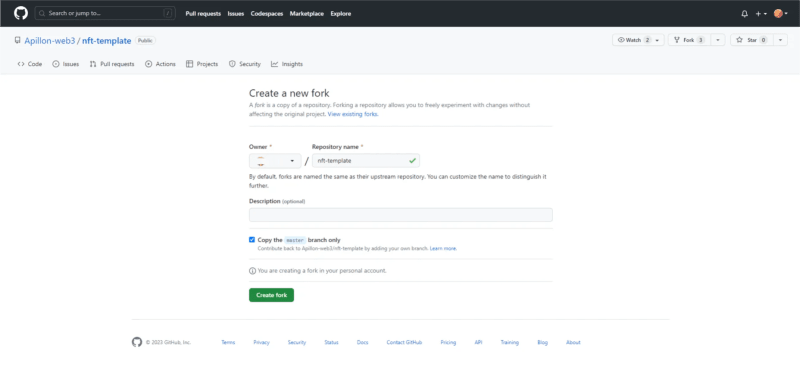
1. Fork Apillon NFT website template
This is the easiest way to display your NFTs. Use Apillon static website template that reads your NFT metadata and host it on a decentralized network.
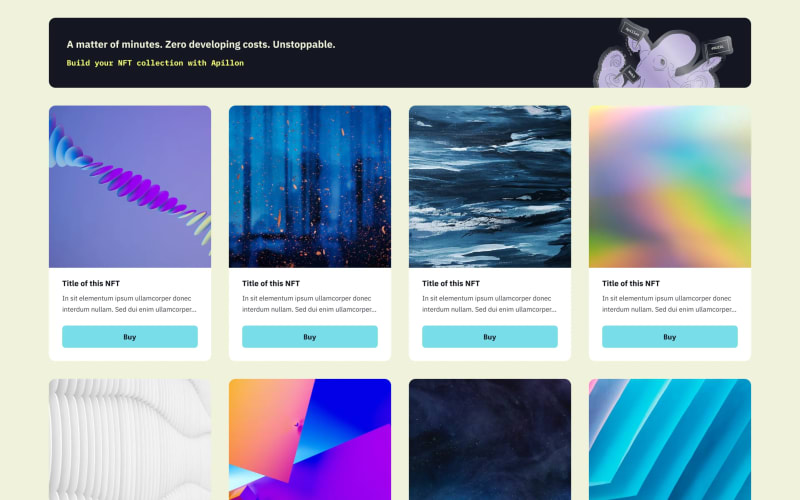
This static website is written in HTML and, thanks to its simplicity, represents a great starting point. You can customize it to suit your brand's or NFT collection image. Click “Create website to display NFTs”.

Now, you're taken to the Apillon GitHub repository to create a fork of the website template.
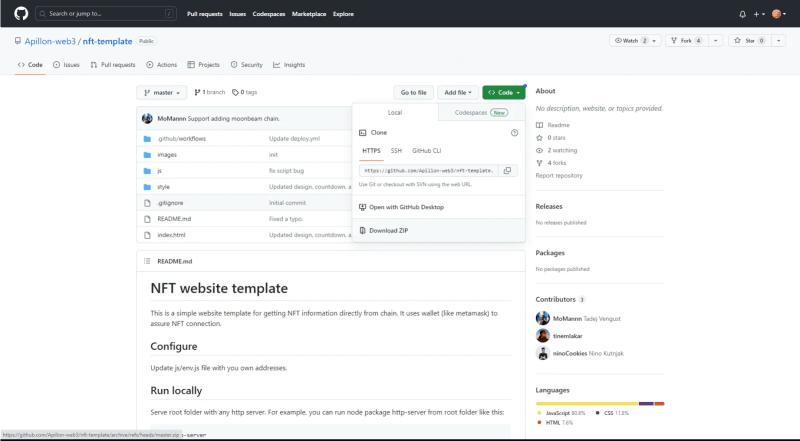
Use the template and simply update the js/env.js file with your addresses. On the list of NFT collections, find Contract address, and copy it to the clipboard.
In GitHub, click the Code button and then "Download ZIP". In your visual code editor, paste the address of your NFT website, and save.
Once done, run locally and redeploy with different functionalities to Apillon Web3 Hosting.
2. Integrate and mint NFT collection on your website
If you prefer bringing your NFT collection to your existing website, wherever it is hosted, even centrally, feel free to do so.
Click “Display them on your existing website”. Again, you use the code from Apillon GitHub, and integrate it to your website.
![]()
3.5 Mint NFTs
Finally, to display your NFTs on your website, you should mint them.
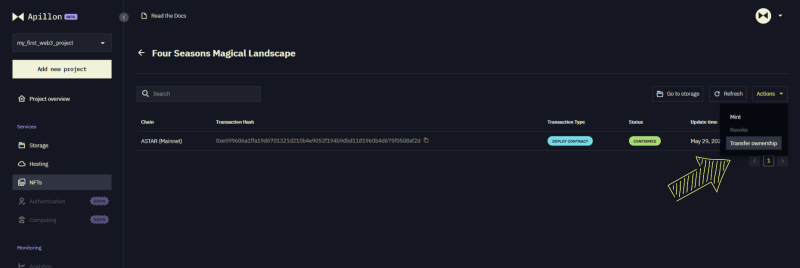
On the list of NFT collections on the Apillon dashboard, you can see their details: the chosen network (Chain), Collection symbol and Name, Contract address (copy and paste it into blockchain explorer to verify), and status (e.g., "Failed", "Deploying", or "Deployed"). You can also find the Mint price and the number of Reserved NFTs.
Under Minted/Max supply, you can see how many of the deployed NFTs were actually minted.
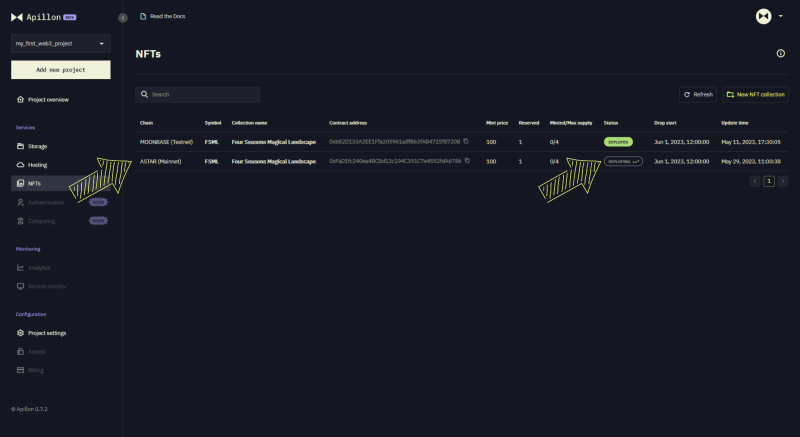
To do more actions in your NFT collection, minting included, click on the collection of choice.
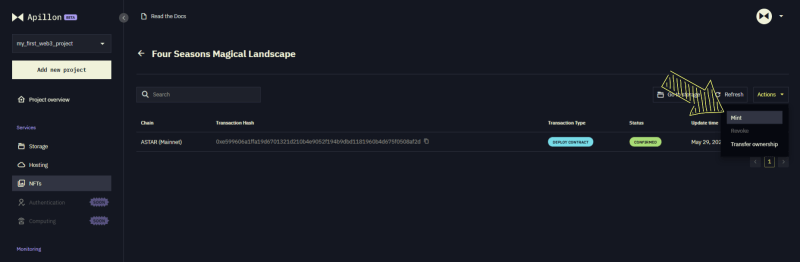
Again, the Chain ID indicates the network where the collection was deployed, and the Transaction hash lets you explore its status on the blockchain explorer.
Under Transaction type, you can see the initiated action for the contracts, and its Status.
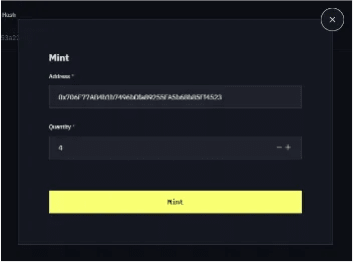
If everything looks good, go to Actions in the top right corner, and click Mint.
By minting NFTs, they will become visible on your website and linked to your wallet or the one you specified in the settings.
Using the code you find on Apillon GitHub, you can simply integrate it into your website.
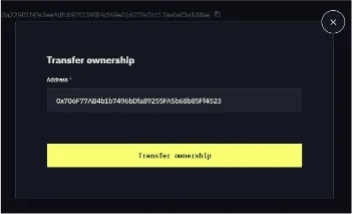
3.6 Transfer ownership
If you decide to move NFT ownership to another wallet, simply choose it under the Actions drop-down, and enter the wallet address into the pop-up.
Long live NFTs
Done! You're now a proud owner of your NFT collection, deployed permanently on the Astar Network.
List them on marketplaces such as tofuNFT, display them locally on your website or dapp, or share them with your audience and collectors.
Let us know how it went, share your unique digital works of art with the Apillon and Astar communities, and inspire others to do the same.
This article was originally published on Apillon Medium.

Top comments (0)