Microservices - What?
Microservices are an architectural style in which multiple, independent processes communicate with each other. These processes are designed to be highly scalable, are de-coupled and perform one small task at a time. These multiple services have their own resources and processes which communicate among themselves through the network.
This differs from a typical client-server architecture where the backend is one monolithic structure encapsulating all the server logic. A microservices architecture addresses separation of concern. This design paradigm allows easier maintenance, greater flexibility, scalability and fault tolerance. The downside of having such a distributed architecture is that if not designed properly it will get complex to debug and maintain.
Example of a Sample Microservice
Let's take a scenario where you are creating an e-commerce store that uses Microservices pattern.
For a typical product say an iPhone on an e-com store, the details page displays:
- Basic Information about the product
- Your Purchase History
- People who bought iPhone, also bought cases
- Deals & Discounts associated with the iPhone
- Merchant Data
- Shipping Options
- Product Testimonials and so on and so-forth. Additionally, a sample product details page will have multiple versions of the interface to cater to web, mobile and a REST API for use by 3rd party applications.
In a microservices pattern, the data is spread over multiple services. In this case, it can be
- Product Detail Service
- Merchant Service
- Payment Service
- Deals & Discount Service
- Inventory Service
- Pricing Service
- Review Service
- Recommendation Service How would these individual services be accessed?
The solution is to implement an API Gateway, which serves as the single entry point for all clients and calls specific Microservices spread across the entire infrastructure as per requirement. A sample industry implementation for the above pattern is the NetFlix API gateway which has multiple API client for different devices. You can read more about it here.
Building a Sample Microservice
There are currently many ways you can set up your microservices.
In this article we will use ZeroMQ to build communication between two processes. ZeroMQ provides building blocks to develop a scalable distributed systed on top of sockets. It is secure - uses elliptic curve cryptography(from Version 4) and offers out of the box communication patterns.
Here are some good things about ZMQ. MQ signifies the threaded Message Queues designed to work asynchronously. Talking more about the zeroMQ is beyond the scope of this article. You should read working with zeromq messaging & distributed systems with zeromq.
The other tool that we are going to be using is Docker. This article assumes the audience to know basics of docker.
There are multiple communication patterns with ZeroMQ to get started with lets setup a simple PUB-SUB with ZeroMQ and Flask, inside a docker container. The illustration below shows the relations and flow amongst the components.
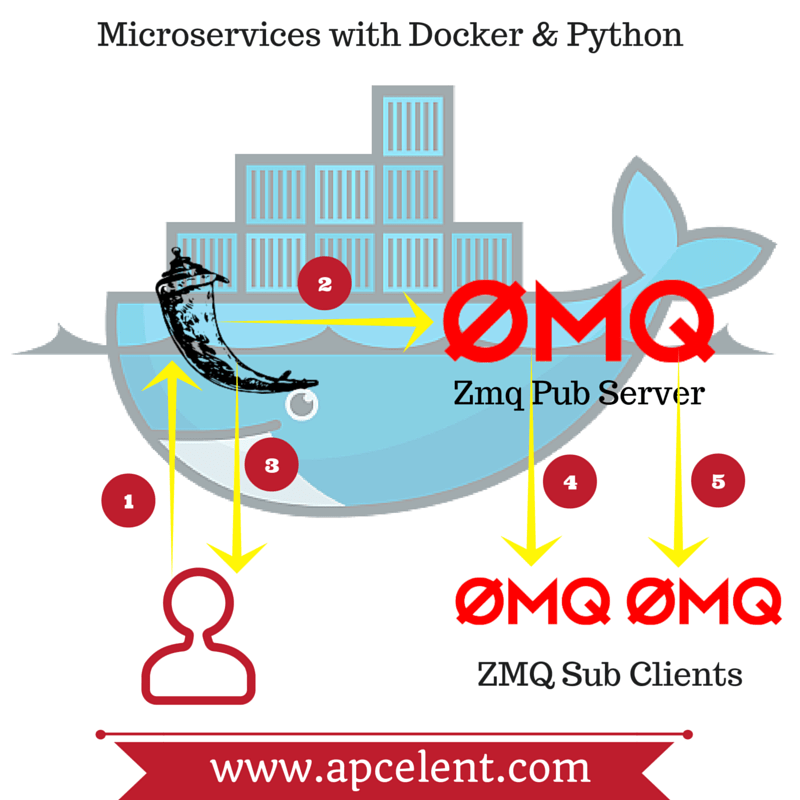
1 & 3 - A flask server runs on prot 5000 and has a URL /downcase/. The URL caters to GET requests, and all requests of the format ?Params= will have a response where the upper case letters will be converted to lower case and this will be returned as response.
2 - The response message is also sent to the ZMQ Publisher running in the same container.
4, 5 - The ZMQ subscriber keeps listening and saves the messages from the ZMQ server to a file called subscriber.log.
Building the Server
Lets see our Dockerfile
FROM ubuntu:14.04

RUN apt-get update
RUN apt-get install -y --force-yes python python-dev python-setuptools software-properties-common gcc python-pip
RUN apt-get clean all

RUN pip install pyzmq

RUN pip install Flask

ADD zmqserver.py /tmp/zmqserver.py

# Flask Port
EXPOSE 5000

# Zmq Sub Server
EXPOSE 4444

CMD ["python","/tmp/zmqserver.py"]
We choose Ubuntu 14.04 as our container OS. We install the basic packages. Using pip we install pyzmq - python bindings to zmq library and we also install Flask. We then expose port 5000(flask server) and 4444(port on which publisher is running.) Additonally we copy the script zmqserver.py which contains all the python code for flask and zeromq and run it.
Lets look at the contents of zmqserver.py
# server.py
import time
import zmq

HOST = '127.0.0.1'
PORT = '4444'

_context = zmq.Context()
_publisher = _context.socket(zmq.PUB)
url = 'tcp://{}:{}'.format(HOST, PORT)


def publish_message(message):

    try:
    _publisher.bind(url)
    time.sleep(1)
    _publisher.send(message)

    except Exception as e:
    print "error {}".format(e)

    finally:
    _publisher.unbind(url)


from flask import Flask
from flask import request
app = Flask(__name__)


@app.route("/downcase/", methods=['GET'])
def lowerString():

    _strn = request.args.get('param')
    response = 'lower case of {} is {}'.format(_strn, _strn.lower())
    publish_message(response)
    return response

if __name__ == '__main__':
    app.run(host='0.0.0.0', debug=False)
The ZMQ pub is running on port 4444. We build a context, and specify the URL. We run the flask app, it has a URL /downcase/ it converts the GET params of Param into lower case, this is the response. This response string is published as a message and the same string is returned to the browser as response.
To build the above docker image, we run the following command sudo docker build -t docker-zmq-pub .and to run the above image docker run --name docker-pub-server -p 5000:5000 -p 4444:4444 -t docker-zmq-pub
We map the port 5000 and 4444 of the container to that of the machine, so that no matter where the client is, it can subscribe to the publisher.
Subscriber Client
# client.py
import zmq
import sys
import time
import logging
import os

HOST = '127.0.0.1'
PORT = '4444'

logging.basicConfig(filename='subscriber.log', level=logging.INFO)


class ZClient(object):

    def __init__(self, host=HOST, port=PORT):
    """Initialize Worker"""
    self.host = host
    self.port = port
    self._context = zmq.Context()
    self._subscriber = self._context.socket(zmq.SUB)
    print "Client Initiated"

    def receive_message(self):
    """Start receiving messages"""
    self._subscriber.connect('tcp://{}:{}'.format(self.host, self.port))
    self._subscriber.setsockopt(zmq.SUBSCRIBE, b"")

    while True:
        print 'listening on tcp://{}:{}'.format(self.host, self.port)
        message = self._subscriber.recv()
        print message
        logging.info(
            '{}   - {}'.format(message, time.strftime("%Y-%m-%d %H:%M")))

if __name__ == '__main__':
    zs = ZClient()
    zs.receive_message()
We specify the IP Address and Port of the Publisher, currently its running on the same machine hence 127. We listen on the URL tcp://IP:PORT. Once we receive a message we log it to a file called subscriber.log with the timestamp. To run the client all it takes is python .py. If you build on top of the above architecture, it can very well serve as a near realtime log-aggregation engine.
I have tested the above code to work on an Ubuntu machine. The code is hosted on github. This was a basic intro on how to setup zmq, docker and a python server, in our next article we will build sample microservices using things we have learned here.
Hope the article was of help. Feel free to submit your thoughts in the comments.
Further Reading
The article originally appeared on Apcelent Tech Blog.

Top comments (1)
Interesting. I commented on this post yesterday about typos and your Dockerfile. It seems you corrected the typos (or I'm not noticing any this time without coffee flowing in my veins).
I do suggest you review your Dockerfile though. Especially your apt-get section.
docs.docker.com/develop/develop-im...