This is you building the frontend of your million-dollar app: Fetch data from APIs, store resulting data in state, create a loading state, access data in multiple components, access loading state, update state after editing data on the backend, optimise API calls, etc. These and many more are the issues that many developers face when building their frontend apps. As developers, we almost always fetch data from APIs, handle state management, and optimise performance. These tasks can be a pain in the a** even for the smallest applications but I bring good news: React Query. React Query is a tool that was built to make the tasks listed earlier seem like a walk in the park.
On their website, they describe it as “the missing data-fetching library for React, but in more technical terms, it makes fetching, caching, synchronising and updating server state in your React applications a breeze.” In this article, I will be introducing you to react query and showing you how you can use it to make your life as a developer not as bad as it already is (that was a joke lol).
Prerequisites
To follow along with this article, it is expected that you have :
- Basic react knowledge
Getting Started
In order to learn how react query works, we’re going to be building the classic todo app.
Let’s begin by initialising a new react app using vite. Open a new terminal session and run the following command:
yarn create vite todo-query --template react
I named my project todo-query, you can use whatever name you want.
Run the following set of commands to install the required dependencies and start the development server:
cd todo-query
yarn
yarn dev
After running these, you should have a project looking like this:

Now let’s install react-query using this command:
yarn add react-query
After installing these dependencies, proceed to open the project in any IDE of your choice. I will be using VSCode.
Navigate to the main.jsx file in your code editor and replace it with the following code:
import React from "react";
import ReactDOM from "react-dom/client";
import App from "./App.jsx";
import "./index.css";
import {
  QueryClient,
  QueryClientProvider,
} from "@tanstack/react-query";

// Create a client
const queryClient = new QueryClient();

ReactDOM.createRoot(document.getElementById("root")).render(
  <React.StrictMode>
    <QueryClientProvider client={queryClient}>
      <App />
    </QueryClientProvider>
  </React.StrictMode>
);
In the piece of code above, we are importing the query client and query client provider, instantiating a new query client, and using the query client provider to make the query client accessible all through our app. (Think of it like providing a react context to your app with a context provider).
We now have a query client provided all through our app and can begin to use react query for our data fetching and caching needs.
Queries
Next, we want to fetch a list of todos and display them to the user when our app loads.
To do this, we make use of the useQuery hook. The useQuery hook accepts different parameters, but fundamentally, we want to pass it two important parameters:
- queryKey: This is a unique string that will be used to “identify” your query. It is used by react query to manage the caching of your queries. It can be a string, an array of strings, or a nested object.
- queryFunction: This is the function that the query would use to fetch data; it should return a promise.
Delete everything in index.css.
In the app.jsx file, write the following:
import { useQuery } from "react-query";

function App() {
  let getTodos = async () => {
    const response = await fetch("https://jsonplaceholder.typicode.com/todos”);
    return response.json();
  };
  const { data } = useQuery("todos", getTodos);

  console.log(data)

  return (
    <>
      <h3>Awesome Todo</h3>
    </>
  );
}

export default App;
Let’s go through the code above.
import { useQuery } from "react-query";
We’re importing the necessary dependency which is react query.
let getTodos = async () => {
    const response = await fetch("https://jsonplaceholder.typicode.com/todos);
    return response.json();
  };
We create a getTodos function that uses the fetch API to get fetch a list of todos from a third-party API.
const { data } = useQuery("todos", getTodos);
console.log(data)
We use react query here to make a query with the queryKey being "todos" and the query function being getTodos after which we log the results to the console.
If you have been following up to this point and you open up your console, you should see a JSON object that contains a list of todo items.
The next thing we want to do is display these todo items on the screen.
Replace your code with the code below, changing only what’s necessary.
import { useQuery } from "react-query";

function App() {
  let getTodos = async () => {
    const response = await fetch("https://jsonplaceholder.typicode.com/todos");
    return response.json();
  };
  const { data, isLoading, isError } = useQuery("todos", getTodos);

  console.log(data);

  return (
    <>
      <h3>Awesome Todo</h3>
      {isError && <p>An Unexpected error has occured</p>}
      {isLoading && <p>Loading Todos</p>}
      {!isLoading &&
        data.map((todo) => (
          <div
            key={todo.id}
            style={{
              borderBottom: `1px solid gray`,
              color: `${todo.completed ? "green" : "red"}`,
            }}
          >
            <p>User:{todo.userId}</p>
            <p>Title:{todo.title}</p>
          </div>
        ))}
    </>
  );
}
Let’s go through the parts of the code that have changed.
const { data, isLoading, isError } = useQuery("todos", getTodos);
Here, in addition to extracting the data from the query, we can also extract the isLoading and isError states, which tell us if the query is still loading and if an error occurred respectively. Without react query, we would have had to manually create and manage these states but react query does this for us effortlessly.
return (
    <>
      <h3>Awesome Todo</h3>
      {isError && <p>An Unexpected error has occured</p>}
      {isLoading && <p>Loading Todos</p>}
      {!isLoading &&
        data.map((todo) => (
          <div
            key={todo.id}
            style={{
              borderBottom: `1px solid gray`,
              color: `${todo.completed ? "green" : "red"}`,
            }}
          >
            <p>User:{todo.userId}</p>
            <p>Title:{todo.title}</p>
          </div>
        ))}
    </>
  );
Here we are returning the jsx, where we display an error message or a loading message depending on their states, or we loop over the todo data and display them on the screen.
Now we should have something that looks like this; forgive the poor UI.

From the above, we can see how we got the loading state, error state, and data in just one line of code. How awesome is that?
React query allows us to do multiple other things, such as:
- Deduping requests
- Paginating queries
- Auto-refetching / polling
- Caching, and a lot more
Mutations
We now know how to get data from our server using react query; the next thing we’ll learn to do is to make changes/updates to our server state. In react query terminology, these are called mutations. We can read our list of todos, next thing we want to do is add a new todo item to our list of todos. To do this, we’ll make use of the useMutation hook, and our code will look like the one below:
import { useQuery, useMutation } from "react-query";

function App() {
  let getTodos = async () => {
    const response = await fetch("https://jsonplaceholder.typicode.com/todos");
    return response.json();
  };
  const { data, isLoading, isError } = useQuery("todos", getTodos);

  let addTodo = async () => {
    const response = await fetch("https://jsonplaceholder.typicode.com/todos", {
      method: "POST",
      body: JSON.stringify({
        title: "fodddddo",
        completed: "false",
        id: 1,
        userId: 1,
      }),
      headers: {
        "Content-type": "application/json; charset=UTF-8",
      },
    });
    return response.json();
  };
  const { mutate } = useMutation(addTodo, {
    onSuccess: (res) => {
      console.log(res);
    },
    onError: (error) => {
      console.log(error);
    },
  });

  return (
    <>
      <h3>Awesome Todo</h3>
      <button onClick={() => mutate()}>Add Todo</button>
      {isError && <p>An Unexpected error has occured</p>}
      {isLoading && <p>Loading Todos</p>}
      {!isLoading &&
        data.map((todo) => (
          <div
            key={todo.id}
            style={{
              borderBottom: `1px solid gray`,
              color: `${todo.completed ? "green" : "red"}`,
            }}
          >
            <p>User:{todo.userId}</p>
            <p>Title:{todo.title}</p>
          </div>
        ))}
    </>
  );
}

export default App;
Let’s go through the changes in the project.
 let addTodo = async () => {
    const response = await fetch("https://jsonplaceholder.typicode.com/todos", {
      method: "POST",
      body: JSON.stringify({
        title: "fodddddo",
        completed: "false",
        id: 1,
        userId: 1,
      }),
      headers: {
        "Content-type": "application/json; charset=UTF-8",
      },
    });
    return response.json();
  };
In this block of code, we are creating our mutation function that is passed to the useMutation hook. The function should perform an asynchronous task and return a promise.
const { mutate ,isLoading: addingTodo } = useMutation(addTodo, {
    onSuccess: (res) => {
      console.log(res);
    },
    onError: (error) => {
      console.log(error);
    },
  });
Now, this is where we use our useMutation hook and destructure the mutate function and the isLoading function (we rename it to addingTodo because we’ve used isLoading before) from it. We also pass in an onSuccess and onError function to it so we can perform actions depending on what happens after the mutation. Because we aren’t using our own API, we will just be logging the results to the console for now, but in the onSuccess function for example, you’ll want to do something like invalidate the todos query so that react query can fetch the new list of todos with our updated todo and in the onError function, we can alert the user that an error occurred.
<button disabled={addingTodo} onClick={() => mutate()}>Add Todo</button>
In the above code, we simply pass a function that calls our mutation function into the onClick handler of our button, and we set the disabled value of our button to be equal to the value of addingTodo (i.e isLoading).
See how simple react-query makes fetching and changing server state look. We would have had to use different data states and loading states and also add side effects for when we change data on the server, but react-query allows us to handle all of this elegantly.
React Query Devtools
React query also has a devtool!! To add it to your project, replace your main.jsx with the code below
import React from "react";
import ReactDOM from "react-dom/client";
import App from "./App.jsx";
import "./index.css";
import { QueryClient, QueryClientProvider } from "react-query";
import { ReactQueryDevtools } from "react-query/devtools";

// Create a client
const queryClient = new QueryClient();

ReactDOM.createRoot(document.getElementById("root")).render(
  <React.StrictMode>
    <QueryClientProvider client={queryClient}>
      <App />
      <ReactQueryDevtools initialIsOpen={false} />
    </QueryClientProvider>
  </React.StrictMode>
);
We import the ReactQueryDevtools and use it in our project. If you go back to your project you should see an icon in the bottom left corner.

If you click on it, you will see the dev tools panel
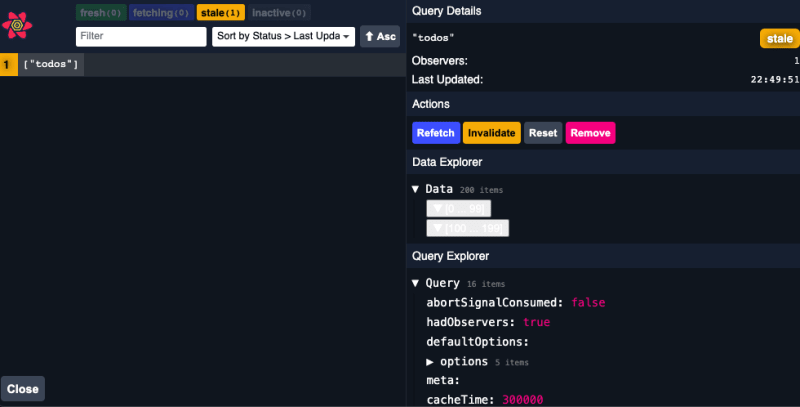
The devtools will help you picture your apps cache and everything that’s going on as far as react-query is concerned. It can be a very useful tool when debugging.
Conclusion
And that’s a wrap!! We just just went through using react query to make our interactions with our server state easier and smoother but there’s a whole lot more we can do with react query. This is just a tip of the iceberg with react query you can do a whole lot more ad I invite you to check out what you can do by taking a look at their documentation.

Top comments (0)