Catapult harvesting reward program is so attractive, you may want to learn how to setup node for harvesting before the mainnet is up.
I like to share with you how you can write an infrastructure as code to deploy your catapult server in your terminal.
Introduction
Terraform is very powerful tools for devops, it can write a plan (infrastructure as code) and manage your cloud service.
as mentioned cloud service, there is a list of the cloud provider supported by terraform, in this case, it using Digital Ocean (DO). In case you are not DO user, register uses my referrals link, you will get $100 in credit over 60 days.
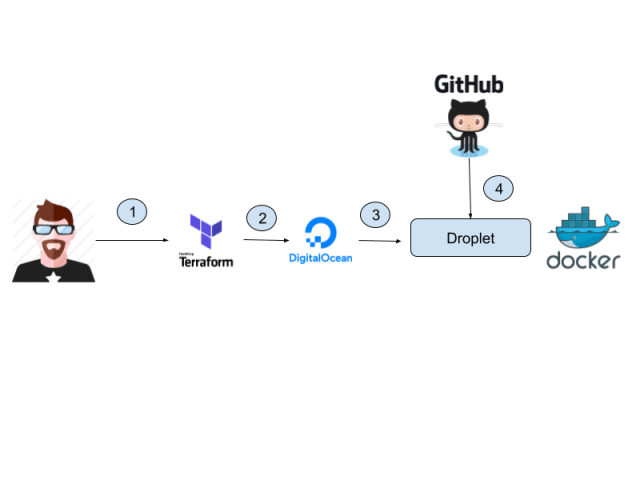
Write a plan to setup the infrastructure, and some of the script you wish to execute after server provision completed.
Terraform will follow the "plan" to execute, starting provision a server.
After the provision is completed, it will start to execute all the script.
The script will start pulling catapult server code from GitHub plus install essential tools such as docker.
Objectives
- Provision server from Digital Ocean.
- Install essential tools such as docker.
- download catapult server code from Github.
- Deploy catapult node and join Testnet.
- Deploy all in terminal.
Prerequisites
Hands-on
1. DO Account Setup (you can skip, if you already have it)
Add ssh-key in your DO account, it's easy for terminal ssh access to Droplet later.
1.1 let generate ssh key without passphrase in your local machine.
ssh-keygen -o -a 100 -t ed25519 -f ~/.ssh/catapult_node
1.2 copy catapult_node.pub to DO account. Tutorial
1.3 create access token for later terraform use. Tutorial
2. Terraform
If you are new in Terraform, can start from here
let write infrastructure plan, I created 4 different files, which is firewall.tf, main.tf, variables.tf, output.tf
In firewall.tf, we need define few inbound port for catapult use.
resource "digitalocean_firewall" "catapult-node" {
    name = "ssh-and-catapult-port"
    droplet_ids = ["${digitalocean_droplet.catapult-node.id}"]

    inbound_rule {
        protocol         = "tcp"
        port_range       = "22" // ssh access
        source_addresses = ["0.0.0.0/0", "::/0"]
    }

    inbound_rule {
        protocol         = "tcp"
        port_range       = "3000" // Catapult Api endpoint
        source_addresses = ["0.0.0.0/0", "::/0"]
    }

    inbound_rule {
        protocol         = "tcp"
        port_range       = "7900-7902" // Catapult peer communication
        source_addresses = ["0.0.0.0/0", "::/0"]
    }
}
In variables.tf, define the variables need to be use in the server provision. here we need DO access token, and private_key for ssh login. so we no longer need for password.
variable "do_token" {
    default = "your_DO_Access_Token" // refer 1.3
}

variable "private_key" {
    default = "~/.ssh/catapult_node" // refer 1.1
}
In output.tf, print out the output return from Terraform. After Terraform successful provision, it will print the server ip address in terminal.
output "fip_output" {
    description = "Droplet ipv4 address"
    value = "${digitalocean_droplet.catapult-node.*.ipv4_address}"
}
Last main.tf, this is an important part because all the server spec and script execution will be here.
// We are pointing "digitalocean" as our provider.
provider "digitalocean" {
  token = "${var.do_token}"
}

// request ssh public key from DO account refer 1.2
data "digitalocean_ssh_key" "mykey" {
  name = "catapult_node"
}

// define droplet spec
// https://developers.digitalocean.com/documentation/v2/#list-all-sizes
// define server spec base on your need.
resource "digitalocean_droplet" "catapult-node" {
    image = "ubuntu-18-04-x64"
    name = "catapult-node-1"
    region = "sgp1"
    size = "s-1vcpu-2gb" // server spec
    ssh_keys = ["${data.digitalocean_ssh_key.mykey.id}"] // attach public key from my DO account

// script to install docker tools and git pull catapult-server-code
    provisioner "remote-exec" {

      inline = [
        "export PATH=$PATH:/usr/bin",
        "curl -fsSL https://get.docker.com -o get-docker.sh",
        "sudo sh get-docker.sh",
        "curl -L https://github.com/docker/compose/releases/download/1.22.0/docker-compose-`uname -s`-`uname -m` | sudo tee /usr/local/bin/docker-compose > /dev/null",
        "sudo chmod +x /usr/local/bin/docker-compose",
        "sudo ln -s /usr/local/bin/docker-compose /usr/bin/docker-compose",
        "git config --global --unset http.proxy",
        "git config --global --unset https.proxy",
        "git clone https://github.com/nemfoundation/catapult-testnet-bootstrap.git",
        "cd catapult-testnet-bootstrap/api-harvest-assembly",
        "sudo docker-compose up --build --detach"
      ]

// for SSH connection to execute script
      connection {
        type     = "ssh"
        private_key = "${file(var.private_key)}"
        user     = "root"
        timeout  = "2m"
        host = "${self.ipv4_address}"
      }
  }
}
play around with
git clone https://github.com/AnthonyLaw/catapult-terraform
cd catapult-terraform
terraform init - to init terraform project.
terraform apply - to create droplet in your DO account
// output message
...
...
digitalocean_droplet.catapult-node (remote-exec): Creating api-harvest-assembly_db_1 ...
digitalocean_droplet.catapult-node (remote-exec): Creating api-harvest-assembly_api-broker_1 ...
digitalocean_droplet.catapult-node (remote-exec): Creating api-harvest-assembly_store-addresses_1        ... done
digitalocean_droplet.catapult-node (remote-exec): Creating api-harvest-assembly_api-broker_1             ... done
digitalocean_droplet.catapult-node (remote-exec):
digitalocean_droplet.catapult-node (remote-exec): Creating api-harvest-assembly_update_vars_1            ... done
digitalocean_droplet.catapult-node (remote-exec):
digitalocean_droplet.catapult-node (remote-exec): Creating api-harvest-assembly_init-db_1                ... done
digitalocean_droplet.catapult-node (remote-exec): Creating api-harvest-assembly_rest-gateway_1           ... done
digitalocean_droplet.catapult-node (remote-exec):
digitalocean_droplet.catapult-node: Still creating... [3m40s elapsed]
digitalocean_droplet.catapult-node: Creation complete after 3m45s [id=171927070]
digitalocean_firewall.catapult-node: Creating...
digitalocean_firewall.catapult-node: Creation complete after 9s [id=98a6e7ed-c54a-4c0c-91b0-f0848fabfa68]

Apply complete! Resources: 2 added, 0 changed, 0 destroyed.

Outputs:

fip_output = [
  "104.248.153.68",
]
Once Apply complete, you can visit <ip>:3000/chain/height to ensure your catapult server are successful setup.
terraform destroy - to destroy droplet in your DO account
Do you really want to destroy all resources?
  Terraform will destroy all your managed infrastructure, as shown above.
  There is no undo. Only 'yes' will be accepted to confirm.

  Enter a value: yes

digitalocean_firewall.catapult-node: Destroying... [id=98a6e7ed-c54a-4c0c-91b0-f0848fabfa68]
digitalocean_firewall.catapult-node: Destruction complete after 10s
digitalocean_droplet.catapult-node: Destroying... [id=171927070]
digitalocean_droplet.catapult-node: Still destroying... [id=171927070, 10s elapsed]
digitalocean_droplet.catapult-node: Still destroying... [id=171927070, 20s elapsed]
digitalocean_droplet.catapult-node: Destruction complete after 22s

Destroy complete! Resources: 2 destroyed.
Summary
Once your catapult node is up and running, you can easy change your harvesterPrivateKey and beneficiaryPublicKey in your node.
With Terraform, you can easy to write the infrastructure plan to setup any server and join the catapult network.
Read more :
Source code
Terraform for beginner
Terraform.io
Running Catapult Testnet


Top comments (0)