
We have already learned that HTML determines the structure of the website, but to make our website look good and appealing we use CSS. In this article, I am going to give you a basic introduction to CSS.
What is CSS?
CSS stands for Cascading Style Sheets. It is used to style HTML elements and make them more presentable. The fancy good looking pages we see on the internet are styled with CSS. Nowadays CSS is also used to design the layout of the webpage.
How to Write CSS?
The basic idea of writing CSS is that we select an element or group of elements with the help of a selector (we will learn more about selectors in the later part of this article) and write a bunch of CSS properties with values to style that element. Here is the syntax to write CSS.

But we first need to know where to write CSS, we can write CSS at three different places, let’s first learn about them.
Inline CSS
We can write CSS as an attribute within the HTML element only. This type of CSS is known as Inline CSS. Inline CSS is used when we want to style any specific element only.
<!DOCTYPE html>
<html lang="en">
<head>
    <meta charset="UTF-8">
    <meta http-equiv="X-UA-Compatible" content="IE=edge">
    <meta name="viewport" content="width=device-width, initial-scale=1.0">
    <title>Learning CSS</title>
</head>
<body>
    <p>Paragraph 1</p>
    <p style="color: #2827CC;">paragraph 2</p>
    <p>Paragraph 3</p>
</body>
</html>

As you can see in the above example in paragraph 2 we have used style attribute to change the color of the paragraph.
Internal CSS
We can write CSS using element inside our
<head></head>. CSS written using the <style></style> element is page-specific, for each new page we will have to write a new stylesheet.
<!DOCTYPE html>
<html lang="en">
<head>
    <meta charset="UTF-8">
    <meta http-equiv="X-UA-Compatible" content="IE=edge">
    <meta name="viewport" content="width=device-width, initial-scale=1.0">
    <title>Learning CSS</title>
    <style>
        h1{
            color:#2827CC;
        }
    </style>
</head>
<body>
    <h1>Heading 1</h1>
    <p>Paragraph 1</p>

</body>
</html>

As you can see in the above example, I have used
<style></style>element inside the<head></head>element to change the color of our heading.
External CSS
This is the most used and recommended way to write our stylesheet, in this method we write CSS in a separate file with a .css extension, and then we link this stylesheet in our HTML document using <link></link> element. With this method, we can even link stylesheets written by other people on the internet.
<!DOCTYPE html>
<html lang="en">
<head>
    <meta charset="UTF-8">
    <meta http-equiv="X-UA-Compatible" content="IE=edge">
    <meta name="viewport" content="width=device-width, initial-scale=1.0">
    <!-- new line to link css -->
    <link rel="stylesheet" href="./css/style.css">
    <!-- new line to link css end-->
    <title>Learning CSS</title>

</head>
<body>
    <h1>Heading 1</h1>
    <p>Paragraph 1</p>
</body>
</html>

/* style.css */

h1{
    color:#03203C;
    background-color: #23C4ED;
    background-color: #23C4ED;
    padding: 10px 20px;
}

p{
    color:#ffffff;
    background-color: #242B2E;
    padding: 10px 20px;
}

I have created a new CSS directory and a new file style.css and written all my styles in this file using
<link></link>element I have linked this CSS file to my HTML document. I have used two attributes in<link></link>elementrel="stylesheet"andhref="./css/style.css"relattribute is used to define the relationship between the HTML document and the linked document hererel="stylesheet"means import this file as a stylesheet and thehrefattribute is used to define the location of the stylesheet.
Selectors
CSS selectors are used to selecting the HTML elements we want to style. In this section of the article, we are going to learn about different selectors.
Universal Selector *
Universal selector is denoted by * . A universal selector is used when we want to apply styles to each and every element of our HTML document. Syntax: *{property: value}.
Here in the below example, I have used the universal selector to change the color of the text in an HTML document, and the color of each and every text got changed.
<!DOCTYPE html>
<html lang="en">
<head>
    <meta charset="UTF-8">
    <meta http-equiv="X-UA-Compatible" content="IE=edge">
    <meta name="viewport" content="width=device-width, initial-scale=1.0">
    <title>Learning CSS</title>
    <style>
        /*Universal Selector*/
        *{
            color:#383CC1;
        }
    </style>

</head>
<body>
    <h1>Heading Level 1</h1>
    <h2>Heading Level 2</h2>
    <h3>Heading Level 3</h3>
    <h4>Heading Level 4</h4>
    <h5>Heading Level 5</h5>
    <h6>Heading Level 6</h6>

    <p>1. Lorem ipsum dolor sit amet consectetur adipisicing elit. Id, inventore.</p>
    <p>2. Lorem ipsum dolor sit amet consectetur adipisicing elit. Non, ab.</p>
    <p>3. Lorem ipsum dolor, sit amet consectetur adipisicing elit. Dolores, cupiditate?</p>
    <p>4. Lorem ipsum dolor sit, amet consectetur adipisicing elit. Ipsam, cum?</p>

    <ul>
        <li>item 1</li>
        <li>item 2</li>
        <li>item 3</li>
        <li>item 4</li>
        <li>item 5 </li>
    </ul>

    <button>Button Test Hover Effect</button>

</body>
</html>

Type Selector
Type Selector is used when we want to select HTML elements by their name. Type selectors select all elements of a given type from an HTML document and apply styles to them. This is the syntax to use type selector element{property: value;}. Let’s See an example of a type selector.
<!DOCTYPE html>
<html lang="en">
<head>
    <meta charset="UTF-8">
    <meta http-equiv="X-UA-Compatible" content="IE=edge">
    <meta name="viewport" content="width=device-width, initial-scale=1.0">
    <title>Learning CSS</title>
    <style>
        /*Universal Selector*/
        /*
        *{
            color:#383CC1;
        }
        */

         /*new code */
         /*Type Selector*/
         p{
            color:#383CC1;
         }
    </style>

</head>
<body>
    <h1>Heading Level 1</h1>
    <h2>Heading Level 2</h2>
    <h3>Heading Level 3</h3>
    <h4>Heading Level 4</h4>
    <h5>Heading Level 5</h5>
    <h6>Heading Level 6</h6>

    <p>1. Lorem ipsum dolor sit amet consectetur adipisicing elit. Id, inventore.</p>
    <p>2. Lorem ipsum dolor sit amet consectetur adipisicing elit. Non, ab.</p>
    <p>3. Lorem ipsum dolor, sit amet consectetur adipisicing elit. Dolores, cupiditate?</p>
    <p>4. Lorem ipsum dolor sit, amet consectetur adipisicing elit. Ipsam, cum?</p>

    <ul>
        <li>item 1</li>
        <li>item 2</li>
        <li>item 3</li>
        <li>item 4</li>
        <li>item 5 </li>
    </ul>

    <button>Button Test Hover Effect</button>


</body>
</html>
in the above HTML document, I have five paragraph elements and I want to change the color of all the paragraph elements on my webpage, so I have used a type selector to do the same. p{color:#383CC1;} selects all the paragraph tag from the HTML document and change their color.

Class Selector
This is the most used CSS selector. For using a class selector we first add a class attribute to our HTML document, and then we select that class name in our CSS and apply some styles, and styles are applied to all the HTML elements with that class attribute. This is the syntax of using the class selector. class_name{property: value}.
<!DOCTYPE html>
<html lang="en">
<head>
    <meta charset="UTF-8">
    <meta http-equiv="X-UA-Compatible" content="IE=edge">
    <meta name="viewport" content="width=device-width, initial-scale=1.0">
    <title>Learning CSS</title>
    <style>

         /*new code */
        /*Class Selector*/
        .primary-heading{
            color:#3B71CA
        }

        .secondary-heading{
            color:#9FA6B2;
        }

        .primary-text{
            color:#3B71CA
        }

        .secondary-text{
            color:#9FA6B2;
        }

    </style>

</head>
<body>
    <h1 class="primary-heading">Heading Level 1</h1>
    <h2 class="secondary-heading">Heading Level 2</h2>
    <h3>Heading Level 3</h3>
    <h4>Heading Level 4</h4>
    <h5>Heading Level 5</h5>
    <h6>Heading Level 6</h6>

    <p class="primary-text">1. Lorem ipsum dolor sit amet consectetur adipisicing elit. Id, inventore.</p>
    <p class="secondary-text">2. Lorem ipsum dolor sit amet consectetur adipisicing elit. Non, ab.</p>
    <p class="primary-text">3. Lorem ipsum dolor, sit amet consectetur adipisicing elit. Dolores, cupiditate?</p>
    <p class="secondary-text">4. Lorem ipsum dolor sit, amet consectetur adipisicing elit. Ipsam, cum?</p>

    <ul>
        <li>item 1</li>
        <li>item 2</li>
        <li>item 3</li>
        <li>item 4</li>
        <li>item 5 </li>
    </ul>

    <button>Button Test Hover Effect</button>


</body>
</html>
As you can see in the above HTML document I have used
classattributes in some of the HTML elements and used the same class name in the CSS to apply styles. you can also see that I have used the same class name in multiple HTML elements. So When we use a class selector we can apply the same styles on any number of elements you just only need to add that class to the element.

ID Selector
id select selects all the elements with the matching id attribute. For using Id Selector we add the id attribute to the element in our HTML document. But remember that there should be only one element with a given ID in a document.
<!DOCTYPE html>
<html lang="en">
<head>
    <meta charset="UTF-8">
    <meta http-equiv="X-UA-Compatible" content="IE=edge">
    <meta name="viewport" content="width=device-width, initial-scale=1.0">
    <title>Learning CSS</title>
    <style>
       /*ID Selector*/

         #btn-primary{
            background-color: #3B71CA;
            padding: 10px 20px;
            font-size: 20px;
            color: #fff;
         }
    </style>

</head>
<body>
    <h1 class="primary-heading">Heading Level 1</h1>
    <h2 class="secondary-heading">Heading Level 2</h2>
    <h3>Heading Level 3</h3>
    <h4>Heading Level 4</h4>
    <h5>Heading Level 5</h5>
    <h6>Heading Level 6</h6>

    <p class="primary-text">1. Lorem ipsum dolor sit amet consectetur adipisicing elit. Id, inventore.</p>
    <p class="secondary-text">2. Lorem ipsum dolor sit amet consectetur adipisicing elit. Non, ab.</p>
    <p class="primary-text">3. Lorem ipsum dolor, sit amet consectetur adipisicing elit. Dolores, cupiditate?</p>
    <p class="secondary-text">4. Lorem ipsum dolor sit, amet consectetur adipisicing elit. Ipsam, cum?</p>

    <ul>
        <li>item 1</li>
        <li>item 2</li>
        <li>item 3</li>
        <li>item 4</li>
        <li>item 5 </li>
    </ul>

    <button id="btn-primary">Button Test Hover Effect</button>


</body>
</html>
In the above example, I have added an
idattribute to the HTML document and used the same id name to add some styles to it.

List Selector
list selector is used when want to apply the same styles on multiple elements. This is the syntax to use list selector
element_one,element_two {property: value;}.
<!DOCTYPE html>
<html lang="en">
<head>
    <meta charset="UTF-8">
    <meta http-equiv="X-UA-Compatible" content="IE=edge">
    <meta name="viewport" content="width=device-width, initial-scale=1.0">
    <title>Learning CSS</title>
    <style>
        /*List Selector*/

        /*Without using list selector*/
         /*
        .primary-heading{
            color:#3B71CA
        }
        .primary-text{
            color:#3B71CA
        }
        */
          /*With  list selector*/
        .primary-heading, .primary-text {
            color:#3B71CA
        }

    </style>

</head>
<body>
    <h1 class="primary-heading">Heading Level 1</h1>
    <h2 class="secondary-heading">Heading Level 2</h2>
    <h3>Heading Level 3</h3>
    <h4>Heading Level 4</h4>
    <h5>Heading Level 5</h5>
    <h6>Heading Level 6</h6>

    <p class="primary-text">1. Lorem ipsum dolor sit amet consectetur adipisicing elit. Id, inventore.</p>
    <p class="secondary-text">2. Lorem ipsum dolor sit amet consectetur adipisicing elit. Non, ab.</p>
    <p class="primary-text">3. Lorem ipsum dolor, sit amet consectetur adipisicing elit. Dolores, cupiditate?</p>
    <p class="secondary-text">4. Lorem ipsum dolor sit, amet consectetur adipisicing elit. Ipsam, cum?</p>

    <ul>
        <li>item 1</li>
        <li>item 2</li>
        <li>item 3</li>
        <li>item 4</li>
        <li>item 5 </li>
    </ul>
    <button id="btn-primary">Button Test Hover Effect</button>
</body>
</html>

Descendant Selector
The descendant selector is represented by two selectors, separated by a blank spaceselectror1 selector2 {property: value}. It selects all the element that is descendant of the first element.
<!DOCTYPE html>
<html lang="en">
<head>
    <meta charset="UTF-8">
    <meta http-equiv="X-UA-Compatible" content="IE=edge">
    <meta name="viewport" content="width=device-width, initial-scale=1.0">
    <title>Learning CSS</title>
    <style>
         /*Descendent Selector*/
        .primary-div p{
            color:#3B71CA
        }
    </style>

</head>
<body>
    <h1 class="primary-heading">Heading Level 1</h1>
    <h2 class="secondary-heading">Heading Level 2</h2>
    <h3>Heading Level 3</h3>


    <div class="primary-div">
        <p class="primary-text">1. Lorem ipsum dolor sit amet consectetur adipisicing elit. Id, inventore.</p>
        <p class="secondary-text">2. Lorem ipsum dolor sit amet consectetur adipisicing elit. Non, ab.</p>
        <p class="primary-text">3. Lorem ipsum dolor, sit amet consectetur adipisicing elit. Dolores, cupiditate?</p>
        <p class="secondary-text">4. Lorem ipsum dolor sit, amet consectetur adipisicing elit. Ipsam, cum?</p>

        <h4>Heading Level 4</h4>
        <h5>Heading Level 5</h5>
        <h6>Heading Level 6</h6>

        <a href="">Click Here</a>
        <div>
            <p>
                Paragraph inside the div
            </p>
        </div>

    </div>
    <ul>
        <li>item 1</li>
        <li>item 2</li>
        <li>item 3</li>
        <li>item 4</li>
        <li>item 5 </li>
    </ul>

    <button id="btn-primary">Button Test Hover Effect</button>
</body>
</html>
In the above example, I have a div element with the class name primary-div and inside that element, we have paragraph heading and anchor element as a child element in the CSS I am using the descendent sector to select all the paragram elements which are descendent of the primary-div.

Direct Child Selector >
Direct child selector is similar to the descendent selector, in this we also use two selectors, but instead of using blank space to separate them we use > selectror1 > selector2 {property: value}. The direct child selector selects the direct child of the first selector.
<!DOCTYPE html>
<html lang="en">
<head>
    <meta charset="UTF-8">
    <meta http-equiv="X-UA-Compatible" content="IE=edge">
    <meta name="viewport" content="width=device-width, initial-scale=1.0">
    <title>Learning CSS</title>
    <style>

         /*Direct Child Selector*/
         .primary-div > p{
            color:#3B71CA
        }

    </style>

</head>
<body>
    <h1 class="primary-heading">Heading Level 1</h1>
    <h2 class="secondary-heading">Heading Level 2</h2>
    <h3>Heading Level 3</h3>


    <div class="primary-div">
        <p class="primary-text">1. Lorem ipsum dolor sit amet consectetur adipisicing elit. Id, inventore.</p>
        <p class="secondary-text">2. Lorem ipsum dolor sit amet consectetur adipisicing elit. Non, ab.</p>
        <p class="primary-text">3. Lorem ipsum dolor, sit amet consectetur adipisicing elit. Dolores, cupiditate?</p>
        <p class="secondary-text">4. Lorem ipsum dolor sit, amet consectetur adipisicing elit. Ipsam, cum?</p>

        <h4>Heading Level 4</h4>
        <h5>Heading Level 5</h5>
        <h6>Heading Level 6</h6>

        <a href="">Click Here</a>
        <div>
            <p>
                Paragraph inside the div
            </p>
        </div>

    </div>
    <ul>
        <li>item 1</li>
        <li>item 2</li>
        <li>item 3</li>
        <li>item 4</li>
        <li>item 5 </li>
    </ul>

    <button id="btn-primary">Button Test Hover Effect</button>
</body>
</html>

As you can see paragraph element which is only the direct child of the primary-div element is getting styled. The descendent paragraph is not getting styled.
Sibling Selector
There are two types of Sibling selectors.
- General Sibling Selector
~ - Adjacent Sibling Selector
+
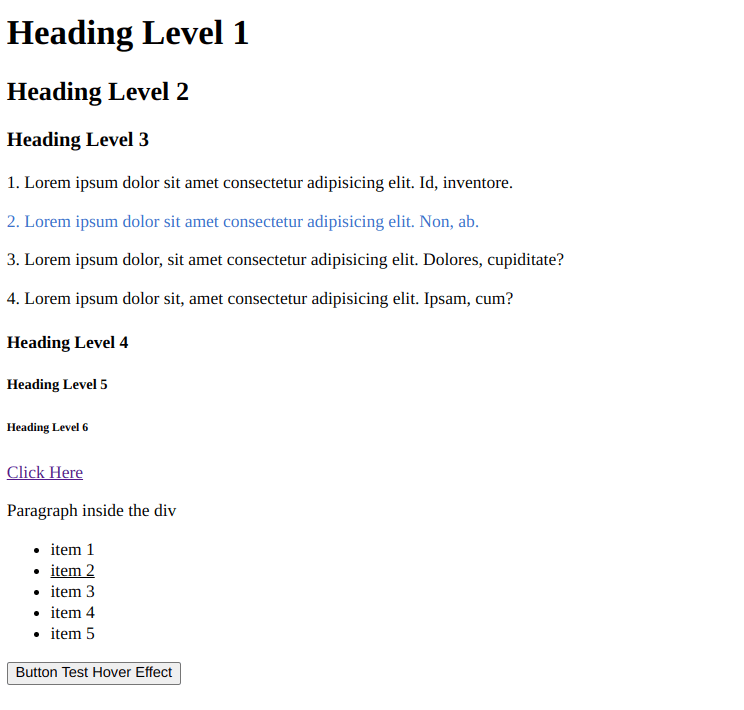
General Sibling Selector ~
The General Sibling Selector Selects all the elements that are next to the selected sibling but All siblings should have the same parent.
former_element ~ target_element { style properties }
<!DOCTYPE html>
<html lang="en">
<head>
    <meta charset="UTF-8">
    <meta http-equiv="X-UA-Compatible" content="IE=edge">
    <meta name="viewport" content="width=device-width, initial-scale=1.0">
    <title>Learning CSS</title>
    <style>
       /*General Sibling Selector*/
        .selected-sibling-item ~ li{
            text-decoration: underline;
        }
    </style>

</head>
<body>
    <h1 class="primary-heading">Heading Level 1</h1>
    <h2 class="secondary-heading">Heading Level 2</h2>
    <h3>Heading Level 3</h3>


    <div class="primary-div">
        <p class="selected-sibling">1. Lorem ipsum dolor sit amet consectetur adipisicing elit. Id, inventore.</p>
        <p class="secondary-text">2. Lorem ipsum dolor sit amet consectetur adipisicing elit. Non, ab.</p>
        <p class="primary-text">3. Lorem ipsum dolor, sit amet consectetur adipisicing elit. Dolores, cupiditate?</p>
        <p class="secondary-text">4. Lorem ipsum dolor sit, amet consectetur adipisicing elit. Ipsam, cum?</p>

        <h4>Heading Level 4</h4>
        <h5>Heading Level 5</h5>
        <h6>Heading Level 6</h6>

        <a href="">Click Here</a>
        <div>
            <p>
                Paragraph inside the div
            </p>
        </div>

    </div>
    <ul>
        <li class="selected-sibling-item">item 1</li>
        <li>item 2</li>
        <li>item 3</li>
        <li>item 4</li>
        <li>item 5 </li>
    </ul>

    <button id="btn-primary">Button Test Hover Effect</button>
</body>
</html>
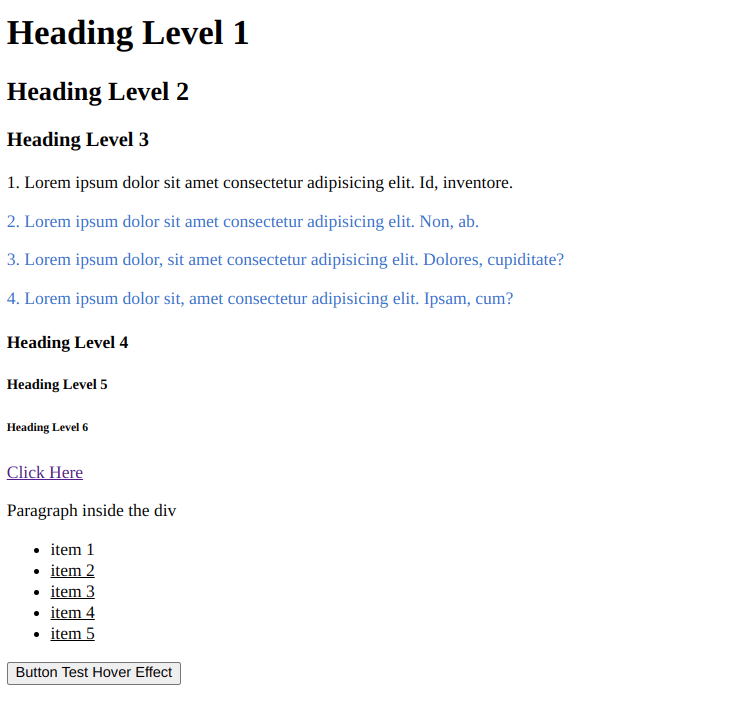
Adjacent sibling Selector +
The Adjacent Sibling Selector selects the element which is adjacent to the selected sibling. All siblings should have the same parent.
former_element + target_element { style properties }
<!DOCTYPE html>
<html lang="en">
<head>
    <meta charset="UTF-8">
    <meta http-equiv="X-UA-Compatible" content="IE=edge">
    <meta name="viewport" content="width=device-width, initial-scale=1.0">
    <title>Learning CSS</title>
    <style>
         /*Adjacent Sibling Selector*/

        .selected-sibling + p {
            color:#3B71CA

        }
        .selected-sibling-item + li {
            text-decoration: underline;
        }

    </style>

</head>
<body>
    <h1 class="primary-heading">Heading Level 1</h1>
    <h2 class="secondary-heading">Heading Level 2</h2>
    <h3>Heading Level 3</h3>


    <div class="primary-div">
        <p class="selected-sibling">1. Lorem ipsum dolor sit amet consectetur adipisicing elit. Id, inventore.</p>
        <p class="secondary-text">2. Lorem ipsum dolor sit amet consectetur adipisicing elit. Non, ab.</p>
        <p class="primary-text">3. Lorem ipsum dolor, sit amet consectetur adipisicing elit. Dolores, cupiditate?</p>
        <p class="secondary-text">4. Lorem ipsum dolor sit, amet consectetur adipisicing elit. Ipsam, cum?</p>

        <h4>Heading Level 4</h4>
        <h5>Heading Level 5</h5>
        <h6>Heading Level 6</h6>

        <a href="">Click Here</a>
        <div>
            <p>
                Paragraph inside the div
            </p>
        </div>

    </div>
    <ul>
        <li class="selected-sibling-item">item 1</li>
        <li>item 2</li>
        <li>item 3</li>
        <li>item 4</li>
        <li>item 5 </li>
    </ul>

    <button id="btn-primary">Button Test Hover Effect</button>
</body>
</html>
Pseudo Class Selector :
Pseudo class is used to define the state of the selected element. There are many different types of Pseudo class selectors and it’s impossible to discuss all of them here, you can read more about them on mdn.
selector: pseudo_class_name: {property: value}.
    <!DOCTYPE html>
    <html lang="en">
    <head>
        <meta charset="UTF-8">
        <meta http-equiv="X-UA-Compatible" content="IE=edge">
        <meta name="viewport" content="width=device-width, initial-scale=1.0">
        <title>Learning CSS</title>
        <style>

            #btn-primary{
                padding: 10px 20px;
                font-size: 20px;

            }
            #btn-primary:hover{
                background-color:#3B71CA ;
                color: #fff;
                cursor: pointer;
            }


        </style>

    </head>
    <body>
        <h1 class="primary-heading">Heading Level 1</h1>
        <h2 class="secondary-heading">Heading Level 2</h2>
        <h3>Heading Level 3</h3>


        <div class="primary-div">
            <p class="selected-sibling">1. Lorem ipsum dolor sit amet consectetur adipisicing elit. Id, inventore.</p>
            <p class="secondary-text">2. Lorem ipsum dolor sit amet consectetur adipisicing elit. Non, ab.</p>
            <p class="primary-text">3. Lorem ipsum dolor, sit amet consectetur adipisicing elit. Dolores, cupiditate?</p>
            <p class="secondary-text">4. Lorem ipsum dolor sit, amet consectetur adipisicing elit. Ipsam, cum?</p>

            <h4>Heading Level 4</h4>
            <h5>Heading Level 5</h5>
            <h6>Heading Level 6</h6>

            <a href="">Click Here</a>
            <div>
                <p>
                    Paragraph inside the div
                </p>
            </div>

        </div>
        <ul>
            <li class="selected-sibling-item">item 1</li>
            <li>item 2</li>
            <li>item 3</li>
            <li>item 4</li>
            <li>item 5 </li>
        </ul>

        <button id="btn-primary">Button Test Hover Effect</button>

        <p class="pseudo-element-before">
            Paragraph to test '::before' pseudo element
        </p>
        <p class="pseudo-element-after">
            Paragraph to test '::after' pseudo element
        </p>

    </body>
    </html>

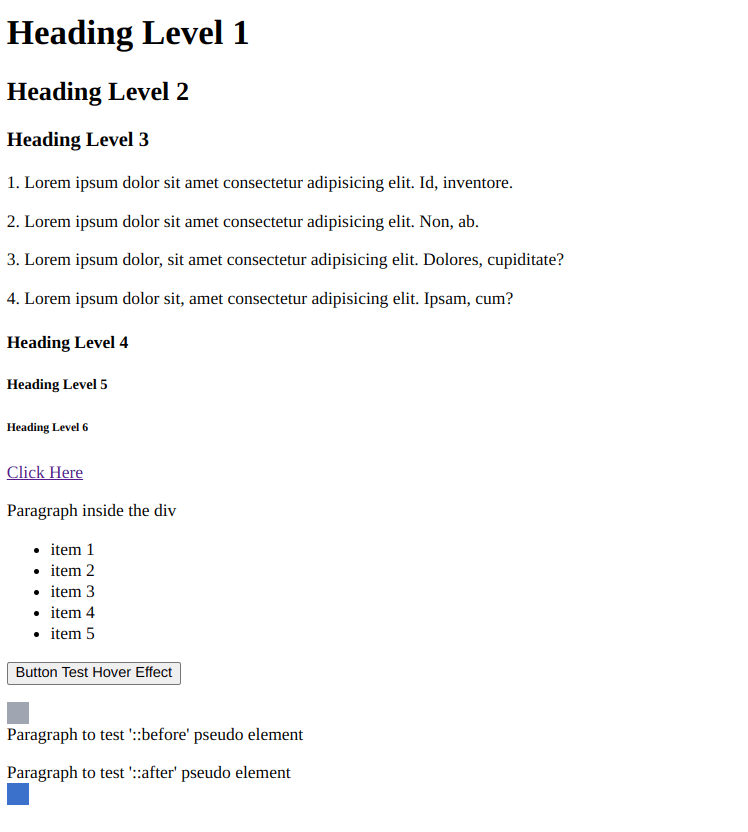
Pseudo Element Selector ::
pseudo-element selector** allows you to style a specific part of an element. By using pseudo-elements, you can target or add an additional element to your HTML without adding extra code.
selector: pseudo_element: {property: value}
<!DOCTYPE html>
    <html lang="en">
    <head>
        <meta charset="UTF-8">
        <meta http-equiv="X-UA-Compatible" content="IE=edge">
        <meta name="viewport" content="width=device-width, initial-scale=1.0">
        <title>Learning CSS</title>
        <style>

            /*Pseudo Element Selector*/

            .pseudo-element-after::after{
                content: ""; /*You can use any string as content - even an empty string*/
                display: block;
                height: 20px;
                width: 20px;
                background-color: #3B71CA;

            }

            .pseudo-element-before::before{
                content: ""; /*You can use any string as content - even an empty string*/
                display: block;
                height: 20px;
                width: 20px;
                background-color: #9FA6B2;
            }

        </style>

    </head>
    <body>
        <h1 class="primary-heading">Heading Level 1</h1>
        <h2 class="secondary-heading">Heading Level 2</h2>
        <h3>Heading Level 3</h3>


        <div class="primary-div">
            <p class="selected-sibling">1. Lorem ipsum dolor sit amet consectetur adipisicing elit. Id, inventore.</p>
            <p class="secondary-text">2. Lorem ipsum dolor sit amet consectetur adipisicing elit. Non, ab.</p>
            <p class="primary-text">3. Lorem ipsum dolor, sit amet consectetur adipisicing elit. Dolores, cupiditate?</p>
            <p class="secondary-text">4. Lorem ipsum dolor sit, amet consectetur adipisicing elit. Ipsam, cum?</p>

            <h4>Heading Level 4</h4>
            <h5>Heading Level 5</h5>
            <h6>Heading Level 6</h6>

            <a href="">Click Here</a>
            <div>
                <p>
                    Paragraph inside the div
                </p>
            </div>

        </div>
        <ul>
            <li class="selected-sibling-item">item 1</li>
            <li>item 2</li>
            <li>item 3</li>
            <li>item 4</li>
            <li>item 5 </li>
        </ul>

        <button id="btn-primary">Button Test Hover Effect</button>

        <p class="pseudo-element-before">
            Paragraph to test '::before' pseudo element
        </p>
        <p class="pseudo-element-after">
            Paragraph to test '::after' pseudo element
        </p>

    </body>
    </html>
Conclusion
That's it for this article I hope this was worth your reading. If you want to read more about selectors then Click Here


Top comments (0)