Introduction
Does AWS provide any service which will offload my sign-up, login, user management responsibility?
What if I told you, AWS has a service which does all of the above, and also provide a hosted web UI which can used by you. It even provides data sync across devices. Everything is perfectly secure. I will help you understand everything you need to know about this service.
As a developer if you ever wished to focus only on the functionality or business logic of the application you are developing, and leaving the worries or sign-up, login, user management, data sync across devices in a safe and secure manner. Paying only based on the number of users per month. The AWS has answered your wish, and I will guide you through this.
As per AWS
You can focus on creating great app experiences instead of worrying about building, securing, and scaling a solution to handle user management, authentication, and sync across platforms and devices.
Let's jump right into the enticing world of AWS Cognito.
What Is Amazon Cognito?
The official definition from AWS:-
Amazon Cognito provides authentication, authorization, and user management for your web and mobile apps.
The most important concept in the above definition is authentication & authorization. This is provided using two components in AWS Cognito.
- AWS Cognito User Pool
- AWS Cognito Identity Pool
Originally AWS Cognito was used for mobile developers, who could use AWS Cognito for its authentication & authorization capabilities along with the user management.
AWS Lambda and ServerLess architecture have given a new dimension to use AWS Cognito. These developers can now offload user management of their application to an AWS Managed service.
AWS Cognito provides such developer with fully managed, scalable an cost-effective sign-up/sign-in service.
Before you jump into learning about User Pool and Identity Pool , you should have a fair understanding of the terms authentication & authorization. You may also need to understand federation.
Basics of Identity and Access Management (IAM)
There is a great article by Okta, which explains about IAM. Since you are here, I will summarize it.
Authentication
This is the first step in the security process of identity and access management.
Authentication is the act of validating that users are whom they claim to be.
The most common ways to authenticate user are:
- User Name and password combination
- OTPs
- Biometrics
- SSO (Social Sign On)
Authentication tells the application Who am I?.
Authorization
Authorization in a system security is the process of giving the user permission to access a specific resource or function.
Once a person is Authenticated, you have to provide him with relevant access. Even a Guest user, can be provided with minimum access.
You can divide your users, into these four categories.
- Admin of the application
- Authenticated User
- Premium user (Paid)
- Guest user
An Administrator can have a different view of the application than a normal authenticated user.
Even an authenticated user can be free user or a premium user, depending on the type, the view of your application may be different.
What type of experience you want to provide your user, decides the level of access.
Lets understand this concept used by an analogy in most of the company.
Most companies in pre-covid times used to give the RFID access card to its employee. Authentication means the process by which someone receives the RFID Access card. Once you receive your RFID access card, depending on the authorization of the employee, he may or may not have access to different parts of the office buildings.
Hope you are clear on these questions now
- What is Authentication? --> This answers the question "Who am I?"
- What is Authorization? --> This answers the question "What I can use?"
There is a third variable in this equation, which is called Federation. Lets understand What is federation?
Federation
The word federation, means a united, trusted relationship between two or more entities. To understand federation properly, you have to understand few other concepts.
-
Identity Federation
- It is a system of trust between two parties, to authenticate users and also convey the information required for giving authorization.
-
Identity provider
- The party in identity federation, which stores the user information, responsible for user authentication.
-
Service Provider
- The party in identity federation, which provides the service based on authentication and authorization provided by Identity provider.
-
Open Standards
- Identity federation is possible because of these open standards
- OIDC (OpenID Connect)
- SAML (Security assertion markup language) 2.0
- OAuth 2.0
When you book movie ticket online, you are authenticated by an online entity, who takes your money and gives you the ticket, when you go to the actual theater you are granted entry based on the ticket, you purchased online. In this case the online ticket vendor is the Identity provider , the theater is the service provider , and the bi-party arrangement is the Identity Federation.
Once the basic identity and access management is clear to you, let's move on to understand User Pool and identity pool.
User Pool
AWS Cognito User Pool , is a way to provide Authentication to user of an Application. It is represented as a user directory in Amazon Cognito.
The authentication mechanism provided by AWS Cognito User Pools is:-
- Social Identity Providers
- SAML Identity Providers
- AWS Cognito User Pools, also provide authentication, or act as an identity provider.
In Federation, as explained, the Identity provider, stores the user information. When AWS Cognito User Pools are used as the identity provider, the user directory of AWS Cognito stores the user login details, else its store in the identity providers storage.
The user directory is accessible by an SDK. This can be used by applications to access user profile.
AWS Cognito User pool provide:-
- Sign up and sign in service
- A built-in customizable web-ui for user to register.
- Social sign-in with social identity provider.
- User directory management and user profile.
- MFA.
Once a user is authenticated, the application receives a JWT (JavaScript Web token). The next step of authorizing uses this JWT.
Configure User Pool
When you select AWS Cognito in AWS console you get this screen, asking to choose .
Since you will configure the User Pool, lets choose the User Pool Option.
To Make life easier you can select the Review Defaults , and it could provide you with a good basic user pool.
You can also choose to configure each of these ten settings.
Customizing all the settings for user pool creation, would be beyond the scope of this Blog. Let's take these two approaches.
- Create a user pool with the default option.
- Add an App to enable the hosted WebUI.
Create a User Pool (Default)
- Step 1 : Select the " Create a user pool".
- Step 2 : It provides us with this screen.
- Step 3 : Provide a name for Pool, and press the Review Defaults.
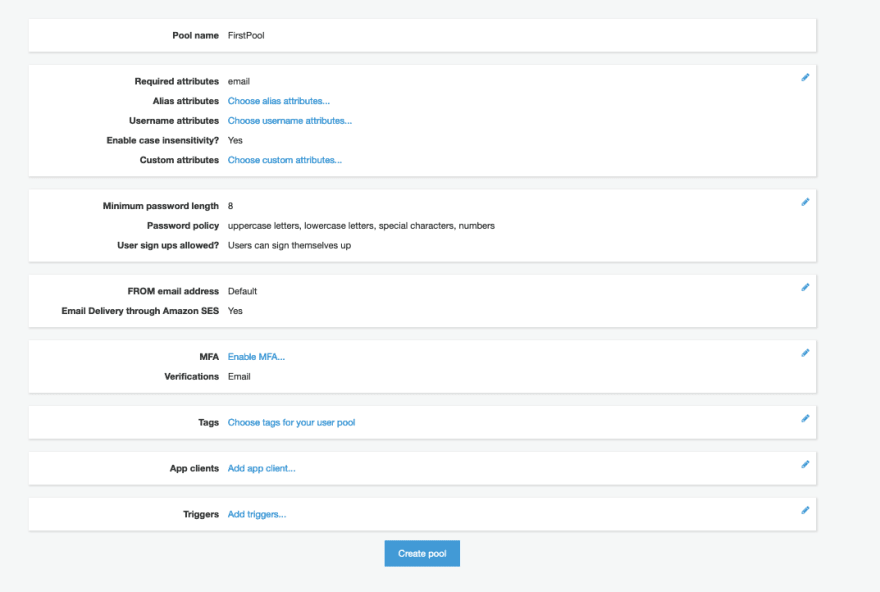
- Step 4 : On pressing the Review Defaults , you get this Review screen.
The review pages, tells us these important information.
- Pool Name
- Email is a required attributes.
- There is a password policies.
- How the message's for AWS Cognito needs to be communicated.
- MFA is enabled or not.
- Tags are created or not
- App Clients are registered or not.
- Which are Triggers to configure. like pre sign-up, pre-authentication
If you carefully watch the Review page and the steps to create a user pool, they match.
- Step 5 : Press the Create Pool , button and your User Pool is created.
Congrats on creating the default user pool. Now you should check out the Hosted UI provided by the AWS Cognito for sign-up and login.
Add an App to Enable the Hosted Web UI
AWS Cognito even goes a step ahead into offloading your user management work. It provides a user sign-in, login page as a hosted web. Let's see, how can you configure this.
You will use the default user pool created before. Once you have created a User Pool, you can edit a lot of attributes provided here.
To Use the hosted WebUi, you will focus on the App Integration property of the user pool.
- Step 1: Select App Integration from Setting of User Pool.
To get the Web Hosted UI, you have to use this configuration, if you have your own domain, provide your custom domain, else use the AWS domain.
- Step 2: Add Domain.
On choosing the Add Domain option, you get this screen.
Enter the domain, you wish, and keep a note of this, you will require it later.
- Step 3 : Add App Client under General settings
Select the App Client under General Setting, so you can enter the app client attributes. The screen will look like this.
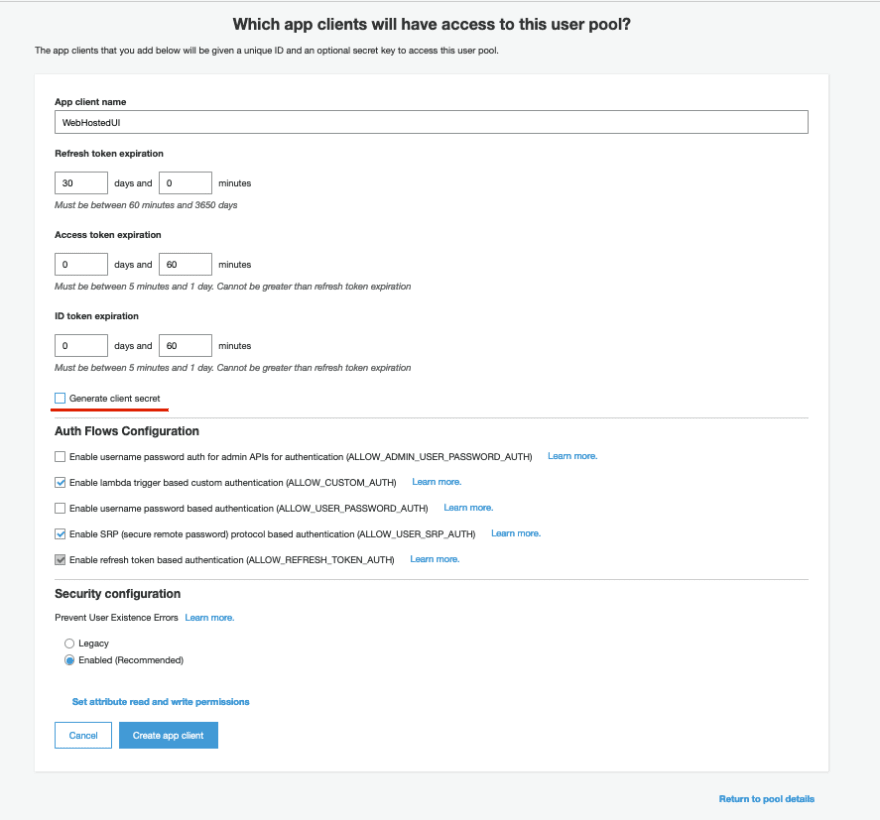
You should select the Add an app client option. The screen will look like this.
You should provide the name of the client, and de-select the option Generate client secret. This option can be used when you have a server side component to generate the client secret. Once the app client is created. We move to the Step 4.
- Step 4 App Client Settings:
Select the App Client Setting, under App Integration. You will get a screen like this.
If you check the App Client details are already present, In the above screen, you have to select
- Cognito User Pool as the enabled identity providers.
- Since you are testing, provide " http://localhost" as the callback URLs, this is for validation.
- Choose Implicit Grant , in Allowed OAuth Flows.
- Select All the allowed OAuth Scope, you want.
Save the option.
- Step 5 : Launch the WebHosted UI.
At the bottom of the previous screen, there is an option for Launch Hosted UI. Use this option. You should get a sign-up page like this.
Here is your simple web hosted a for Login and sign up. Though everything may not work. Just refer this as a guideline.
At this point you can use IAM roles for your application and this authentication to make your application function. But providing different level of authorization will still be the application's responsibility. If you want to hand over this part also then move to Identity Pool.
Identity Pool
AWS Cognito Identity pool does both Authentication and authorization, but in a different way.
The AWS Cognito Identity pool uses Federated identity for authenticating users. Different identity federation can be provided by
- Social Identity Provider
- SAML Identity Provider
- OpenID Connect Provider
- Amazon Cognito User Pool.
Kindly note, the AWS Identity pool is the service provider in the identity federation paradigm. It uses the identity providers to authenticate the user.
Once these identity providers do their magic (authentication), they inform the Identity pool by issuing a type of token. On receiving the token, identity pool will authorize users to a different level of access.
Identity pool will provide the user with different level of access by using IAM Roles.
Identity pool uses AWS STS, service to grant the users credentials to access AWS resources.
Configure Identity Pool
Configuring Identity Pool is a 2 Step Process.
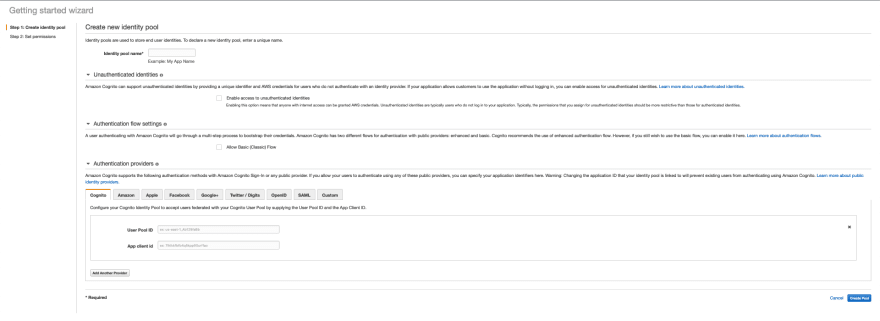
Select Manage identity Pool from the screen when you created the user pool. You will be greeted with this screen.
- Step 1 : Create Identity Pool
In this step you have to configure 3 things apart from providing a name to the identity pool.
- Unauthenticated Identities
- AWS Cognitio provides support for Guest user. It generates a unique ID for each guest.
- In the future if they register, the complete session is saved into the user directory.
- Authentication flow settings
- We can select a basic or an enhanced authentication flow.
- Authentication providers
- We have All the Social Identity providers along with OpenID and SAML.
- We will use Cognito, which needs us to provide user pool id and App Client ID , which was created during the user pool.
Once you fill the required details, let's proceed to the most important step in AWS Cognito, providing Permissions.
- Step 2 : Set Permissions
This is the screen, as you can guess, can provide two types of IAM Role to both Authenticated and Unauthenticated user. The IAM Role will be created here.
Here is the IAM policy statement for Authenticated Users in AWS Cognito Identity pool.
{
  "Version": "2012-10-17",
  "Statement": [
    {
      "Effect": "Allow",
      "Action": [
        "mobileanalytics:PutEvents",
        "cognito-sync:*",
        "cognito-identity:*"
      ],
      "Resource": [
        "*"
      ]
    }
  ]
}
Here is the IAM policy statement for UnAuthenticated Users in AWS Cognito Identity pool.
{
  "Version": "2012-10-17",
  "Statement": [
    {
      "Effect": "Allow",
      "Action": [
        "mobileanalytics:PutEvents",
        "cognito-sync:*"
      ],
      "Resource": [
        "*"
      ]
    }
  ]
}
Once you are ready, just select Allow. You will have your AWS Cognito Identity Pool created, just use this option for integrating with the SDK you want to use.
- Getting Started with Amazon Cognito
Python Code for AWS Cognito
You might be thinking, how does it all come together. You have a user pool and an identity pool. You also created the Web Hosted UI. You might be thinking how do I use it together.
If you like video, to learn, visit the AWS Cognito Python tutorials by Paris Nakita Kejser. This is the only AWS Cognito's in Python video tutorial.
We will just pick two important flow from the above tutorials, as some changes need to be done in the code mentioned in the video.
Sign-Up using AWS Cognito, Python SDK Boto3
import os
import boto3
from dotenv import load_dotenv, find_dotenv

load_dotenv(find_dotenv())

# read the .env-sample, to load the environment variable.
dotenv_path = os.path.join(os.path.dirname( __file__ ), ".env-sample")
load_dotenv(dotenv_path)

username = "abc.xyz@gmail.com"
password = "#Abc1234"

client = boto3.client("cognito-idp", region_name="<region-name>")

print(os.getenv("COGNITO_USER_CLIENT_ID"))

# The below code, will do the sign-up
response = client.sign_up(
    ClientId=os.getenv("COGNITO_USER_CLIENT_ID"),
    Username=username,
    Password=password,
    UserAttributes=[{"Name": "email", "Value": username}],
)
There are certain prerequisites for this code to work.
Create a file called .env-sample, in the current directory where you have the above code. In this file you should provide the macro COGNITO_USER_CLIENT_ID, with the client ID from General Settings > App Client > App client id.
The above will be picked using the dotenv module.
When you execute the above code, you will get this back as a response,
{
   "UserConfirmed":false,
   "CodeDeliveryDetails":{
      "Destination":"a ***@g***.com",
      "DeliveryMedium":"EMAIL",
      "AttributeName":"email"
   },
   "UserSub":"123456-d094-44e0-942d-789012134",
   "ResponseMetadata":{
      "RequestId":"123-1842-4027-345-789abc09234",
      "HTTPStatusCode":200,
      "HTTPHeaders":{
         "date":"Mon, 19 Apr 2021 05:11:44 GMT",
         "content-type":"application/x-amz-json-1.1",
         "content-length":"175",
         "connection":"keep-alive",
         "x-amzn-requestid":"123-1842-4027-345-789abc09234"
      },
      "RetryAttempts":0
   }
}
If you check the General Setting > User and groups , the user will be unconfirmed, you will see this, and get a verification code in your email.
Confirmation Code using AWS Cognito, Python SDK Boto3
Now you are an unconfirmed user, you have got the confirmation code in the mail. Let's find a way to make you a confirm user. Here is the code to do that.
import os
import boto3
from dotenv import load_dotenv, find_dotenv

load_dotenv(find_dotenv())

dotenv_path = os.path.join(os.path.dirname( __file__ ), ".env-sample")
load_dotenv(dotenv_path)

username = "abc.xyz@gmail.com"

client = boto3.client("cognito-idp", region_name="<region-id>")

print(os.getenv("COGNITO_USER_CLIENT_ID"))
confirm_code = "112418"

# Below API sends the confirmation code.
response = client.confirm_sign_up(
    ClientId=os.getenv("COGNITO_USER_CLIENT_ID"),
    Username=username,
    ConfirmationCode=confirm_code,
)

print(response)
Post this the response is this.
{
   "ResponseMetadata":{
      "RequestId":"3412d123-c175-4571-91a5-12349c14a9bd",
      "HTTPStatusCode":200,
      "HTTPHeaders":{
         "date":"Mon, 19 Apr 2021 05:22:10 GMT",
         "content-type":"application/x-amz-json-1.1",
         "content-length":"2",
         "connection":"keep-alive",
         "x-amzn-requestid":"3412d123-c175-4571-91a5-12349c14a9bd"
      },
      "RetryAttempts":0
   }
}
If you again go and check in General Setting > User and groups , the user should be confirmed now.
You have successfully created your first app user.
Login and Getting User details using AWS Cognito
You have now successfully created a new user, and also confirmed the user. The next logical step will be to Login and get some user details from AWS Cognito.
This you can achieve in this manner.
import os
import boto3
from dotenv import load_dotenv, find_dotenv

load_dotenv(find_dotenv())

dotenv_path = os.path.join(os.path.dirname( __file__ ), ".env-sample")
load_dotenv(dotenv_path)

username = "abc.xyz@gmail.com"
password = "#Abc1234"

client = boto3.client("cognito-idp", region_name="ap-south-1")

print(os.getenv("COGNITO_USER_CLIENT_ID"))

# Initiating the Authentication,
response = client.initiate_auth(
    ClientId=os.getenv("COGNITO_USER_CLIENT_ID"),
    AuthFlow="USER_PASSWORD_AUTH",
    AuthParameters={"USERNAME": username, "PASSWORD": password},
)

# From the JSON response you are accessing the AccessToken
print(response)
# Getting the user details.
access_token = response["AuthenticationResult"]["AccessToken"]

response = client.get_user(AccessToken=access_token)
print(response)
Please note sometime you may get this error
botocore.errorfactory.InvalidParameterException: An error occurred (InvalidParameterException) when calling the InitiateAuth operation: USER_PASSWORD_AUTH flow not enabled for this client
If you get this error, please check in General Settings > App Client > Auth Flow Configuration
You should have this option selected ALLOW_USER_PASSWORD_AUTH selected, or just for testing enable all the option like this.
You will get a JSON as a response of initiate_auth, you have to just pick the AccessToken from it and pass it to get_user. Once that is done, you will get this as a response.
{
   "Username":"abc.xyz@gmail.com",
   "UserAttributes":[
      {
         "Name":"sub",
         "Value":"1234eb31-d094-44e0-942d-50a1234a66b"
      },
      {
         "Name":"email_verified",
         "Value":"true"
      },
      {
         "Name":"email",
         "Value":"abc.xyz@gmail.com"
      }
   ],
   "ResponseMetadata":{
      "RequestId":"xxxxxxx-1231-4f1c-b881-dcf10c54e576",
      "HTTPStatusCode":200,
      "HTTPHeaders":{
         "date":"Mon, 19 Apr 2021 08:26:10 GMT",
         "content-type":"application/x-amz-json-1.1",
         "content-length":"213",
         "connection":"keep-alive",
         "x-amzn-requestid":"xxxxxxx-1231-4f1c-b881-dcf10c54e576"
      },
      "RetryAttempts":0
   }
}
This is enough to understand how AWS Cognito works, you can even follow the video for Forgot Password flow also.
AWS Cognito Sync
The official documentation of AWS Cognito Sync is.
Amazon Cognito Sync is an AWS service and client library that enables cross-device syncing of application-related user data.
Few use cases of the AWS Cognito Syncs are.
- Synchronize the user profile data across the mobile devices and the web, without a back-end.
- The application can cache data locally if there is no connectivity, and once you get connected the data are synced.
- The AWS Identity pool is required to use the AWS Cognito Sync.
Conclusion
AWS Cognito is a service to use if you want to offload complete user management tasks to AWS. This will cost a little, but you can continue to focus on the good things of your application and ignore the mundane activity of user management.
You can rest assured that AWS will take responsibility of upgrading the service for latest security patches, and you are not exposed to such security flaws.
AWS Cognito User pools and Identity pools are the two brothers of AWS Cognito, shouldering the responsibility of authentication and authorization. Using IAM roles, you can provide very fine grained access to users.
Integration using SAML, OIDC also help in using 3rd party vendors as your Identity Providers. Even the Guest users can be assigned a unique ID which can later be saved to a user profile, if he registers.
Though you may never use the AWS Cognito provided Web Hosted UI, but it makes a great point in AWS service, how thought out their services are.
The AWS Boto3 SDK can use the AWS Cognito APIs to provide the complete functionality of User Management in your application with the most minimal amount of code.
This would have given you a fair understanding of AWS Cognito Service. Let me know if you tried the Python Code to login the user.
Reference
- Introduction to Amazon Cognito - User Authentication and Mobile Data Service on AWS
- Authentication for Your Applications: Getting Started with Amazon Cognito - AWS Online Tech Talks
- AWS Cognito | Amazon Cognito | AWS Tutorial for Beginners | AWS Training | Edureka
- Fine-grained Access Control with Amazon Cognito Identity Pools
- User Authentication For Web And iOS Apps With AWS Cognito (Part 1)
- What's the difference between Amazon Cognito user pools and identity pools?
- Understanding AWS Cognito User and Identity Pools for Serverless Apps
- IAM 101 Series: Federation and Federated SSO
- What is the difference between Federated Login and Single Sign On?
- What Is Amazon Cognito?
- Identity federation in AWS
- Deep Dive on User Sign-up and Sign-in with Amazon Cognito
- Learning AWS Cognito with Python
- AWS Cognito Authentication USER_PASSWORD_AUTH flow not enabled for this client
- Python Boto3 for AWS Cognito
- What is the use of python-dotenv?
- Authentication and Authorization Flows
Info graphics
Authentication Vs Authorization
| Authentication | Authorization |
|---|---|
| Validate the user | provide access to resources |
| Passwords, biometrics, OTP used for authentication. | Policy and rules are used to grant access. |
| First Step in IAM | Follows authentication, (exception - Guest user) |
| OIDC 2.0 | OAuth 2.0 |
| ID Token are used | Access tokens are used |
| User has some control | User have no control |
AWS Cognito User Pool Vs Identity Pool
| User Pool | Identity Pool |
|---|---|
| Authentication | Authorization |
| User Management | IAM Roles for Access |
| Sign-Up & Login | Fine Grain Access |
| Provide WebHosted UI | Complete back end access |
| User Pool is charged | Identity pool is free |
| No Guest user | Guest User |
Using AWS Cognito User Pool With Identity Pool
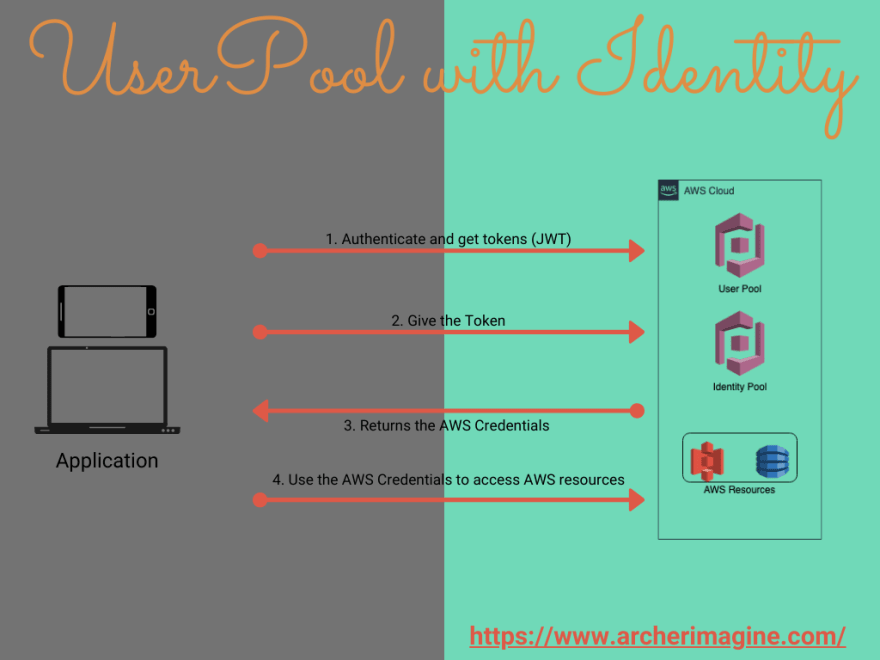
When you have both AWS Cognito user pool and identity pool, they can function together with each other to provide access to user for AWS resources. These can be done in three steps.
- The Application uses the AWS Cognito User Pool, to authenticate, and gets tokens in return.
- The application exchanges this tokes with the AWS Cognito Identity Pool and received AWS credentials in returns.
- Use the AWS Credentials, and use to access the AWS resources.
When you are using AWS Cognito User Pool With Identity Pool, the flow is explained above.
- The application authenticates and get token from AWS Cognito User Pool as a JWT Token.
- This JWT Token is then passed on to AWS Cognito Identity Pool, which returns an IAM Roles for the user.
- Once the IAM role is assigned, the user can access any resources on AWS.


Top comments (0)