
Angular Schematics is a workflow tool for the modern web — official introduction article
Quick Intro
There are many articles on how to build your own Angular schematics but in this one we’re going to focus on using available schematics to the fullest! 💪
Most of the time we will be using @schematics/angular which are provided in Angular CLI out of the box.
What are we going to learn
- Use shortcuts, they are much faster and easier to type, duhhh 😂!
- Skip creation of an initial application
- Generate multiple applications and libs to promote code reuse
- Use schematics from different npm packages
- Set schematics defaults in angular.json file so that we don’t need to specify all the flags all the time
- Generate services — providedIn: 'root' vs --module flag (scoping to lazy-loaded modules)
- Use ng add to add libraries like Angular Material (or others)
BONUS: Useful commands
BONUS+: Amazing code completion capabilities!
FUN FACT: In the beginning all I had in mind was 6 distinct useful tips and see how it ended up. We have 7 main points and 2 bonuses 🤦 But schematics just have so many cool features that there was no other way 😂
1. Use Shortcuts, They Are Much Faster! 🏎️
Most of the schematics commands in Angular CLI come with the shortcut version. For example, instead of ng generate service service-name we can simply write ng g s service-name.
Less letters = lower probability of typos, yaay🎉!
Also, schematics used to be documented in the GitHub Wiki of the Angular CLI repository but this was improved. Official schematics documentation is now available as a part of angular.io together with the rest of the docs which is very convenient! Check them out to see all the available commands and their shortcut versions!
2. Skip Creation Of An Initial Application
Angular CLI comes with great support for multiple apps and libraries in a single workspace. This feature can be easily missed because by default Angular CLI will generate new project with a default application directly in the project root in the ./src/ folder.

CLI will create new projects folder when we decide to add more libraries later during the development process. This will lead to a inconsistent code structure where original app doesn’t follow paths and conventions compared to the ones added later.
This can be prevented by creating our new workspace with ng new --createApplication=false flag.
What we get is an empty workspace. Then we can continue with the ng generate application our-first-app (or library our-first-library ).
That way, all the code in the workspace will be located in the predictable location inside of projects folder! Great! 🎉🎉🎉

3. Generate Multiple Applications And Libraries To Promote Code Reuse
As mentioned above, Angular CLI currently supports multiple apps and libraries in the single workspace (by default inside of the projects/ folder.
The libraries and apps can be added by running ng generate library library-name and ng generate application app-name respectively.
You can go with the multiple independent npm packages or monorepo, that’s up to your subjective preferences. Both have their distinctive advantages and disadvantages.
The Angular CLI will generate libraries which will get their own package.json file in the dist folder after they were built by ng-packager. Such a library can be easily published to npm independently from the rest of the projects in the workspace. This supports multiple npm packages scenario out of the box
On the other hand, tools like @nrwl/nx help us to implement similar structure in a monorepo fashion. Choose what works best for your use-case!
How can we generate entities in different apps and libraries?
Using schematics in a workspace with single app is very straight forward. Every call to ng generate will generate desired entity in the specified path inside of the one and only app. What would happen with multiple apps and libraries in a single workspace?
The angular.json file contains the defaultProject property which specifies which project will be implicitly assumed when executing any Angular CLI command. This is valid also for the things like ng build or ng test.

We can also specify --project flag as a part of these commands to make it run in a desired app or library… The command will then look like this: ng g c path/some-component --project some-app
PRO TIP: It might be worth it to change defaultProject property in angular.json file when working mostly on a single app (or lib) to prevent unnecessary typing or create additional npm script in package.json which will do that for us. For example, "ng-my-lib": "ng run --project my-lib" which we can then use like this npm run ng-my-lib -- test . Note the --npm pipe to pass in a sub-command.
4. Use schematics from 3rd party npm packages
Angular CLI comes with default set of schematics implemented in the @schematics/angular npm package which gives us ability to generate apps or components.
The schematics itself are actually framework independent
Many people, organizations and open source libraries already implemented and provided their own schematics in the npm registry for our use.
A good example of this could be NgRx state management library which ships its own schematics in the @ngrx/schematics npm package. So how can we use this additional 3rd party schematics?
Specify schematics package name in the generate call
This one is the most straight forward solution. Once we installed additional schematics package in our workspace we can simply call them using ng g : [...options]. Or to imagine it from a more practical angle — ng g @ngrx/schematics:action feature-name/entity-name --spec=true …

Run schematics without the help from Angular CLI
Schematics can be executed even without the help of Angular CLI. In that case we can just run schematics @ngrx/schematics:action feature-name/entity-name.
How to make schematics command available in our environment will be discussed in the BONUS section 😉
Follow me on Twitter to get notified about the newest Angular blog posts and interesting frontend stuff!🐤
5. Set schematics defaults in angular.json file so that we don’t need to specify all the flags all the time
Many of the schematics which we use to generate entities like components or services support vast amount of additional configuration flags.
For example, with components we can set flag for --inlineStyle and --inlineTemplate so that we have whole implementation inside of the component typescript file.
A single project usually contains many components so we would need to repeat these flags manually and quite often if we wanted to preserve unified code style…
Luckily, Angular CLI has support for defining default values of the schematics options!

The default values are defined inside of the schematics object and they are defined per individual schematic. Every schematic is defined by the package name and the respective schematic.
In the example above we’re providing defaults for the component schematics from the package @schematics/angular.
This approach is great because it is flexible enough to allow us to specify defaults for multiple schematics packages like popular 3rd party @nrwl/schematics, @ngrx/schematics packages or even our own custom built @some-org/schematics.
The schematics object can be defined as a top level property and in that case defaults will be applied for the ng g call WITHOUT --project flag. Project specific schematics defaults can be configured too and will be activated only when using ng g together with the --project some-project flag.
Overriding of the default schematics collection
Some schematics collections (like ngrx) enable us to call original Angular CLI schematics (like component or service) next to all the new schematics they are bringing to the table.
In that case we can set such a collection as a default Angular CLI schematics collection using ng config cli.defaultCollection . The defaultCollection property will be added into angular.json file.
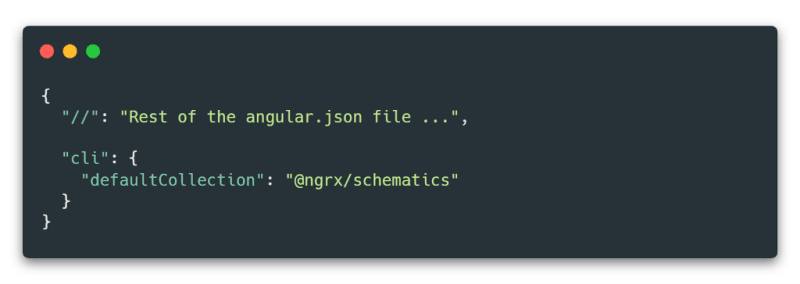
Setting default collection enables us to execute schematics from that collection without the need to specify the schematics package name in the call. That way we can call ng g action feature/action-name instead of ng g @ngrx/schematics:action feature/action-name which is great!
6. Generate services — providedIn: 'root' vs --module flag (scoping to lazy-loaded modules)
Service generation has changed and the services generated by Angular CLI 6+ use new providedIn: 'root' syntax by default.
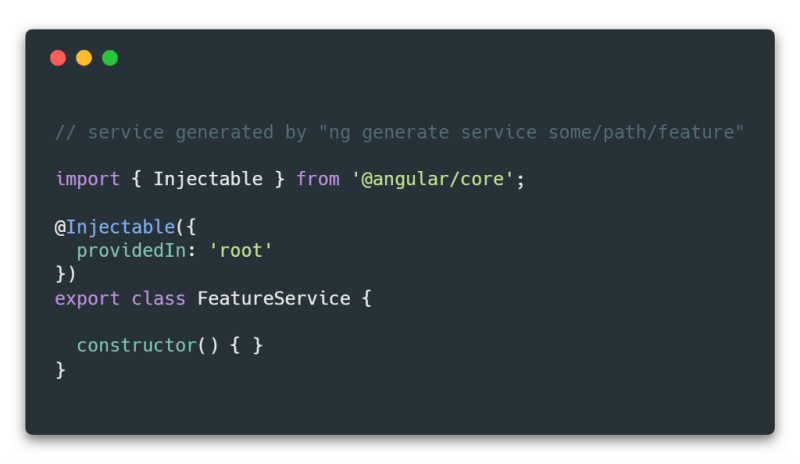
Such a service doesn’t have to be specified in providers: [] array of any @NgModule which is nice convenience. Even better, library services provided in the root will be tree-shaken automatically if they were not explicitly imported by the consumer app!
This is great improvement compared to previous dependency injection style using providers: [] array when all the provided services would always end up in the bundle regardless of whether they were used at all!
Providing service using the old style providers: [] has still its place when we want to get unique instance of the service per created component or when we want to scope service to lazy loaded module.
Before it was possible to ng generate service some-feature and specify --module ../some.module flag but this is no longer supported in Angular CLI 7+.
In case we want to scope our service to some component or module we have to remove the content of the @Injectable() decorator. Then we can import the service to the desired module and add it manually to the providers: [] array.

7. Use “ng add” to add libraries like Angular Material (or others)
Until now, we have been mostly talking about the execution of various schematics which were already available in our workspace. The schematics themselves usually created couple of new files and maybe added some import statement here and there to wire stuff up…
But what about libraries that need more extensive setup work?
Schematics cover our back yet again! The helps comes in the form of ng add command and the corresponding (special) ng-add schematics implemented in the particular schematics package!
The most common example probably would be Angular Material, a great component library used in many Angular projects. Angular Material setup process is a bit more complicated….
- Obviously, we have to install the @angular/material npm package
- We have to decide if we want to go with pre-built theme or add our own custom theme
- We have to decide if we wan to support touch events and browser animations
Such a nontrivial setup process is best handled using ng add.
Without ng add we would have to install the package manually and then spend couple of minutes reading the docs to figure out how to set everything up!
PRO TIP: It still might be worth it to add ng-add schematics to your open source library even if it doesn’t do much more than npm install the package. That way people can add it using the usual workflow! Check out example how to implement this minimal ng-add schematics in the @angular-extensions/model library.
🎁 BONUS: Useful commands
Run schematics without Angular CLI
Schematics are independent from the Angular CLI and can be executed outside of the workspace. All we have to do is to install npm i -g @angular-devkit/schematics which will give as schematics command which we can run in our terminal of choice.
Another possibility would be to us npx. Unfortunately, in our case the package name and the command name are not the same so the execution would be quite cumbersome… npx -p @angular-devkit/schematics schematics and therefore I recommend to use global npm installation instead.
List all available schematics
schematics --list-schematics schematics-package-name:
This command lists all available schematics from the specified package. The package has to be installed and available in the node_modules/ folder of the folder from where the command was executed. (Please note that the package name ends with : character)
Example: schematics --list-schematics @ngrx/schematics: in the workspace of the project generated by Angular CLI with installed @ngrx/schematics package.
💝 BONUS+: Amazing code completion capabilities!
We might have noticed that the first line of the angular.json looks a bit funny…

The $schema property is responsible for the super awesome code completion capabilities!
Let’s say we would like to add defaults to another schematics of our project. All we have to do is hit code completion key shortcut of our editor of choice and we would get the list of possible values!
Very often together with a helpful description!

That’s It For Today!
I hope you enjoyed this article and will get more productive by using Angular Schematics in your projects!
Please support this guide with your 👏👏👏 using the 👏 button on the left side and help to spread it to a wider audience 🙏. Also, don’t hesitate to ping me if you have any questions using the article responses or Twitter DMs @tomastrajan
Starting an Angular project? Check out Angular NgRx Material Starter!

And never forget, future is bright

If you made it this far, feel free to check out some of my other articles about Angular and frontend software development in general…
- The Best Way To Unsubscribe RxJS Observable In The Angular Applications!
- The Ultimate Answer To The Very Common Angular Question: subscribe() vs | async Pipe
- Total Guide To Angular 6+ Dependency Injection — providedIn vs providers:[] 💉
- Total Guide To Dynamic Angular Animations That Can Be Customized At Runtime
- How Did Angular CLI Budgets Save My Day And How They Can Save Yours


Top comments (1)
Good guide. Please tell me, which terminal config or wrapper you use at 7 tip? :)