Android Studio 4.0 will include a lot of really great features, like layout Multi Preview, support for Jetpack Compose or Live Layout Debug tool. This seems to be a lot for a single release, but there is also one more thing — MotionEditor. This tool finally makes working with MotionLayout really easy and fun!

MotionLayout is out there since the release of constraint-layout:2.0.0-alpha1 (June 2018), and it has already caused quite a stir. When we first saw the example animations that can be done pretty easily using it, we were pretty impressed. However, as it turned out, using MotionLayout was time- and work-consuming, because there was a lot of code to write, and in order to test it we had to run our app on the device each time.
These times are over!
As for constraint-layout:2.0.0-beta3 and Android Studio 4.0 Canary1 we can edit MotionLayout in the graphic design tool, and what's even better, we can preview the effects of our work right in the Android Studio, with no need to run the app on the device ❤
That sounds really awesome. Now, let’s see how it works.
MotionLayout
At the beginning, just a few words about the MotionLayout itself.
MotionLayout class extends ConstraintLayout. That means you can seamlessly convert the latter to the first, and without any changes it should work pretty much the same. That is really nice, because it enables us to experiment with MotionLayout, starting with any existing ConstraintLayout.
<androidx.constraintlayout.widget.ConstraintLayout xmlns:android="http://schemas.android.com/apk/res/android"
    xmlns:app="http://schemas.android.com/apk/res-auto"
    android:layout\_width="match\_parent"
    android:layout\_height="match\_parent">

    <View
        android:id="@+id/sky" android:layout\_width="0dp"
        android:layout\_height="0dp"
        android:background="@color/sky\_morning"
        app:layout\_constraintBottom\_toTopOf="@id/guideline"
        app:layout\_constraintEnd\_toEndOf="parent"
        app:layout\_constraintStart\_toStartOf="parent"
        app:layout\_constraintTop\_toTopOf="parent" />

    <View
        android:id="@+id/ground"
        android:layout\_width="0dp"
        android:layout\_height="0dp"
        android:background="@color/ground"
        app:layout\_constraintBottom\_toBottomOf="parent"
        app:layout\_constraintEnd\_toEndOf="parent"
        app:layout\_constraintStart\_toStartOf="parent"
        app:layout\_constraintTop\_toBottomOf="@id/guideline" />

    <androidx.constraintlayout.widget.Guideline
        android:id="@+id/guideline"
        android:layout\_width="wrap\_content"
        android:layout\_height="wrap\_content"
        android:orientation="horizontal"
        app:layout\_constraintGuide\_percent="0.5" />

    <ImageView
        android:id="@+id/biker"
        android:layout\_width="wrap\_content"
        android:layout\_height="wrap\_content"
        android:contentDescription="@string/biker"
        android:src="@drawable/ic\_bike"
        app:layout\_constraintBottom\_toBottomOf="@id/guideline"
        app:layout\_constraintTop\_toTopOf="@id/guideline" />

</androidx.constraintlayout.widget.ConstraintLayout>
Above: just a simple constraint layout that will be our starting point.
The real magic of MotionLayout lays in the MotionScene resource file, which contains all the constraints and attributes transitions that result in our layout animation.
<?xml version="1.0" encoding="utf-8"?>
<MotionScene
    xmlns:android="http://schemas.android.com/apk/res/android"
    xmlns:motion="http://schemas.android.com/apk/res-auto">

    <Transition
        motion:constraintSetEnd="@+id/end"
        motion:constraintSetStart="@id/start"
        motion:duration="1000">
       <KeyFrameSet>
       </KeyFrameSet>
    </Transition>

    <ConstraintSet android:id="@+id/start">
    </ConstraintSet>

    <ConstraintSet android:id="@+id/end">
    </ConstraintSet>
</MotionScene>
Above: an empty MotionScene file.
Each Transition has to have a start and end ConstraintSet, and a number of KeyFrames that enables us to achieve various interesting effects. You should remember, that constraints set in the MotionScene always take precedence over these declared in the MotionLayout file.
If you want to know more about the MotionLayout itself, there is a great series of articles on the Google Developers Medium.
To use all the discussed below features you need to add a dependency to your build.gradle file.
dependencies {
    implementation 'androidx.constraintlayout:constraintlayout:2.0.0-beta3'
}
MotionEditor
Ok, so now that we know what MotionLayout is, let’s see what Android Studio 4.0 can do to make our work with it more enjoyable.
First of all, in the layout design panel there is a tool to automatically convert our selected ConstraintLayout to the MotionLayout.

What it really does is changing the root layout to MotionLayout, creating a new MotionScene xml file in the resources/xml package and setting the app:layoutDescription attribute of the new layout to the motion scene file. That's it. But is also redirects us to the brand new MotionEditor view.

There you can see a preview of our MotionLayout on the left, a panel with all the transitions and constraint sets in the middle, and attributes panel on the right.
One thing to remember is that you can navigate between code, design, and split screen using the three buttons on the top right corner of the view (not on the bottom left as it was before).
Now, by navigating between the start and end states in the middle panel, we are able to add/change views constraints and attributes. E.g. we want the color of the sky to change from light to dark. All we need to do is to choose start state, click on sky entry and add a new Custom Attribute (there is an autocomplete in the attributes popups ☺). Then repeat it for the end state.

MotionLayout will do the rest for us, and we get a nice simple sky animation.
In a similar way, but by changing the start and end constraints of the biker image, we are able to create a changing position animation.

By clicking on the grey arrow between the states, you open the Transition panel where you can play the current motion animation.

To make it work on the device we need to start the motion somehow. We can either start/set the progress in code, or add an OnSwipe/OnClick MotionObject. In this example, we choose the second option, and by clicking the third button on top of the motion panel we add a SwipeHandler with an anchor at the biker.


Now let’s add some sunshine to our animation ☺
We add the sun image, and want it to move above the biker, but on the arc, so simply changing the constrains won’t be sufficient. We need to add also a KeyFrame. We can do it by choosing KeyPosition from the Transition panel, and setting the percentY position in a 50th frame (frames go from 0 to 100) to a negative value, and type do pathRelative.


Now our animation starts to gain some life.

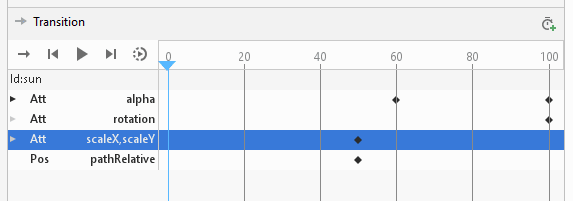
In a similar way, but using KeyAttribute we can modify things like scale, rotation or alpha of our view.

Let’s get nuts and add all of the above attributes! Making the sun do a 360 degrees rotation during the animation, scaling to 1.5 in the middle, and vanishing after the 60th frame.
When we add a moon image with the same path as the sun image, and with alpha increasing after 60th, we’ll get a really nice transition.
Now you can use your imagination and add other views to the animation. Will you be able to recreate the one from below? ☺

This kind of animation is a great example of how MotionLayout can be mixed with a ViewPager for creating a really nice custom experience.
_You can find the complete code of the example _ HERE .

It is also worth to mention that if you have a MotionLayout written with an older constraint-layout version and older Android Studio, you can still use it with the Android Studio 4.0, and MotionEditor will work just fine, no changes need to be done ✔
Problems
The tools that Android Studio 4.0 gives us to work with the MotionLayout are great, however we must remember that neither of them is stable yet, and definitely not production ready. There still can occur some random crashes and other errors.
Here are some problems I encountered while playing with the above example:
- modifying constraints can sometimes cause big lags
- there must be no errors or warnings (!) in your xml code for MotionEditor to work
- ‘showPaths’ option does not work when there are many views in the layout
- MotionEditor does not work for your custom classes extending MotionLayout
Conclusion
Now it’s time for your own experiments. MotionLayout gives us great abilities to create beautiful and meaningful animations. There are many other features that I haven’t discussed here, like multiple transitions in a single MotionScene, creating custom attributes, using MotionLayout progress, KeyCycles, or motion easing.
The best place to start your adventure is definitely the documentation page, where you can find many examples.
Article by Aleksandra Krzemień. Originally published at https://angrynerds.co on November 15, 2019.

Oldest comments (0)