Have you always wanted to learn how to constrain your views and elements in Swift programatically and want to use no-libraries, well you are in the best place. This method of writing constraints is quite tedious in comparison to the likes of SnapKit but you will learn the fundamentals of constraints and then you can apply this knowledge to libraries like SnapKit in the future.
Let's get started 😀
Firstly, we need to understand the key types of Anchors and what they all mean! Let's list the types out.
Types of Anchors ⚓️
To constrain programmatically you must constrain to the pre-specified anchors that are provided for us to use. These are:
- Top (Anchor at the top of the view)
- Bottom (Anchor at the bottom of the view)
- Leading (Anchor at the left of the view)
- Trailing (Anchor at the right of the view)
- CenterX (Anchor on the centre of the X axis)
- CenterY (Anchor on the centre of the Y axis)
- Width (Anchor determining Width)
- Height (Anchor determining Height)
Remember: Usually you will need four constraints, never less. If you have more than four constraints you should see if you can improve the way you are constraining your elements.
Now, let's look at the process of adding constraints and we can then explore examples of each type!
Process of adding constraints 👷🏼♂️
It's usually good practice to add your constraints directly under your view.addSubview(view) code. I usually have a process for adding constraints to elements. It looks a little bit like this.

You should always remember to make sure to add the new view as a subView of the main view and then make sure you change the bool as shown above. This bool allows us to write out our own custom programmatic constraints. A common mistake is to not make this false.
Examples of constraints using our Anchors
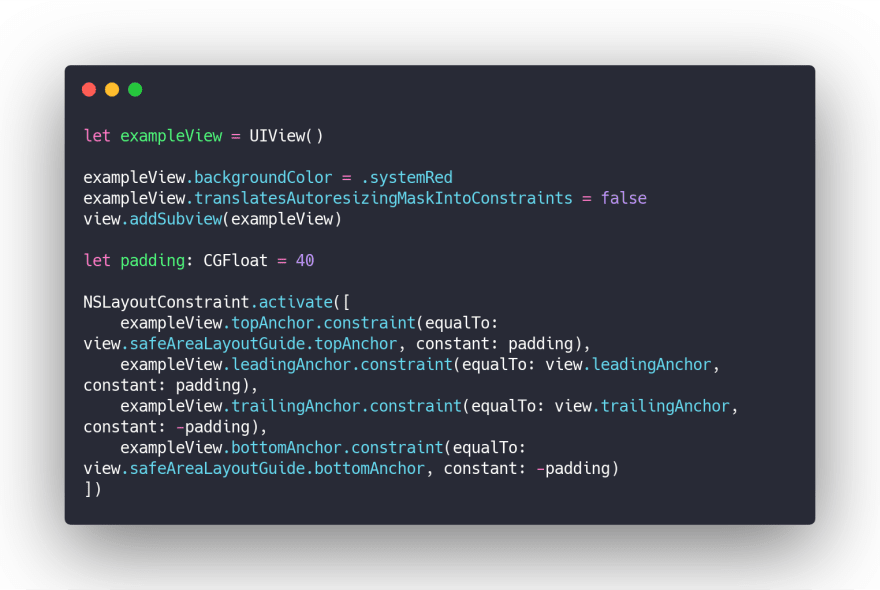
tip: Something I learned from Sean Allen is that you can define a padding type as a CGFloat and use this variable instead of manually inputting your constants. This allows you to change your UI from one position. Example below!

Now we can delve into the examples. We will go through some examples and show different ways they could be implemented. Take into account there are many different types of constraints, eg: constants, multipliers. We are going to use constants, just take into account that where you see constant it could also be a multiplier if you needed it to.

Top Anchor
This example below links the example view to the top of the main view with a distance of 40. this is a common way of setting up this type of constraint.

tip: add safeAreaLayoutGuide in between view and topAnchor to pin to the safe area not the top of the view!
Bottom Anchor
This example below constrains the example view to the bottomAnchor with a distance of 10. Take into account that the number needs to be negative as we want the view to be away from the anchor not past it. This will make more sense when we do leading and trailing anchors.

tip: add safeAreaLayoutGuide in between view and bottomAnchor to pin to safe area once again.
Leading Anchor
The leading anchor is the anchor on the left hand side of the screen. The left hand side is the leading anchor as we imagine we are looking from left to right. With this knowledge we can verify that the trailing anchor is the anchor to the right. Leading anchor constants do not need to be negative as we want our view to be pinned to the right of the anchor.

Trailing Anchor
Key thing with trailing anchors is that the constant must be negative not positive as you are wanting your view to be x pixels behind the Anchor itself. The example below is the line we would add to make this possible. This examples shows us pinning a trailing anchor

CenterX Anchor / CenterY Anchor
CenterX and CenterY Anchors are fairly self explanatory. We use them to center views when we need them to be fixed in an axis. These two anchors are useful for having an image in the exact center of the screen. I will show examples of pinning to the CenterX Anchor and also the CenterY Anchor but with a constant.

Width Anchor / Height Anchor
Width and Height Anchors are quite self explanatory. These constraints allow you to add a width and height to your views. I will show you an example below.

Full Examples using what we have learned! ✍️
Now let's put into practice what we've learned! I will include three full examples below showing valid constraints along with what they look like on the device!
Example 1
This example shows how we can create a View and then pin the view to the edges of the phone. I've made the view red so you can see what's happening.
Here you can see what's happening on the phone in red!

Example 2
This example shows how we can pin a view to the centre of the phone and then add a width and height to it, you could use this for main screen logos! I used a variable for the box size so we can easily resize it if needed.

Here you can see what's happening on the phone in blue!

Example 3
This example shows how we can create two views and stack them without using a stack view. This could be used to create some interesting designs! Look at the way I've pinned to the first views bottom anchor in the second views top anchor constraint.

Here you can see what's happening on the phone in green and pink!

Review 🥳
Now you have seen examples of how to add constraints programmatically in Swift!
If you have any additions for this post please do leave it in the comments, this is my first ever post so feedback would be appreciated!


Top comments (4)
I would add that leading and trailing anchors are switched when user has RTL language selected. As alternative you can use left and right anchors to prevent elements being switched automatically based on language.
Good shout! I also missed a few other things that I've just noticed. I'll probably add more into this blog this week and write another one about something similar. Thanks for that!
it's really good summary of auto layout constraints. thank you.
I’m glad you liked it!