The “kiss” of Flutter Frameworks.
In keeping with the “KISS Principle”, this is an attempt to offer the MVC design pattern to the Flutter community in an intuitive fashion incorporating much of the Flutter framework itself. All in one lone Flutter Package:
Some Github examples right off the hop!
Right-click and save these examples as bookmarks. You may want to try out these examples later. They use this MVC implementation.
Counter app example — the counter app first created with a new Flutter project. This one, however, will use the MVC package.
Startup_namer example — ‘Your First Flutter App’ but with this package.
Forget Everything I’ve Told You!
By the way, if you’ve been following me on Medium.com, forget the other two articles I wrote on the subject! Don’t read them! (Well, maybe the first bit of An MVC approach to Flutter.) I’ve moved on since then having learned a great deal and experimented on how to marry MVC with Flutter. I’ve made a Flutter Framework that I now use with all my apps! I’m satisfied for now. So much so, I’ve made it into this package and use as the basis for all my apps.
Like many design patterns, MVC aims to separate ‘the areas of work.’ It’s meant to separate ‘the areas of responsibility’ when developing software. With MVC, this means separating ‘the interface’ from ‘the functionality’ from ‘the data’ that makes up the application. To decouple these three major areas in the software allows for efficient modular coding, code reuse and parallel development:
- Model — the source for data. In some implementations, it contains the business logic.
- View — concerned with how data (not necessarily that in the Model) is displayed in the user interface.
- Controller — controls what data is displayed, answers to both system or user events, and, in some implementations, contains the business logic.
“The model is. The view shows (what the model is). The controller changes (what the model is or what the view shows).” — Jon Purdy Jun 8 ’11 at 1:51
The version of MVC conveyed in this implementation is actually more of a PAC (Presentation-abstraction-control) pattern instead of the classic MVC. In the PAC pattern, the Controller contains the business layer. Ideally, the code in the ‘View’ does not directly affect or interfere with the code involved in the ‘Model’ and vice versa. While the ‘Controller’ controls the ‘state’ of the application during its life cycle. The View can ‘talk to’ the Controller; The Controller can ‘talk to’ the Model, but again, the View is unaware of the Model and vice versa.
However, this particular MVC implementation has been designed to allow one to implement the more classical pattern. One that allows the View and the Controller to ‘talk to’ each other, as well as ‘talk to’ (call public functions & public properties) the Model.
However, there’s no Model
Note, I’ve purposely left any implementation of a Model out of this version of the MVC. You won’t find the concept of a Model in this package. There’s a ‘View Class’, and there’s a ‘Controller Class’, but there’s no ‘Model Class.’ If and how a Model is implemented, I leave to the developer.
When it comes to a Model, you may even choose to implement a hybrid of a sorts (and all that entails). For example, one Dart file could contain what would be defined as both the Controller and the Model.
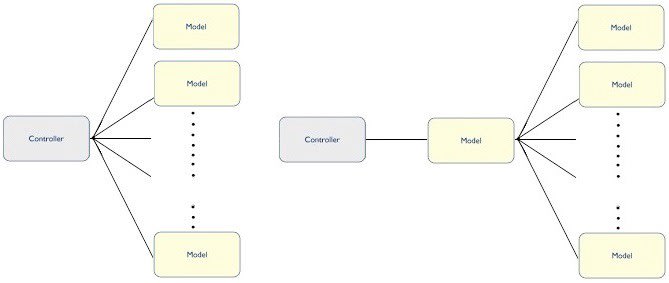
Maybe your app has no data! Maybe your app has a lot of data! (i.e. any number of Models). Who knows! This package will allow for that…by not caring either way frankly.
The last graphic demonstrates another possible purpose for a Model. There may be times your app works with maybe another app’s data source. Your Model serves to then ‘convert’ the other app’s data to a format suitable to your app. It’s data used by a multitude of applications. Yours is just one.
This is demonstrated with this library package contribution to the Flutter Architecture Samples Project. You’ll find the model in the MVC Example merely ‘relays’ the data requests to models also used by the other architecture design patterns. In this case, the Scoped Model.
There is some rules!
From the beginning, the intent for this package was not only to allow the developer the freedom to write their code — in the best way to meet their needs, but also in a way that best utilizes the underlying Flutter framework.
Like it or not, however, there are some rules to follow. I’ll get to all them in subsequent articles, but for now, there’s one prominent rule you’ve got to know. There’s one rule, one stipulation, if you decide to use this package when building your apps that you’ll have to follow: A Controller can only have one View. A Controller can’t be assigned to more than one View. You’ll have to break up your code into separate Controllers if you want your ‘business logic’ to access more that one View. You would then have those Controllers’ ‘talk to’ each other if you must.
Besides, this an app for a small little phone. It’s not for a huge website like, say…Facebook. You’re likely going to have ‘one View’ and ‘one Controller.’ Besides, that’s what design patterns, frameworks, architectures, or whatever you want to call them are for. They not only organize the code, they impose some structure, some conformity and some consistency as well.
The idea being that doing so will allow a developer new to the development team, who is familiar with this package or at least with the MVC design pattern, to walk in and already know where all the code is. The developer, with task in hand by their manager, can ‘hit the ground running’ and go straight into the application knowing how the code is arranged and how the boilerplate works — what little boilerplate there is in this case.
However, like any good MVC design should, you are allowed to make as many Controllers as you like access a View. Each ready to react to any event or process that originates from that View. Oh yes, there’s event handling too!
Again, for most simple apps, there’s usually going to be just one View and just one Controller. However, if there is a number of Controllers assigned to a View, and when ‘an event’ does occur in that View, the Controllers will fire, in turn, in the order they were assigned.
So? How do you use it?
So, how do you use this package? Well, let’s fall back on the ol’ ‘Counter app’ first introduced to you every time you create a new Flutter project. To utilize the package in the Counter app, I changed three things. I extended the Class, _MyHomePageState, with the Class StateMVC, I introduced a ‘Controller’ Class that extends ControllerMVC, and I then introduced a static instance of that Controller Class to the build() function. Done!

Now, of course, there’s a lot of things going on here, but you don’t see that. Like any good library package should, a lot is kept in the background. At a glance, however, you can see there is now a separation of the ‘Interface’ and the ‘data.’ The build() function (the View) is concerned solely with the ‘look and feel’ of the app’s interface — how things are displayed. In this case, it is the Controller that’s concerned with what is displayed.
What data does the View display? It doesn’t know nor does it care. It ‘talks to’ the Controller instead. Again, it is the Controller that determines ‘what’ data the View displays. In this case, it’s the app’s title and a counter. Even when a button is pressed, the View turns to the Controller to address the event by calling one of the Controller’s public functions, incrementCounter().
But what about StatefulWidget?
Note, with this configuration, the Stateful Widget is pretty much empty. With the exception of passing along the app’s title (a trivial task which could be done by other means), its role is simply to create the State object.
With its role now limited to just that, the StateMVC Class can simply extend State<StatefulWidget>. In other words, any code once appropriate in the StatefulWidget, MyHomePage, would now likely go into a Controller.
How Do Things Relate?
Notice that in this arrangement, the Controller is ‘talking back’ to the View by calling the View’s function, setState(), to tell it to ‘rebuild.’
Maybe you don’t want that. Maybe you want the View to be solely concern with the interface, and it alone determines when to rebuild or not. It’s a simple change.

You see the function, setState(), is now called in ‘the View’ (in the build function) and not in the Controller. Doing so does separate the ‘roles of responsibility’ a little more, doesn’t it? After all, it is the View that’s concerned with the interface. It may know best when to rebuild, no? Regardless, with this package, such things are left to the developer. Also, notice what I did with the app’s title? I created a static String field in the MyApp class called, title. It is the app after all. It should know its own title. Leaving the StatefulWidget object to its sole task — creating the State object.
How about Model?
Currently, in this example, it’s the Controller that’s containing all the ‘business logic’ for the application. In some MVC implementations, it’s the Model that contains the business rules for the application. So what would that look like? Well, maybe it could look like this:
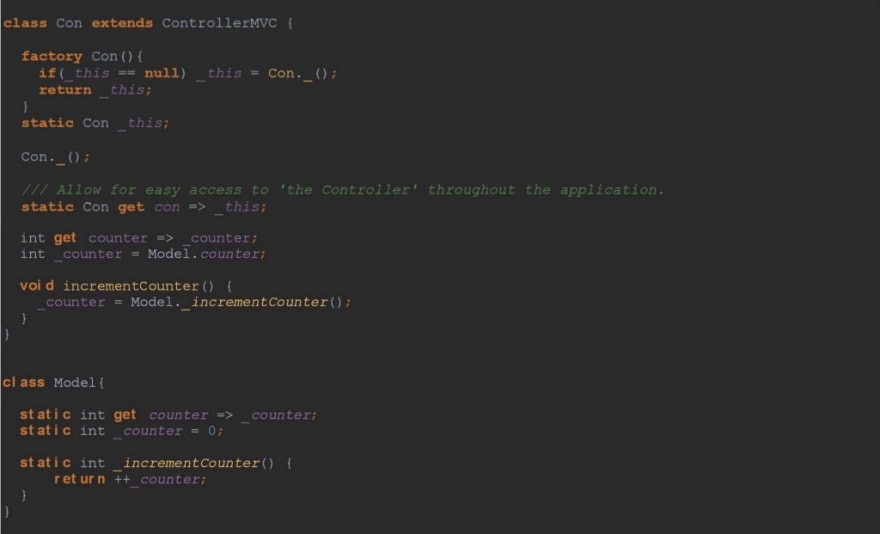
I decided to make the Model’s API a little cleaner with the use of static members. As you can see, the changes were just made in the Controller. The View doesn’t even know the Model exists. It doesn’t need to. It still ‘talks to’ the Controller, but it is now the Model that has all the ‘brains.’
However, what if you want the View to talk to the Model? Maybe because the Model has zillions of functions, and you don’t want the Controller there merely ‘to relay’ the Model’s functions and properties over to the View. You could simply provide the Model to the View. The View then calls the Model’s properties and functions directly.
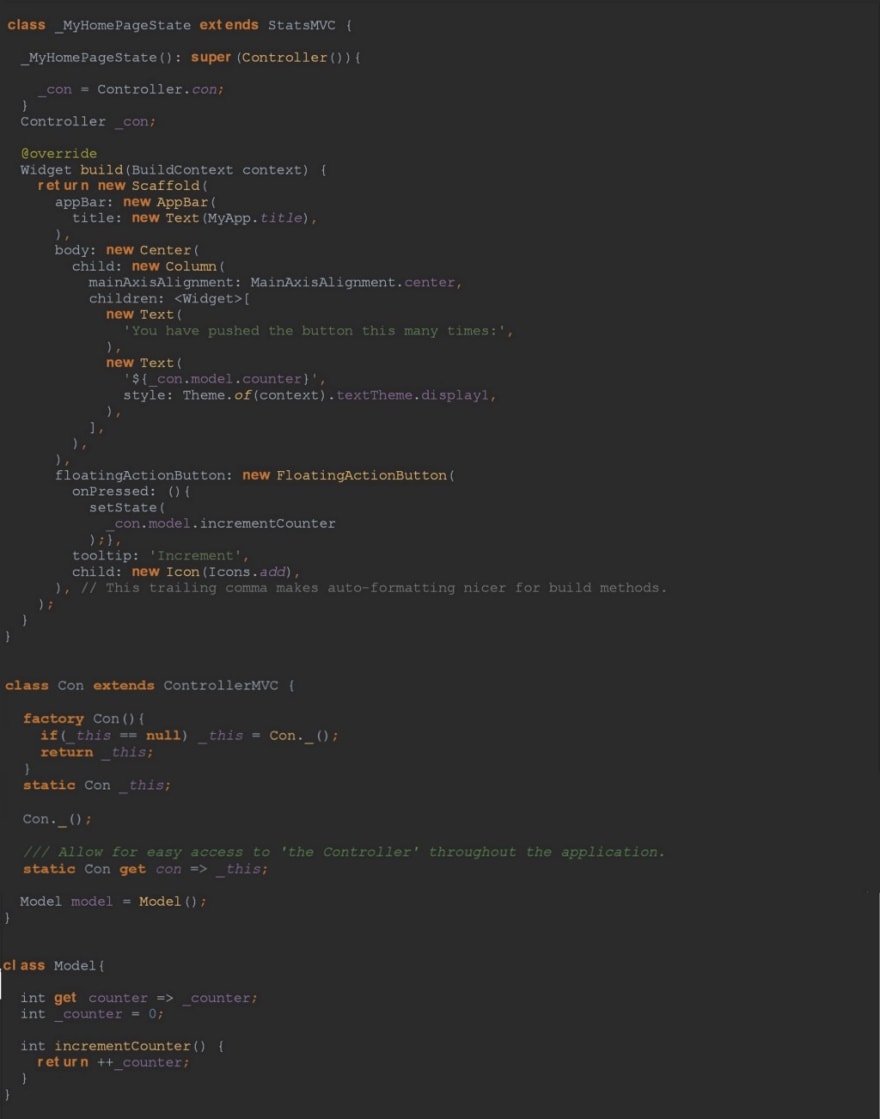
Not particularly pretty. I would have just kept the Static members in the Model, and have the View call them instead (or not do this at all frankly), but I’m merely demonstrating the possibilities. With this MVC implementation, you have options, and developers love options.
How’s It Works?
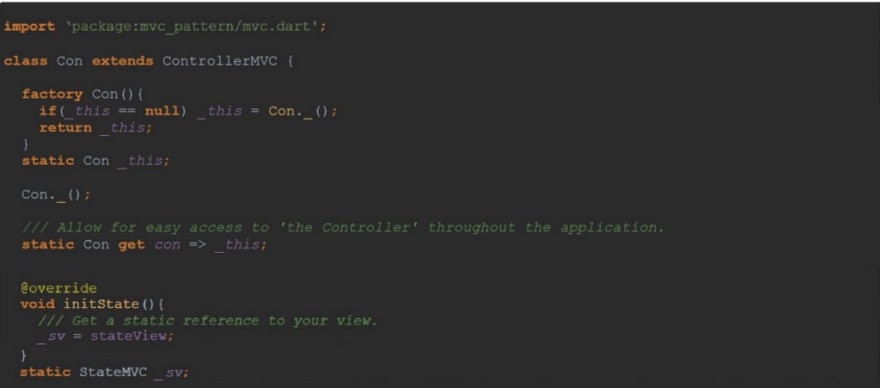
When working with is MVC implementation, you generally override two classes: The Controller (Class ControllerMVC) and the StateView (Class StateMVC). Below is a typical approach to overriding the Controller.
The Controller has ‘direct access’ to the View (aka. the StateView, aka. the Class StateMVC). This is represented by the property, stateView, in the Class, ControllerMVC. In this example, a ‘static’ reference to the View. A ‘static’ reference to the Controller itself is made as well, in the Constructor. This example conveys a generally good approach when dealing with the application’s Controller because you then have easy access to your Controller throughout the app. It’s now in a static field called con. See how it’s easily accessed now in another Dart file below:
Now, in any View or any Widget for that matter, you can access the app’s data or business logic easily and cleanly through it’s Controller. For example , you can then reference the Controller in a build() function using the field, con.
The other Class (StateMVC) has called ‘StateView’ because, in this MVC implementation, ‘the View’ is a State object. Surprise!
Note, the StateView, like the State Class is abstract and must be extended to implement its build() function. So, in fact, ‘the View’, in this MVC implementation, is simply the State’s object’s build() function! Surprise!

The Controller
Note, the Controller class (ControllerMVC) looks pretty thin at first glance, but that’s by design. That just gives you more room to code your app! All the ‘leg work’ is done in the Class, _StateView. Strange name from a ‘Controller’ parent class, ain’t it? You’ll see why next.

Set the State
The ‘StateView’, of course, has the setState() function. It’s a State object after all. However, with this MVC implementation, you also have the setState() function in your Controller! You can call it in both Classes. That’s very important. All your Controllers can behave like a State object! Surprise! That’s because Controller class (ControllerMVC) extends _StateView.

Both Classes, also have a refresh() function. To ‘refresh’ or to ‘rebuild’ the User Interface (The View). It’s a little trick. It’s just the function, setState() called with an empty closure. Cute.

Listen! There’re listeners!
Note, the ‘Controller’ class has a parent Class called StateEvents (class _StateView extends StateEvents). It is this Class that allows the Controller to response to events generated by the phone or (indirectly) by the user. As of this release, there are some twelve separate events available to the Class. Note, this StateEvents Class is also available to you! Extend this Class, and you’ll have an ‘event listener’ to use in your app — listeners that fire along side Controllers also assigned to a particular View. Interesting, no?

Note, a ‘StateEvents Listener’ will not have access to the ‘StateView’ object, but instead only to it’s ‘State’ object. If you want more access to ‘the View’, then your class should extend the class, ControllerMVC. I’ll dedicate a separate article to these listeners later.
For now, below are the three functions used by the Controller (and by the ‘StateView’ for that matter) to register such Listener objects. Using such functions, the Controller (Class ControllerMVC) can assign listeners to the View it itself is assigned to, while the ‘StateView’ (Class StateMVC) can assign listeners directly.

Of course, you have a means to remove a listener if and when it’s necessary.

Before and After
Note, the function, addListener(), does the same thing as the function, addAfterListener(). The ‘before’ and ‘after’ reference means you can assign listeners that will fire ‘before’ or ‘after’ the Controllers fire. Why? I don’t know! It’s your app! ;)
A Function for every Event
Below, you’ll see the twelve events available to you. Turn to the WidgetsBindingObserver Class for details. Frankly, you may never ever use all these events. A few you will use every time, however, most you won’t ever need to use. Regardless, this framework allows easy implementation if and when you do.

That Rule Again!
The same rule that applied to View’s and its Controller applies to its Listeners: A Listener can only be assigned to one View. In time, things may be changed to allow a Controller to access one View ‘as a Controller’, but any number of Views ‘as a Listener’. Listeners, after all, are merely called when particular events are triggered. We’ll see. Maybe in version 2.0?
For now, you’ll use a Listener (i.e. A Class that extends StateEvents) only when you want some particular code to fire for some particular event in some particular View. Again, like Controllers, you can have any number of Listeners assigned to a View.
How to Start Your App
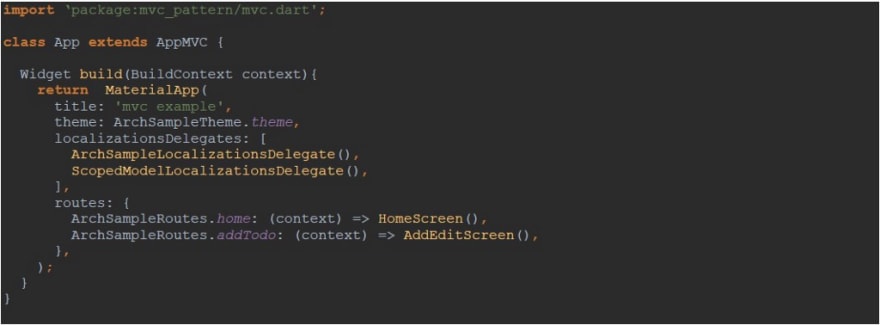
Below would be a typical approach to start up an app using this package. This is done by using yet another Class in the MVC Pattern package. It’s called AppMVC.
Below is a ‘conceptual representation’ of the AppMVC Class with its logic removed for brevity. However, what’s left will give you an appreciation of just what you can do with this Class, and it’s a lot. Again, some of the events are not listed here, but all twelve of the events mention above are addressed and could be used at ‘the Application level’ if the developer wishes to.
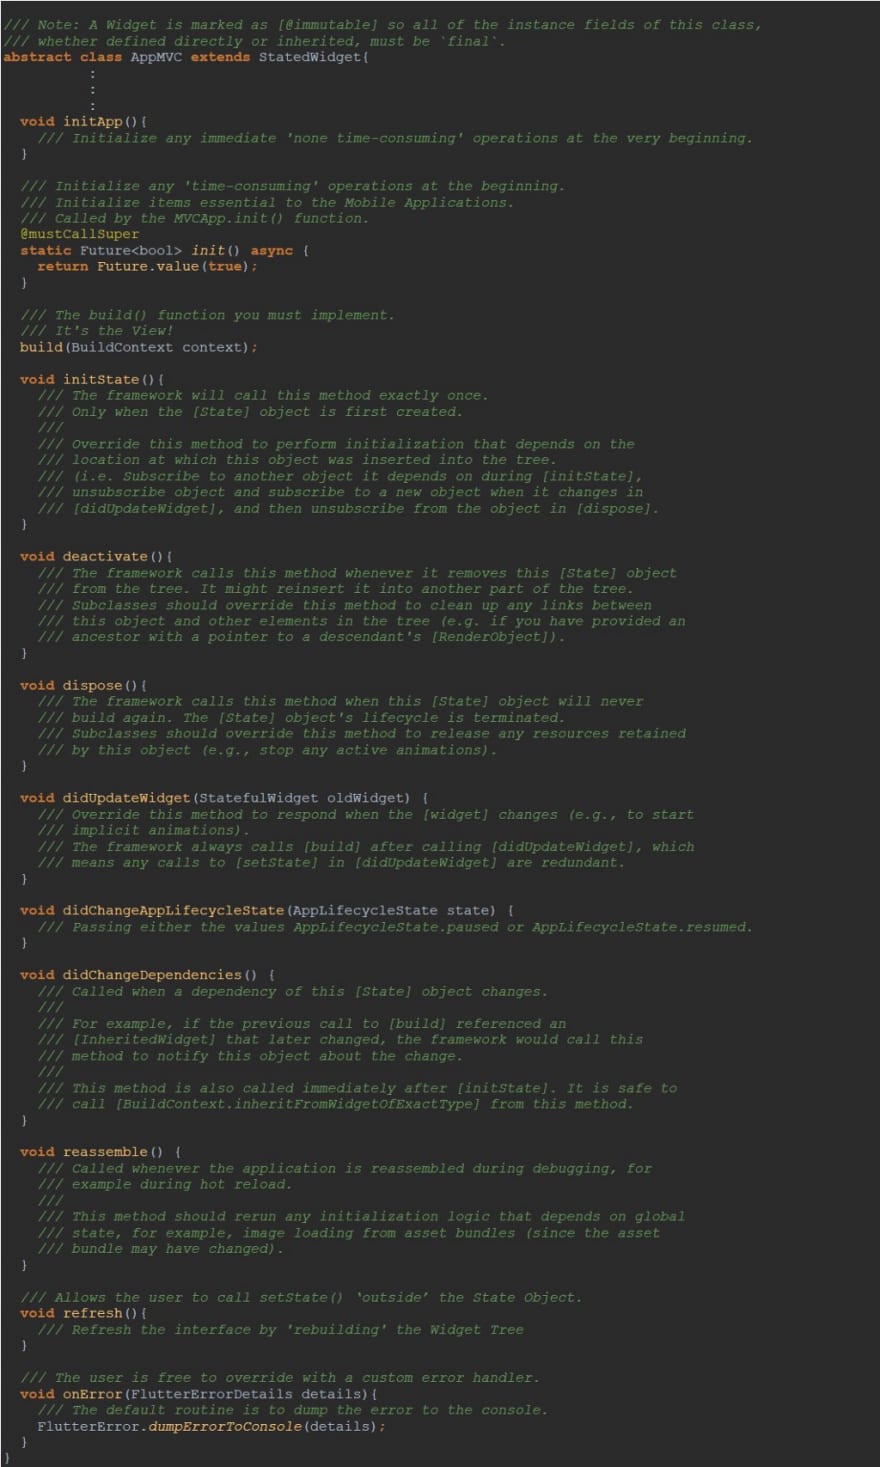
Two ‘new’ functions exist solely for the ‘App Class’: initApp() and init(). A lot of things have to ‘start up’ when starting up an App, and these two functions provide a place for them. The function, initApp(), is for ‘quick’ synchronous processes while the init() function returns a Future and so is for asynchronous operations. In such cases, usually a FutureBuilder() function is called upon. You see, one has to wait at the start of the app for such ‘asynchronous stuff’ to complete, and so a ‘Loading Screen’ is displayed while we wait.
There’s an Error Handler
Did you notice the last function in the App Class? See below. That’s right. It’s an error handler. Error handling is important. But like writing documentation, we programmers tend to neglect it. ( That reminds me, I’ve got to work on the package’s online documentation. It’s horrific! hehe )

Where was I?! Oh yes! Left on its own, if an error does occur, this framework’s default response is the usual ‘red screen of death.’ However, developers are encouraged to not only use their try…catch statements judiciously in their code, but to also override the onError() function to ‘catch’ any unexpected errors. Face it. Your application will fail at one time or another. From the very foundation of this framework you’re encouraged, however, to address error handling. Have your app fail in a more graceful fashion….maybe even email an error report somewhere.
There’s an Error Handler. Everywhere!
Again, in this MVC implementation, error handling is considered paramount. The ‘App’ Class has its own Error Handler, but so does everything else! This package places an Error Handler in everything you make: in every Controller, every Listener, every ‘StateView’ and, and in some instances, even right inside the build() function!
Remember the StateEvents Class? The one that allows your Controller and your Listener to response to events? It’s got a Error Handler. That means so does your Controllers and any number of Listeners you may create.

It’s Your Responsibility. Handle it!
I went back and forth on the idea of ‘imposing’ my own error handler in this framework, but, in the end, I decided against it. It would go against the idea behind this framework: The developer has options. Besides, it’s the developer who would have a better idea on how to handle unexpected errors in their particular app! By default, the error response (the red screen of death) is preserved. It’s the developer’s responsibility to implement error handling. The framework, at least, readily provides a means to…everywhere.
The StateView Error Handler
Note, even our StateView (Class StateMVC) has an error handler. If all of the Controllers assigned to it haven’t bothered to create their own error handling, the developer can create a error handler at ‘State Level’ that will at least try to handle things when something goes wrong.

Not a good practice, but maybe you weren’t assigned to create the Controller(s) for your app. Maybe you’ve been assigned the ‘State Level’ stuff and you’re working in the class that extends Class StateMVC. At least you can ensure your State object will stay up if one of the Controllers errors. Again, modular coding is one of the benefits to using design patterns.
Another View
Error Handling has been deemed so important, there’s yet an additional State Object Class called StateViewMVC. It extends StateMVC, but has it’s own error handling — right inside its build() function.
It does mean ‘breaking out’ a little bit since you’ve got to now extend three Classes instead of two. Remember, I said you generally override two classes: The Controller (Class ControllerMVC) and the StateView (Class StateMVC)? Well there is…wait for it…another option. Love options!
There’s ‘another view’ with a name more suitable to this whole venture called, ViewMVC. This ‘View’ is not a State object, but you still extend it to implement its build() function for your interface! Note, this ‘View’ extends the same class, _StateView, as the Controller!? Now what does that mean?!

Because, both the Controller and this ‘View Class’ extend the same parent Class, they both can address events, and they both behave like State Objects. That’s a game-changer!
The Other StateView Class
So, there’s another ‘StateView’ Class other than the class, StateMVC. This other class, however, takes in its ‘View’ as a parameter to its constructor. Notice, the parameter, view, passes on its ‘controller’ to the super class, StateMVC.

This StateView Handles Errors
Unlike its parent class, StateMVC, this class has an error handler right inside its build() function!
This means, with all those Controllers and Listeners running in turn when ‘rebuilding your Widget tree’, you can be assured, if one of them misbehaves and an error occurs, the error handler you implemented will make every effort to fail gracefully or maybe, if possible, recover and continue! I’ll be writing a separate article dedicated to this approach in the weeks to come.

What’s To Come
In fact, there will be a lot to come with the release of this first article. In truth, this was only ‘to announce’ the official release of this package. There’s a lot more to it then mention here. For example, there’s still another class called StatelessWidgetMVC! Now what’s that all about?!
I didn't even mention the class I call, StatedWidget. Instead of creating both a StatefulWidget and its accompanying State<t extends StatefulWidget>, I just use this class. It’s used in the framework already for the AppMVC Class. Finally, we’ve just touched the surface on error handling! More to come.

Finally and Freely
I give this package freely to our fledgling Flutter community. I saw a need. I feel it‘ll be a good option when starting your next mobile app. Always good to have options, right?
Cheers.








Top comments (0)