Exordium
At the time of this writing, I am working on a UIKit application for a client and wanted to share how I set up programmatic projects in Xcode. SwiftUI is quickly becoming the standard for building user interfaces for Apple's ecosystem, and I'll be updating my app RoadHazard with the framework once I'm finished with this client's project!
I prefer programmatic UIs over Storyboards, and again SwiftUI brings this to a whole new level. In my experience, using a Storyboard-based app can get hectic and quite sluggish. Swift provides the same Auto Layout functionality that you'd find on a storyboard, and the transition to programmatic UIs is actually quite smooth.
So, let's dive in.
— — —
My Experience
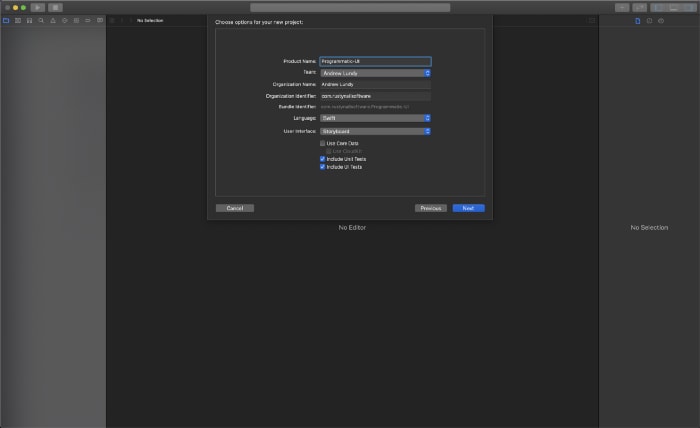
The first thing you'll want to do is create a new "Single View App" in Xcode. Make sure you are using the Storyboard interface.

Secondly, go to the General Settings of your target, and under Deployment Info, you should see a dropdown option labeled Main Interface.

Delete the current value.

Next, go ahead and delete the Main.storyboard file by either Right-Clicking -> Delete or pressing Command (⌘) + Delete. This will produce an alert that asks you if you want to move the storyboard file to the Trash, or only remove the reference to it.
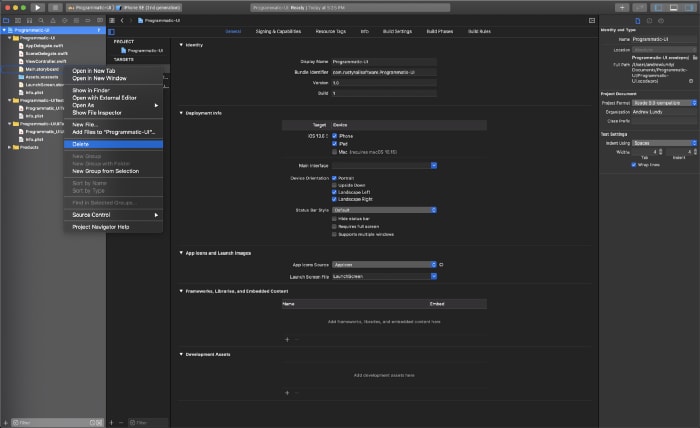
The difference between the two is that "Move to Trash" will completely delete the file from your hard drive, and "Remove Reference" will simply remove the reference to the file in your Xcode project, but keep it on the drive. You'll want to remove the reference.

Now, head over to the project's Info.plist file. Look for a key named "Application Scene Manifest" and extend it by clicking the arrow to the left of the name. This will produce two items, "Enabled Multiple Windows" and "Scene Configuration." Extend the "Scene Configuration" dictionary to reveal the "Application Session Role." Finally, extend the key named "Item 0" found in "Application Session Role." You should see a key named "Storyboard Name" - click the minus symbol next to the name to delete this key.

If you do not remove the "Storyboard Name" key after removing the Storyboard file, and Main Interface setting of your target - the app will crash, and you will receive the following error:
Terminating app due to uncaught exception 'NSInvalidArgumentException,' reason: 'Could not find a storyboard named 'Main' in bundle NSBundle.
Your "Application Scene Manifest" should look like this:

The last thing that we're going to do will take place in the SceneDelegate file. At first, the class should contain five empty functions, and one named willConnectTo, which includes a guard let statement. We'll be working within this function. Please note that this function is called during the process when the app is starting up.

First, you'll want to store the scene in a variable. To do this, we just give the guard let variable a name. It's currently marked with an underscore, which means this variable doesn't have a name. This type of syntax is also seen when you want to exclude the labels when you call custom functions, amongst other uses.
Go ahead and change the guard let statement to read as:
guard let scene = (scene as? UIWindowScene) else { return }
Next, you'll create the main window using the scene from the guard let statement. Remember that this scene is created during the process when the app starts up. In this case, you create the main window by initializing a UIWindow using the windowScene parameter:
window = UIWindow(windowScene: scene)
The next step is to set the root view controller of your window. This is just as it sounds - the view controller that your application considers the root of the view controller hierarchy. You do this by simply setting the rootViewController property to an instance of a view controller:
window?.rootViewController = ViewController()
The final step to getting started with a programmatic project is making the window you just created the key window of the app and showing it. You do this by calling the makeKeyAndVisible method on the window:
window?.makeKeyAndVisible()
The willConnectTo function should look like this:

I've set the ViewController's view background color to red, to show that the correct ViewController is shown when the app runs.

There you have it. Creating a programmatic project in Xcode is quite a simple process, and I personally prefer working with programmatic user interfaces compared to Storyboards. One is not better than the other - as they each have their pros and cons. I'd recommend learning and working with both, then deciding on which process you like more.
As Apple's tech continues to advance, SwiftUI is becoming the standard way to build user interfaces for their ecosystem. That being said, I believe that there is still value in knowing UIKit as it shows you the foundation of how iOS applications are built. SwiftUI is built on top of UIKit, and you can actually integrate the two frameworks in one app.
If you'd like resources on where to get started with iOS development, you can check out the projects laid out in the Hacking with Swift series by Paul Hudson. He offers both a UIKit and SwiftUI path - 100% free. Start with some of his projects, but be sure that you branch out and build something on your own as this is where the real growth as a developer comes.
Until next time - keep spreading the love, building innovative software and encouraging other humans.
If you'd like, you can follow me on Twitter or LinkedIn.

Top comments (0)