What is a smart contract?
A smart contract is like a regular contract with rules and conditions between buyer and seller. Still, the difference is in a smart contract, these terms of the agreement are written with executable code on the machines, and then they are running on a distributed system.
One of the most popular smart contract networks is Ethereum, and its programming language is Solidity. You can write your smart contract with this powerful language and publish it on the Ethereum blockchain network as a Token.
What is Token?
A token is an interchangeable item with many different properties and behavior. Tokens are used in many different ways, like:
- reputation points in an online platform
- an online piece of art
- skills of a character in a game
- lottery tickets
- voting
- financial assets like a share in a company
- a fiat currency like USD
- an ounce of gold
- and so more …
This powerful feature of Ethereum should have standard cause these tokens wanted to speak to each other with an API; this is where ERC-20 plays its role.
What is ERC-20?
As we found here, ERC-20 is a standard for writing tokens with smart contract programming language. Now the question is, what is this standard?
In this standard, we need to implement some predetermined events and methods.
function name() public view returns (string)
function symbol() public view returns (string)
function decimals() public view returns (uint8)
function totalSupply() public view returns (uint256)
function balanceOf(address _owner) public view returns (uint256 balance)
function transfer(address _to, uint256 _value) public returns (bool success)
function transferFrom(address _from, address _to, uint256 _value) public returns (bool success)
function approve(address _spender, uint256 _value) public returns (bool success)
function allowance(address _owner, address _spender) public view returns (uint256 remaining)

event Transfer(address indexed _from, address indexed _to, uint256 _value)
event Approval(address indexed _owner, address indexed _spender, uint256 _value)
- Function name: Will return the token's name defined in the project.
- Function symbol: Will return the sign of the token.
- Function decimals: This is defined to show how many decimals this token can have.
- Function totlaSupply: The total supply of the token in the network.
- Function balanceOf: Return the balance of the given wallet address.
- Function transfer: Transfer the given value to the provided wallet address.
- Function transferFrom: Transfer given value from the given sender wallet address to the receiver wallet address.
- Function approve: which will check if the total supply has the amount of token which needs to be allocated to a user.
- Function allowance: which will check if the sender has enough supply to send to the receiver.
- Event Transfer: This event is published when the token is transferred from the sender to the receiver.
- Event Approval: This event is published when the spender approves that can send the given value to the receiver.
The Wallet (MetaMask)
To work with the ETH network and develop on top of that, you need a wallet address. The simplest way to set up our wallet and use it in our journey is to use MetaMask.
Owing a MetaMask wallet is very easy, and you can do it in a couple of minutes. First, you need to download the MetaMask browser extension and then follow it to finish the process.
Be careful; if this account of MetaMask is your one, you should save the credentials somewhere safe and don’t forget it!
The Test Environments (Ropsten Test Network)
For beginning the development of the token, you need a place for the test environment.
In the MetaMask browser extension, you can find a dropdown at the top of it and should be written “Ethereum Mainnet.” Click on that and change it to the Ropsten Test Network.
Using the Ropsten faucet you can earn some test ETH for testing purposes. You need to change the network on your MetaMask wallet to Ropsten Test Network and copy-paste your wallet address that starts with “0x…” into the mentioned website text field, then click “Send me test Ether”.
Development IDE (Remix IDE)
An integrated development environment is a software application that provides comprehensive facilities to computer programmers for software development. An IDE usually consists of a source code editor, build automation tools, and a debugger.
Remix IDE has all the necessary tools that we need to create, debug, compile and deploy an ERC-20 token.
How to create an ERC-20 token
Go to the Remix IDE and make a new solidity file, for example – mytoken.sol
Paste the following code into your new Solidity script:
pragma solidity ^0.4.24;

//Safe Math Interface

contract SafeMath {

    function safeAdd(uint a, uint b) public pure returns (uint c) {
        c = a + b;
        require(c >= a);
    }

    function safeSub(uint a, uint b) public pure returns (uint c) {
        require(b <= a);
        c = a - b;
    }

    function safeMul(uint a, uint b) public pure returns (uint c) {
        c = a * b;
        require(a == 0 || c / a == b);
    }

    function safeDiv(uint a, uint b) public pure returns (uint c) {
        require(b > 0);
        c = a / b;
    }
}


//ERC Token Standard #20 Interface

contract ERC20Interface {
    function totalSupply() public constant returns (uint);
    function balanceOf(address tokenOwner) public constant returns (uint balance);
    function allowance(address tokenOwner, address spender) public constant returns (uint remaining);
    function transfer(address to, uint tokens) public returns (bool success);
    function approve(address spender, uint tokens) public returns (bool success);
    function transferFrom(address from, address to, uint tokens) public returns (bool success);

    event Transfer(address indexed from, address indexed to, uint tokens);
    event Approval(address indexed tokenOwner, address indexed spender, uint tokens);
}


//Contract function to receive approval and execute the function in one call

contract ApproveAndCallFallBack {
    function receiveApproval(address from, uint256 tokens, address token, bytes data) public;
}

//Actual token contract

contract SampleToken is ERC20Interface, SafeMath {
    string public symbol;
    string public name;
    uint8 public decimals;
    uint public _totalSupply;

    mapping(address => uint) balances;
    mapping(address => mapping(address => uint)) allowed;

    constructor() public {
        symbol = "ST";
        name = "Sample Token Coin";
        decimals = 2;
        _totalSupply = 100000;
        balances[YOUR_METAMASK_WALLET_ADDRESS] = _totalSupply;
        emit Transfer(address(0), YOUR_METAMASK_WALLET_ADDRESS, _totalSupply);
    }

    function totalSupply() public constant returns (uint) {
        return _totalSupply - balances[address(0)];
    }

    function balanceOf(address tokenOwner) public constant returns (uint balance) {
        return balances[tokenOwner];
    }

    function transfer(address to, uint tokens) public returns (bool success) {
        balances[msg.sender] = safeSub(balances[msg.sender], tokens);
        balances[to] = safeAdd(balances[to], tokens);
        emit Transfer(msg.sender, to, tokens);
        return true;
    }

    function approve(address spender, uint tokens) public returns (bool success) {
        allowed[msg.sender][spender] = tokens;
        emit Approval(msg.sender, spender, tokens);
        return true;
    }

    function transferFrom(address from, address to, uint tokens) public returns (bool success) {
        balances[from] = safeSub(balances[from], tokens);
        allowed[from][msg.sender] = safeSub(allowed[from][msg.sender], tokens);
        balances[to] = safeAdd(balances[to], tokens);
        emit Transfer(from, to, tokens);
        return true;
    }

    function allowance(address tokenOwner, address spender) public constant returns (uint remaining) {
        return allowed[tokenOwner][spender];
    }

    function approveAndCall(address spender, uint tokens, bytes data) public returns (bool success) {
        allowed[msg.sender][spender] = tokens;
        emit Approval(msg.sender, spender, tokens);
        ApproveAndCallFallBack(spender).receiveApproval(msg.sender, tokens, this, data);
        return true;
    }

    function () public payable {
        revert();
    }
}
You can change the token name and symbol by changing the lines 62 and 63.
You can change the decimal and totalsupply of your token by changing lines 64 and 65.
It would help if you changed YOUR_METAMASK_WALLET_ADDRESS with your wallet address (the same wallet address that you put in the Ropsten faucet).
Note : The total supply value must have additional trailing zeros as specified by the decimals field. For example, the decimal value in this contract is two, and we need a total supply of 1000 tokens, so we’ll have to set the real supply variable to 100000 (simply because it won’t allow a decimal point).
Let’s explain each part of this code:
contract SafeMath : This contract is used to safely implement the four primary math operations and use its methods instead of the usual operations to avoid possible problems.
safeAdd : This is a method for adding only two positive numbers and returning the result;
safeSub : This is a method for subtracting only two positive numbers that the second one has to be less than the first one and return the results;
safeMul : This is a method for multiplying only two positive numbers and producing the results;
safeDiv : This is a method for dividing only two positive numbers also the second one is not zero and yielding the results;
contract ERC20Interface : This is an interface of the ERC20 standard token that we will use to implement our token.
function totalSupply : This function is used to return the token’s total amount.
function balanceOf : This function gets an address and returns its balance in the network.
function allowance : This checks the remaining amounts of the token that the spender can use.
function transfer : This will transfer the desired quantity token to the given address.
function approve : The will permit the spender to use the user token on their behalf.
function transferFrom : This will send tokens from the sender to the receiver.
function approveAndCall : Executing the transactions of buying and selling the tokens.
event Transfer : This will propagate when some tokens are transferred.
event Approval : When approval is submitted, this will publish to the network.
function () public payable: Fallback function prevents sending tokens directly to the contract address.
contract ApproveAndCallFallBack : A contract function to receive authorization and execute a function in one call.
How to Compile and Deploy an ERC-20 token
You can click on the compile icon and submit the compile button on the left pane. Your token is ready to deploy now!
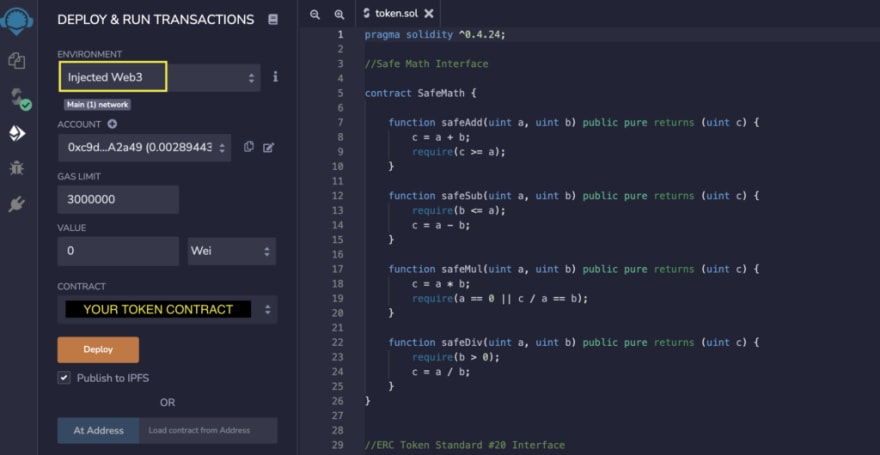
For deploying your token on the Ropsten Test Network, click on the deploy icon on the left pane and select the environment option “Injected Web3.”. Make sure to choose your primary contract name from the contract selector. Now you can submit the “Deploy” button and confirm the transaction on your MetaMask. Currently, you can see your token contract at the bottom of it.
Great! Your first token is published on the test network.
Add custom token to MetaMask
The last step is adding your custom token to your MetaMask wallet and seeing your balance.
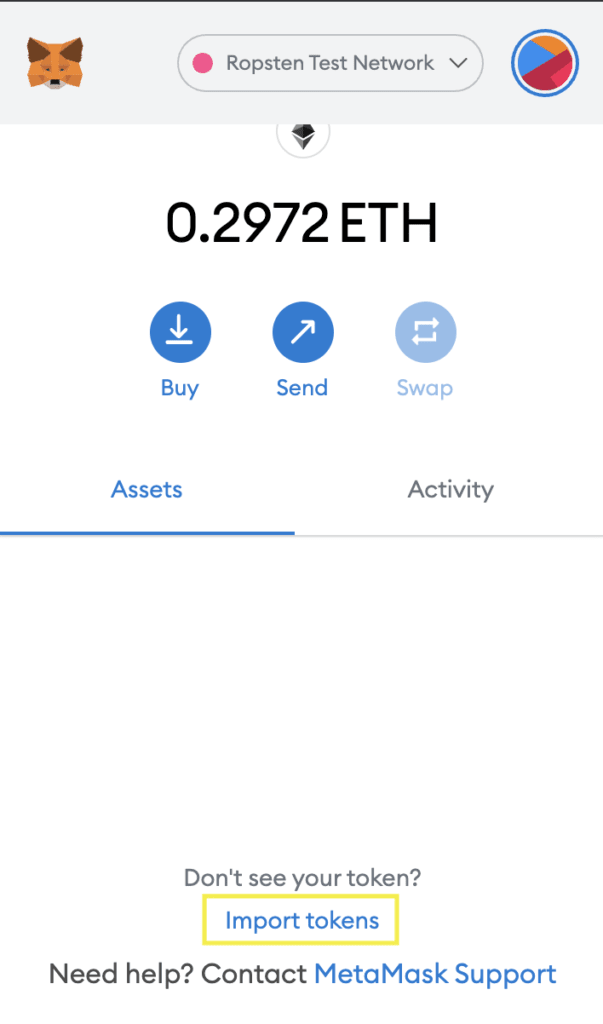
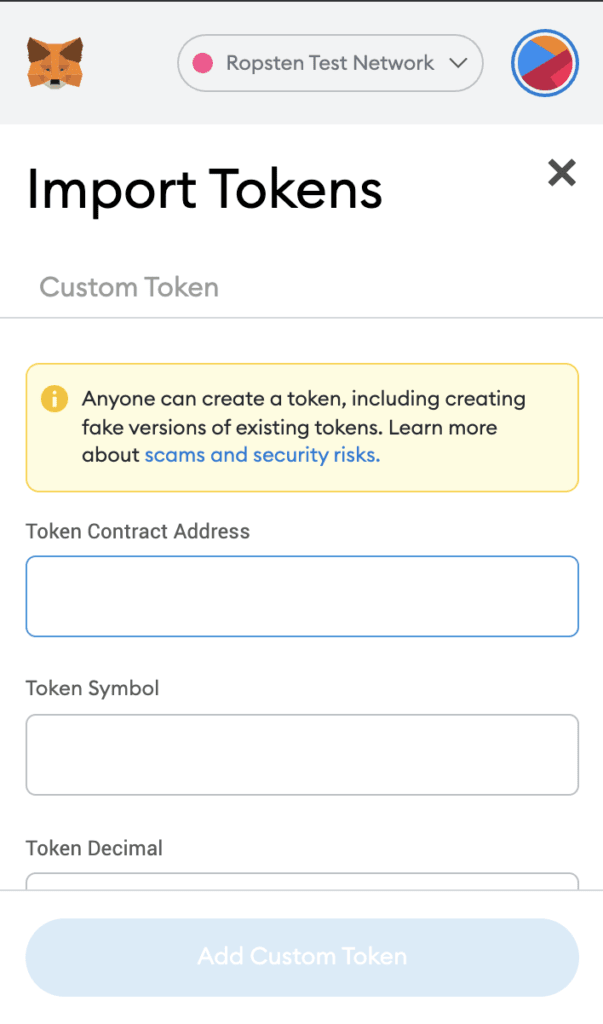
At the deployed contracts tab where you deployed in the IDE, copy the contract address from there, and on your MetaMask, click on the “Import tokens” button, and paste the contract address in the “Token Contract Address” field. MetaMask will retrieve other details from the network.
Conclusion
Congratulations! You have created an ERC-20 token on the Ethereum network successfully.
If you want to know when the new article will be published, subscribe to my Newsletter on my website!
Subscribe to Newsletter


Top comments (0)